Disclosure: Meeple Mountain received a free copy of this product in exchange for an honest, unbiased review. This review is not intended to be an endorsement.
Disclosure: Meeple Mountain was provided a pre-production copy of the game. It is this copy of the game that this review is based upon. As such, this review is not necessarily representative of the final product. All photographs, components, and rules described herein are subject to change.

We’ve talked about Cascadia many times before, from our review of of the Cascadia base game, to our review of the Cascadia: Landmarks expansion, our inclusion of Cascadia in a list of games you can easily play with kids and a humorous list of games which include bears. But I don’t think any of us expected Cascadia to get “the dice game” treatment.
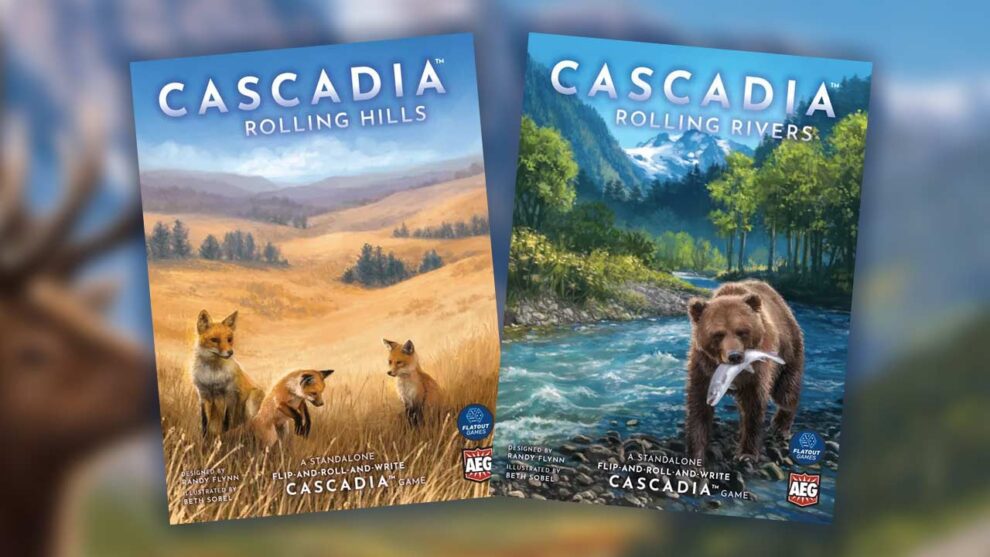
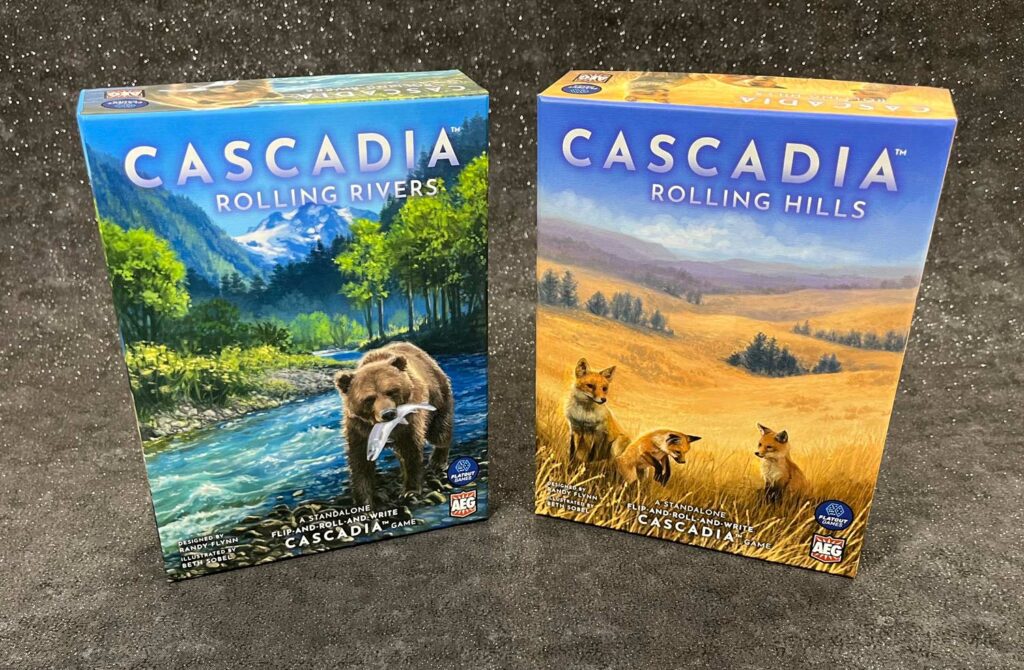
That’s right; this newest member of the family (technically two newest members) is a reimagining of Cascadia as a roll and write game. But let me reassure you that Cascadia: Rolling Hills, and Cascadia: Rolling Rivers aren’t just some money grab. While they do share the same DNA, they’re totally new games.
Let’s dive in and find out what makes these two new entries tick. Note that while my main focus in this review is on Cascadia: Rolling Hills, I do talk about both games.
Cascadia: Rolling Overview
As the name implies, these are dice games built atop the Cascadia framework: the animals and habitats we’ve come to know and love, as well as the hex based layout of the countryside. Over the course of 20 rounds you’ll roll dice to gain various animal and nature token symbols. These symbols allow you to complete habitat cards which act both as points and a game timer (you’ll see a total of 20 of them over the course of the game). After completion, a card can provide additional bonuses which allow you to affect the outcome of future dice rolls, or extra animal symbols, or some combination of the two.
One of the special things about Cascadia: Rolling, is that each box contains multiple maps referencing specific locations in the Pacific Northwest. Even better is that each map is truly different, with a different set of rules, layout, and complexity. I’m going to give you an overview of each map, but since the basic gameplay is the same for all maps, let’s talk first about that.
Gameplay
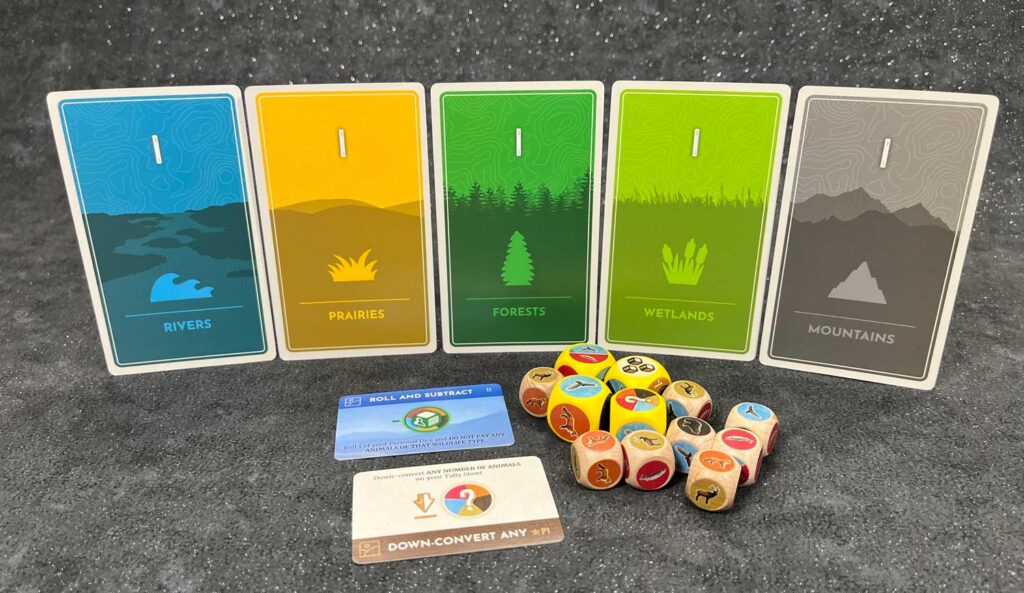
Each player is given an animal tally sheet, 2 small dice, and a page featuring whichever map you’re using. Prepare the habitat card deck and flip one of them over. Finally, shuffle and turn over 4 Completion cards. These completion cards will either give you discounts to completing a habitat card, or rewards for completing them.
Every turn, you roll your own dice, and the active player rolls the 4 larger shared “central dice”. These central dice feature a different combination of animal symbols, as well as some symbols which can give you special abilities on that turn.
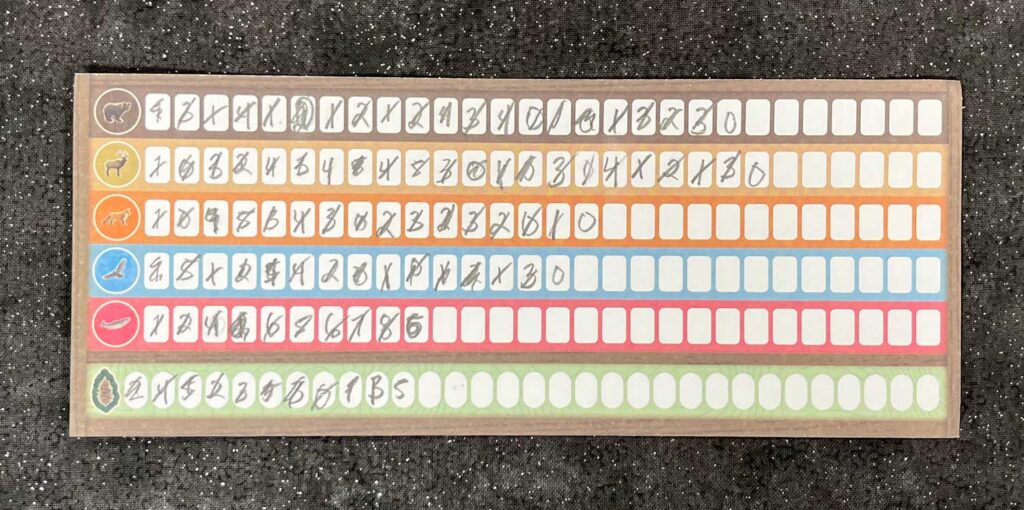
Review the animal symbols displayed on your dice as well as the central dice and select one animal. Update the count of that animal on your tally sheet like so.
After selecting your animal, you might have the ability to complete a face up habitat card. Look at the cost, along with any discounts. If you decide to complete a card, update the counts of the animal symbols on the card, then mark that card accordingly on your map (I’ll discuss this in a bit more detail below). Finally, take any bonuses provided by the habitat or associated completion card.
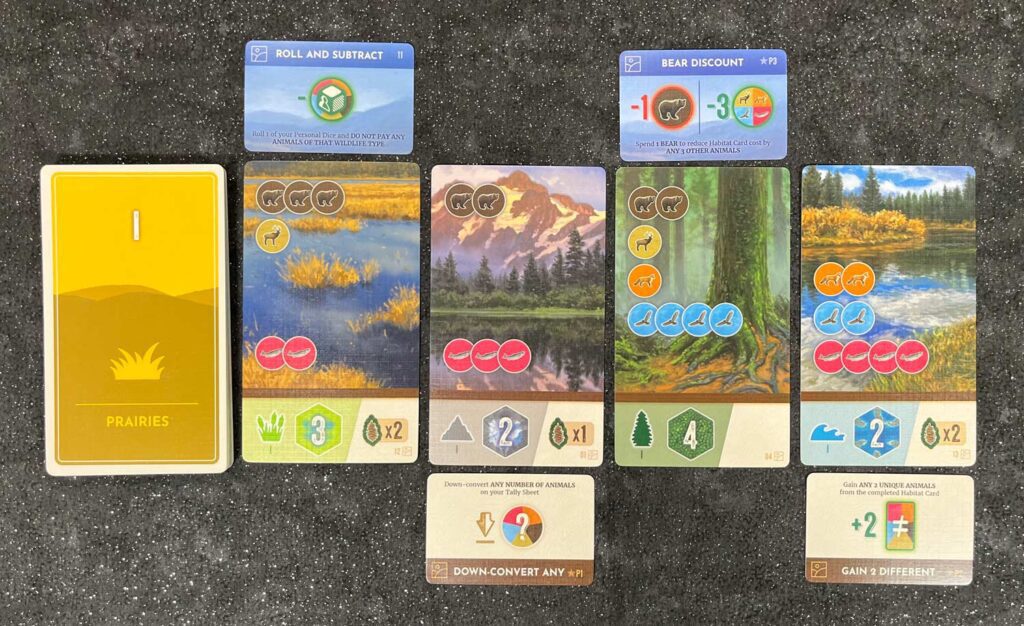
Note: one player completing a habitat card does not prevent other players from also completing that card.
Once the turn is over, slide the habitat cards to the right, and flip over a new one. If there are already four habitat cards displayed, the one furthest to the right is discarded. The game ends at the end of the round after the last habitat card is revealed.
Tally up your points based on the specific map you’re playing, and determine the winner.
Let’s give you an overview of the maps from Cascadia: Rolling Hills.
Zumwalt Prairie
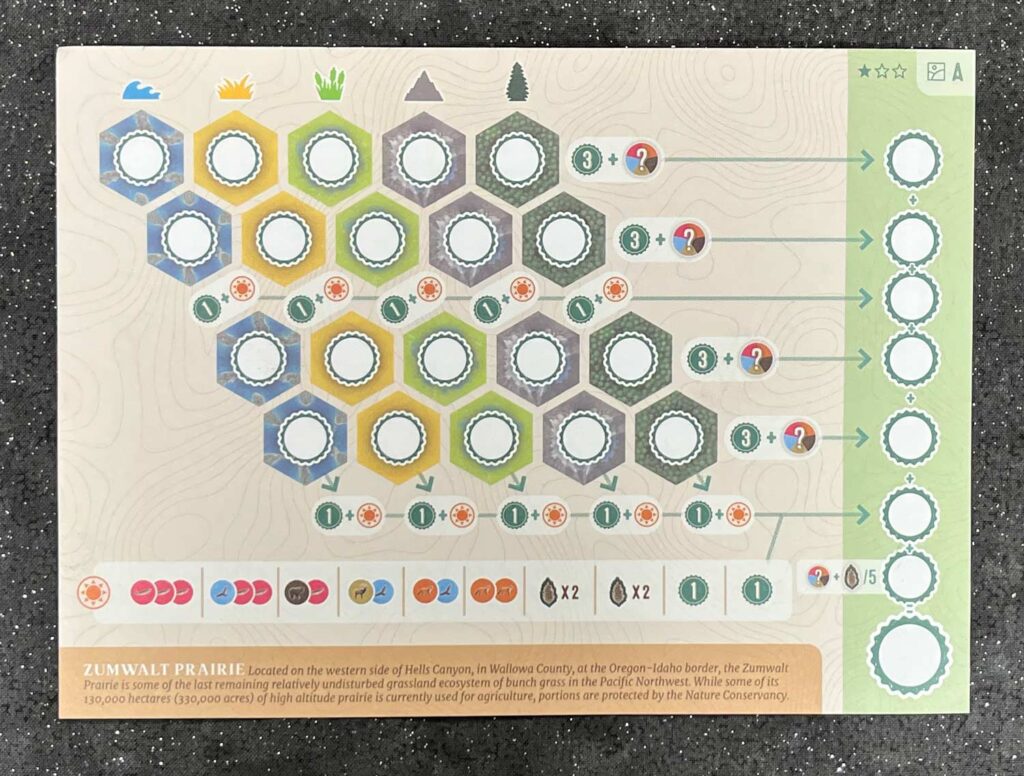
The Zumwalt Prairie map has a 1/3 difficulty and is the recommended starting map. As you complete habitat cards, make note of the card’s point value and mark it in the matching column on your map. Working from the top down, you’re incentivized to complete rows and columns, and to reach specific milestones in each habitat, after which you’ll earn point bonuses, as well as additional animal symbols. Scores are tallied by adding up the points earned in each row, plus bonuses. Then tallying the score across all rows to determine the final point value.
The Zumwalt Prairie map is a great place to start since you only need to concern yourself with 2 main things: collecting different habitat cards, and/or completing high value cards. Since the number at the bottom of each habitat card is a point value, it’s always “better” to complete higher numbers, but given that they cost more, you’ll need to balance those increased points with the bonuses you’ll get from completing a row, even if you do so with a lower value card. I played the Zumwalt Prairie map with my 11yo son and he did great, so this is easily a map that kids can grasp.
Okanagan
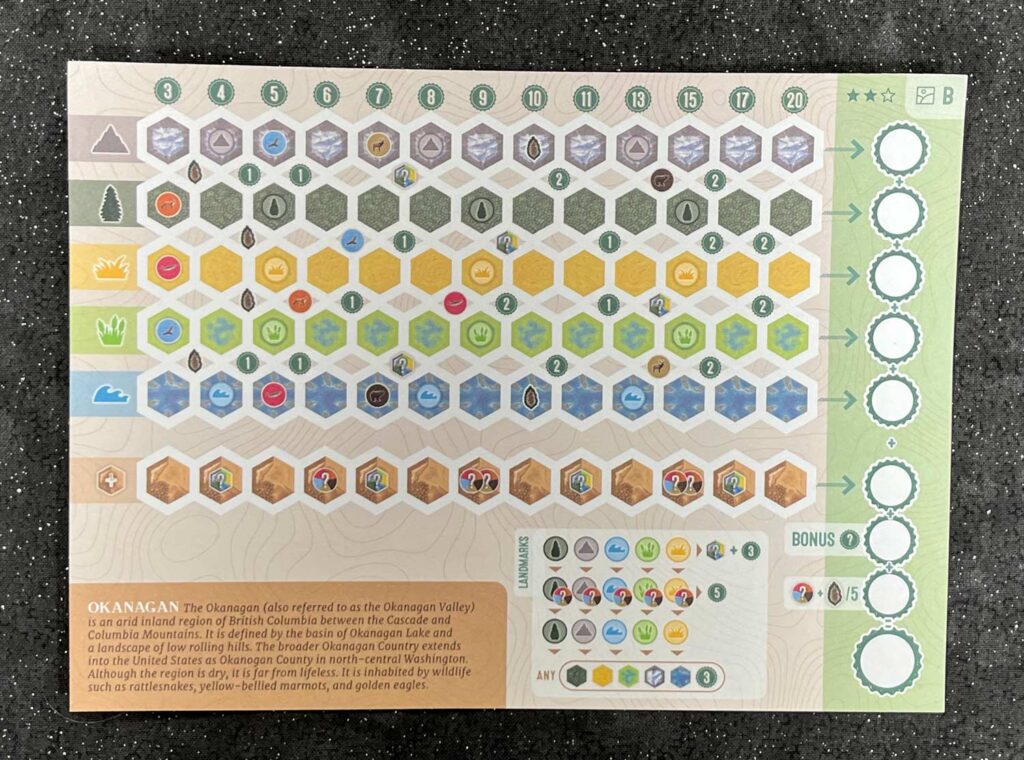
The Okanagan map has a 2/3 difficulty. As you complete habitat cards you’ll work from left to right, filling in one hex for each value on the card: complete a value 3 mountain card, fill in 3 mountain hexes. If you fill in a hex containing an animal symbol, or if you complete hexes which surround an animal symbol, collect it. If you fill in or surround a “Landmark” icon, refer to the Landmark bonus area at the bottom of the map. If you’re able to complete an entire row of habitat hexes, continue filling in hexes in the “overflow row” at the bottom of the map sheet. You’ll earn points for the furthest completed habitat hex in each row, and bonus points acquired by filling in hexes.
The Okanagan map is, in my opinion, a bit more straightforward than the Zumwalt Prairie map. While you do want to complete multiple different habitats, there’s also a nice bonus for going deep into a specific habitat and being able to start filling out the overflow row. It does introduce the notion of Landmark icons, which might trip you up the first time, but given that they’re not “animal symbols” it shouldn’t cause too much confusion.
Palouse
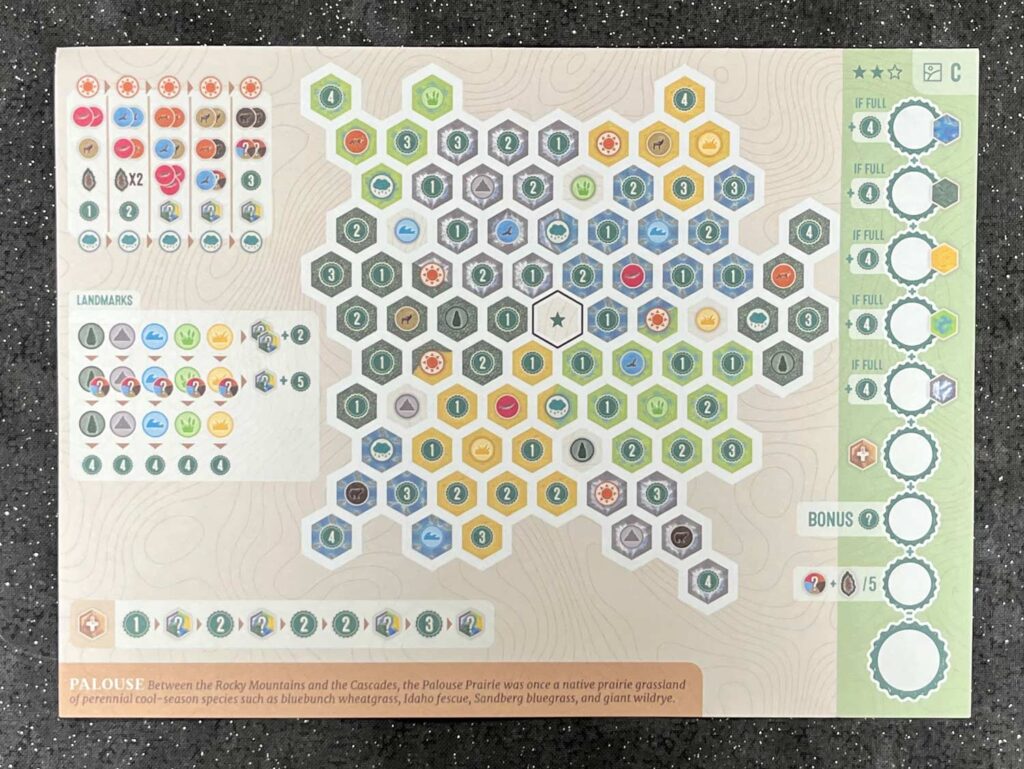
The Palouse map has a 2/3 difficulty. This map is the first to introduce adjacency requirements. Starting in the middle of the map, each habitat card you complete allows you to mark off hexes of that type. But each hex must be next to either the central “Star” hex, or another hex you’ve previously marked off. Some hexes on this map can be either of two habitats. If you complete every hex for a specific habitat, earn the habitat bonus on the right side of the map. If you have additional hexes of a completed habitat, carry them over to the overflow track at the bottom left. As you fill in hexes you might earn animal or landmark bonuses—mark those off accordingly. To score, tally up the points earned by filling in hexes, then add up any bonuses you earned.
The Palouse map is definitely more of a challenge than the previous two maps. Not only do you have to pay attention to what habitat cards you complete, and what values they are, but you also have to balance collecting points vs collecting bonuses which might benefit you on future turns. You also have to decide if it’s worth going deep into one habitat to earn the 4 point completion bonus, or if you’d rather fill in more hexes across the entire map. In typical board game fashion, you can never do everything you want to.
Craters of the Moon

The Craters of the Moon map has a 3/3 difficulty, and rightfully so. Similar to Okanagan and Palouse, as you complete habitat cards, you’ll be able to mark off hexes on the map. This map is broken into 15 distinct regions, indicated by a thick black line around groups of hexes. When completing a card you’ll mark the first letter of one or more of the animals on the card, for each value of the card. If a mountain card is worth 3 points, and costs 2 hawks and 2 bears, then you’d be able to fill in three hexes with either the letter H or the letter B. Collect bonuses as you fill in various hexes, and earn bonuses for filling in a region with all of the same animal, for example completing region 1 with all elks.
Scoring for this map is a bit more complicated than the others. You’ll earn the indicated number of points for completing regions, as shown on the left side of the map. You’ll also earn landmark bonus, and diversity bonuses—once per habitat—for having at least one of each animal in that habitat anywhere on the map.
The Craters of the Moon map definitely ratchets up the complexity. It’s not enough to mark off hexes, you have to be picky about which animals you write in (in hopes of getting the “same wildlife” bonus or the diversity bonus). You also have to decide which regions to focus on—some are worth more than others, but might also take more hexes to complete. And you have to do all of this by being picky about which cards you complete. A challenging puzzle to be sure.
Final Thoughts
Cascadia won the coveted Spiel des Jahres in 2022 and went on to win a slew of other game of the year awards from all over the world. Clearly this particular combination of mechanisms and artwork resonated with people. But with Cascadia and an expansion already out there, who’s the audience for a roll and write version?
I’d say that anyone who enjoyed the base game is definitely a candidate for the Cascadia: Rolling series. While the gameplay is different, these new games present much the same type of optimization puzzle. You have to constantly be on the lookout for possibilities based on what you want and can do on any given turn. Additionally, if you love dice, then make sure to check this one out. The nice rounded corners feel good in your hand, the symbols are easy to read, and the iconography has been consistent throughout all of the games in this series. Flatout Games does a great job thinking about the small details, and that’s apparent in the final product you’ll wind up playing.
My main concern is the two different versions: Rolling Hills and Rolling Rivers. As far as I can tell, the first three maps in both games are the same, barring symbol locations and some bonuses. The final map in each appears to be different with the 3/3 “Fraser (Sto:Lo)” map in Rolling Rivers being distinct from the Craters of the Moon map. The upside is that the games can be “combined” to allow for higher player counts, and mixing and matching of special dice to allow for different actions. And let’s be honest, the fact that Flatout Games included 4 maps in a $19 game is pretty great. So whether you opt for both games or not, you’re getting a great deal.
Cascadia: Rolling is an excellent entry into the roll and write genre. Multiple maps, great use of dice, bonus cards, and more. These two games are already on Kickstarter, jump on this one as soon as you can.
Cascadia: Rolling Hills details
- Designer: Randy Flynn
- Artists: Beth Sobel
- Publishers: Alderac Entertainment Group, Flatout Games, Gém Klub Kft., KOSMOS, Lucky Duck Games, White Goblin Games
- Release Date: 2024
- Player count : 1 - 4
- Age range : 10+
- Time range : 15 - 30 minutes
- Mechanism(s): Contracts, Dice Rolling, End Game Bonuses, Hexagon Grid, Line Drawing, Market, Multiple Maps, Paper-and-Pencil, Set Collection, Solo / Solitaire Game, Variable Set-up
- BGG Geek Rating: 7.26859 - converted to Meeple Mountain scale: 3.5.
- More articles about Cascadia: Rolling Hills.