What is Storm Over Jerusalem?
Storm Over Jerusalem (SoJ) is a wargame that simulates the Roman siege of Jerusalem in 70 AD. Emperor Vespasian’s son and future emperor, Titus, commanded four legions, while the city was defended by multiple Judean factions, including the Zealots. The siege began in April, just three days before Passover. This meant the city’s population was teeming with pilgrims. After almost five months, the Romans eventually overwhelmed Jewish resistance, sacked the city, and more importantly for the Jewish people, destroyed the Temple, the center of Judean worship.
According to the Jewish historian Josephus — considered a turncoat by his fellow Jews — over one million Judeans were killed and 97,000 were made slaves. The fall of Jerusalem effectively ended what became known as the First Jewish War, although it did not officially end until the capture of the mountaintop fortress of Masada in 73 AD. The successful termination of the Jewish War solidified the position of Vespasian, who had only come to power a year earlier, and ensured the continuation of the Flavian Dynasty.

Setup and Victory Conditions
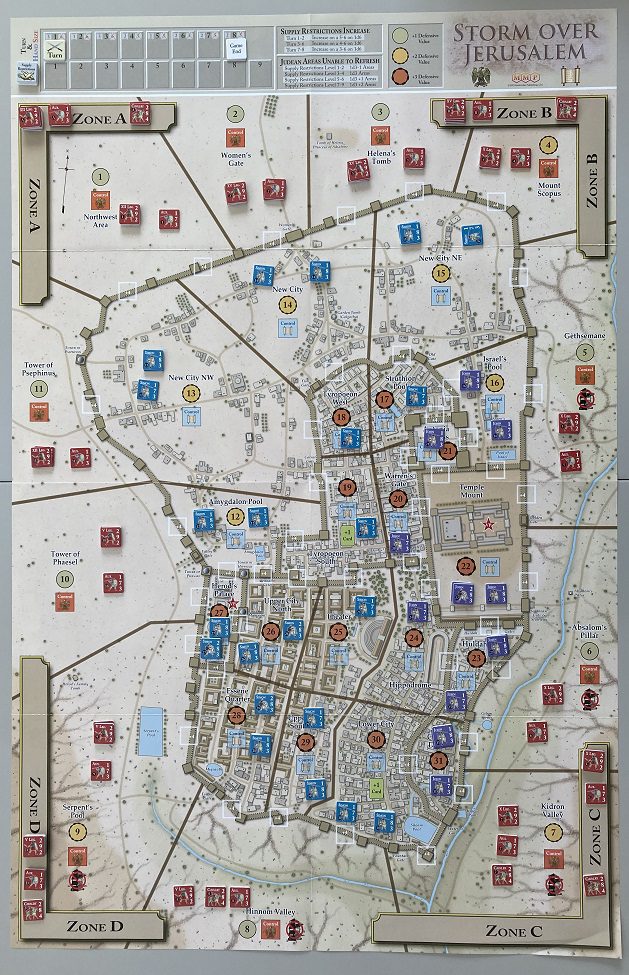
The Judean forces begin the game occupying all city areas and fall under the overall command of one of two leaders, Simon bar Giora and John of Gischala. Each unit is printed with the number of the area it starts in. The Roman player deploys his units outside the city in much the same way, except that some units begin in Zones (marked A thru D) around the periphery of the map. These units will enter as reinforcements later in the game.
The Roman player wins an automatic victory by controlling both Area 22 (Herod’s Palace) and Area 27 (the Temple Mount), at the end of a turn. Otherwise, players are awarded victory points (VPs) at the end of each turn. One VP is awarded for control of Herod’s Palace, 1 VP for the Temple Mount, 1 VP to the Judean player if they control all city areas, and 1 VP to the Roman player for each Judean leader that was not placed on the board during the turn. At the end of the game, each player also earns 1 VP for every 2 enemy units eliminated. The player with the most VPs wins.
Sequence of Play
The sequence of play contains three phases:
Draw Phase
Both players draw cards from their respective decks into their hands until they reach their maximum hand size for that turn, as indicated on the turn track. Cards above the turn limit must be discarded. Note that two of the areas within the city (19 and 30) provide one additional bonus card each, if controlled and no enemy units are present in the area.
Impulse Phase
Players alternate performing actions. Those actions include moving units, attacking enemy units in the same area, assaulting an adjacent area, playing a card for its event, discarding a card to repair a wall (Judean) or build siege towers (Roman), or passing. The Roman player always takes the first impulse each turn. Units become spent (flipped to their reverse side) after they take an action. Players can pass at any time on their impulse; however, they must pass if they have no units eligible to perform an action and no cards left in their hand. If the Roman player passes, the turn ends immediately unless the Judean player discards a card. If they do, they take an impulse and then the Roman player can take an impulse (or pass), and so on until both players pass.
End Phase
This phase consists of several administrative actions. First, players may discard cards from their hand. Then all Out of Supply (OOS) markers are removed before the Judean player checks for Supply Restrictions and places new OOS markers. Both players then flip spent units face up to their fresh side, except for Judean units marked OOS. The Roman can then remove siege towers from Roman controlled areas and receive reinforcements. Finally, any VPs are awarded to each player and Judean leaders deployed this turn are removed from the map.
Movement and Combat
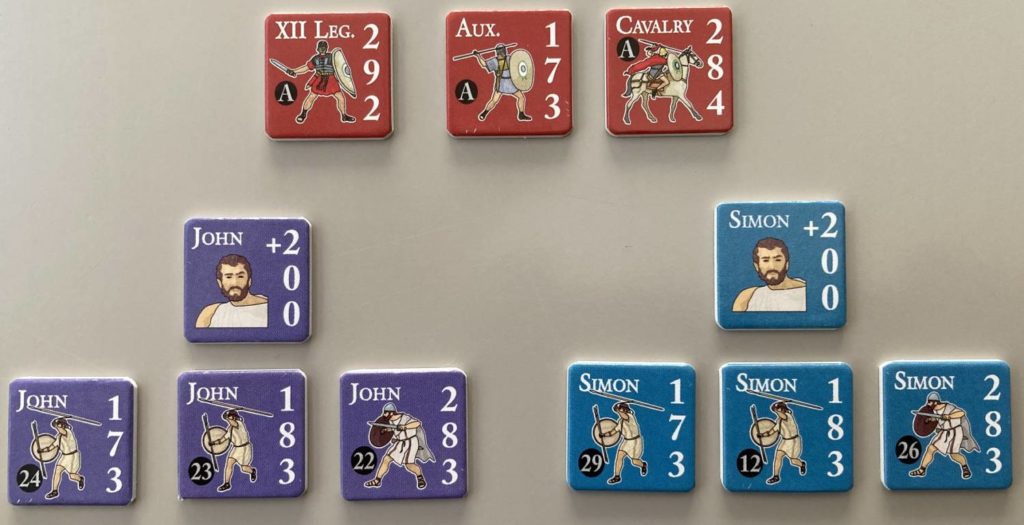
Each unit is printed with its Firepower, Defense Strength, and Movement Point (MP) allowance. A unit expends 1 MP to move into an adjacent area. However, if moving into an area controlled and/or occupied by the enemy, it costs 1 additional MP. Likewise, it costs 1 additional MP to move out of an area controlled and/or occupied by the enemy. Stacking limits (5 units for the Romans and 6 units for the Judean) must be observed during movement, not just at the completion of movement.
During combat, the attacking player adds together the Firepower value of their units, rolls two dice, and adds the result to determine the total attack points. The defending player determines their number of defense points by using the highest defense strength of any single unit in the area. To this they add the defense value of the area. Each area on the map has an intrinsic defense value: 1 for those outside the city walls, 2 for the areas comprising the New City, and 3 for the rest of the city. In addition, each wall provides the Judean player a +4 defensive value if the Romans attempt to attack or assault across the wall.
Both players can play cards from their hands to affect the outcome of combat. First, the attacker plays cards, then the defender. The Judean player can also deploy one of their leaders into an area to gain 2 additional defense points. The final point values are then compared. For each attack point more than defense points, a Damage Point is inflicted on the defender. If the number of attack points is equal to or less than the defense points, then no Damage Points are inflicted. Damage Points are absorbed by flipping fresh units to their spent side, retreating spent units (provided a retreat path exists), eliminating spent units, etc. The number of Damage Points absorbed varies depending on whether there is a valid retreat path.
Roman Siege Craft
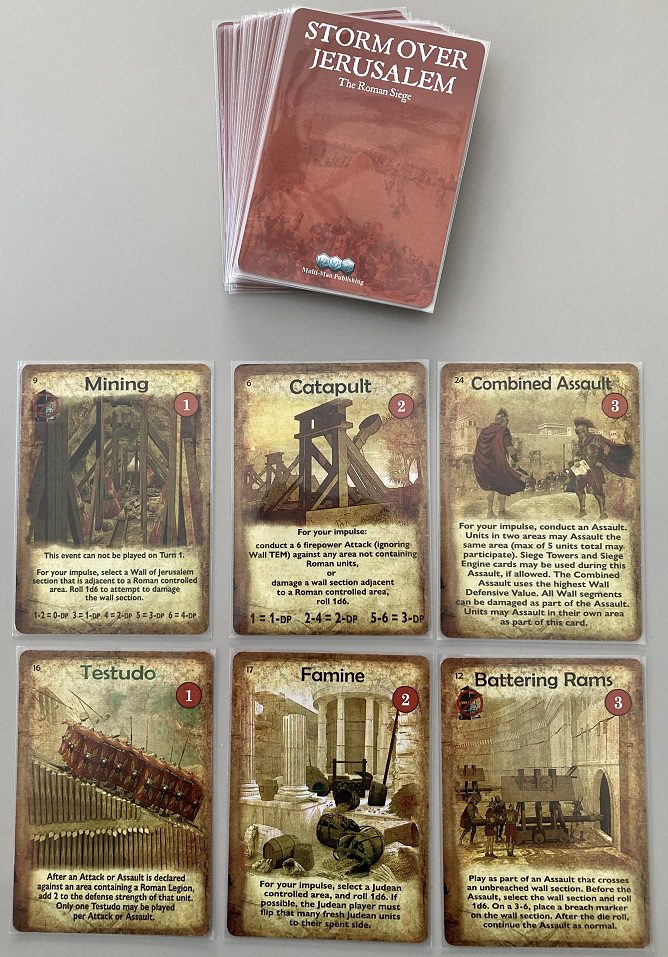
The Roman player can play a card from their hand to construct siege towers in areas they control. The value printed on the card determines the number and value of the siege towers built. For example, if the Roman player discards a card with a value of 3, they can build 3 value 1 siege towers, a value 1 and value 2 siege tower, or a single value 3 siege tower. Likewise, cards can be used to upgrade a siege tower from a lower value to a higher value. Siege towers reduce the defensive value of a wall during an assault by the value of the tower. Towers can move from one area to the next along with other activated Roman units.
In addition to towers, some Roman cards provide siege engines (ballistas, onagers, catapults, and battering rams), as well as siege ramps, that aid in attacks/assaults per the instructions on the card. The Romans also have a mining card that allows them to burrow under a wall to damage it. Certain siege engines (towers, ramps, and battering rams) and mines cannot be constructed in areas 5 thru 9 due to the roughness of the terrain.
To counter Roman siege operations, the Judean player can play a card from their hand to repair damaged walls. The card’s printed value indicates how much damage can be repaired. These repairs are carried out by a fresh unit in an area adjacent to the wall, after which the unit becomes spent. After all, repairing stone walls is hard work.
Judean Starvation
During the End Phase, the Roman player rolls a die to determine the effect of the siege on the city’s ability to feed and provide other supplies to the inhabitants. If the Romans control all areas outside the city, Jerusalem is cut off and the Supply Restriction Level will increase depending on the die roll. The Roman player can discard a card to increase the die roll’s value by 1. The Judean player then rolls a die to determine how many areas they will need to mark with OOS markers based on the new Supply Restriction Level.
Game Play and Strategy
Roman Player
The Roman player will find the movement, stacking, and combat rules will limit the pace of their advance in the city. For example, if they assault with 3 fresh units into an area, even if they successfully eliminate all Judean units, they can only move 2 fresh units into that area on their next action. That’s because the Roman stacking limit is 5 units and must be observed even during movement. Furthermore, those 2 units will not have enough MPs remaining to assault into the next enemy controlled/occupied area since they had to spend 1 MP to enter the just cleared area, and then 2 MPs to enter the next Judean occupied area. Since Roman infantry have a movement allowance of 2 MPs, that means they will need to halt after entering the first area. Thus, it will be a slow grind to advance from one area to the next. This takes precious time, yet there are only 8 turns in the game.
Therefore, to make sufficient progress, while also eliminating Judean units, the Roman player will need to establish multiple avenues of advance into the city, slowly tightening the ring and pushing the Judeans back. Because there are walls between each major sector of the city, the Romans will need to use siege engines to improve their chances of successful assaults. But the number and type of siege engines available is limited by the cards. Consequently, the Roman may need to assault areas with as many units as possible to overcome the area’s total defense value.
The Roman player will also need to post sufficient units outside the city to prevent Judean sorties that could help relieve the siege and the accompanying supply restrictions. Cavalry units are the best for this given their movement point allowance of 4. Since a good number of Roman units start the game in the Zones waiting to enter as reinforcements, there may not be enough manpower to mount as many assaults as the Roman might wish. This will either limit the number avenues of advance or the number of units assigned to each assault. Perhaps both. That means the Romans must give careful consideration to how they phase their attacks, i.e., which parts of the city they should assault first, and the subsequent path of areas they should follow.
Given siege engines can’t be built in Areas 5-9, the Romans may opt to attack from the west and north (Areas 1-4, 10 and 11) into the New City areas (12-16) initially, as was historically the case. Once the New City is cleared, the Romans can launch assaults supported by siege engines into the Tyropoeon City (Areas 17-20), Herod’s Palace, the Antonia Fortress, and the Temple Mount. If the Judean player shifts units to blunt those attacks, it may weaken areas in the south, sufficiently providing an opportunity for a successful assault by Roman infantry alone. Much will depend on what cards are drawn each turn.
Judean Player
The Judean player’s biggest decision is when to hold an area and when to fall back. The more areas defended, the larger the perimeter that must be defended, thus weakening the line. Falling back smartly shortens the perimeter, making subsequent areas more difficult for the Roman player to overwhelm. The Judean play must make the Romans pay dearly for each area, and then pull back before taking too many casualties.
Of course, certain areas need to be held at all cost (Herod’s Palace and the Temple Mount), and to a lesser extent Areas 19 and 30 since they each provide the Judean player with an additional card. The more cards available to the Judean player, the more opportunities they will have to repair walls, shift units to threatened areas, and launch localized counterattacks. The two Judean leaders are ideal for this purpose. They can either be placed in an area and add 2 points to an attack, but only 1 point to each defense. They can also rally up to 3 spent Judean units in an area, allowing them to launch a surprise counterattack
Since time is on the Judean player’s side, delay, delay, delay. Besides stubbornly holding key areas, the Judean player can feint sorties outside the city walls. This can be done by moving a large force of units to an area on the outer perimeter of the city the Romans are not currently assaulting. The Romans will either need to redeploy units to counter the threat, thereby weakening their assaults elsewhere, or risk a possible breakout. If the Judeans can gain control of any area 1-11, the Judean Supply Restrictions are immediately reduced by 2. This, in turn, will mean fewer areas will be left Out of Supply.
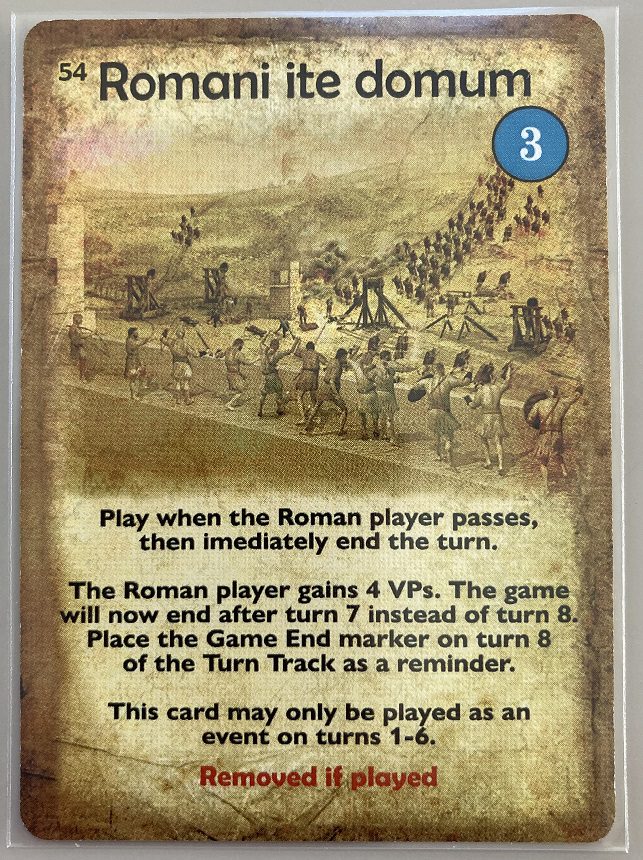
The Judeans also have an Ace up their sleeve – —Card 54, Romani et domum (Romans go home). If played as an event, it shortens the game to 7 turns. If the Judeans still control Herod’s Palace and the Temple Mount, playing Card 54 near the end of the game before the Romans can mount an effective response could be devastating to Roman plans. However, the card does immediately award the Romans 4 VPs. So, the Judeans should only play the card if they have inflicted at least 4 VPs more than the Romans due to unit losses.
Components
The game map depicting the city and surrounding countryside is stunning, and includes various points of interest (e.g., Golgatha and Herod’s family tomb) that do not affect game play but are a nice addition. The unit counters and markers are easy to read, and the tactical cards are wonderfully illustrated, using sepia tones that evoke antiquity. Each player gets two 6-sided dice and a player aid card that summarizes all the rules required to play the game, so there is little need to consult the rulebook during play. Speaking of the rulebook, it is only 12-pages in length, copiously illustrated, clearly written, yet succinct.
Closing Thoughts
Storm Over Jerusalem is a well-balanced game if both players are reasonably competent. That said, the Romans do have significant advantages. They get reinforcements; the Judeans do not. They have siege engines to help overcome city walls and their units are stronger than most Judeans. As the besieging player, they will usually have the initiative and force the Judeans to respond to their moves. And their ability to impose Supply Restrictions on the Judeans could allow them to take areas they would not have been able to otherwise.
But a crafty Judean player can still achieve a victory despite these Roman advantages. To do so, they just need to hold onto Herod’s Palace and the Temple Mount and keep unit losses the same or less than those suffered by the Romans. Judicious use of their two leaders, combined with a fighting withdrawal that delays the Roman without resulting in too many casualties, could allow the Judean player to avoid the historical outcome. That will require a good bit of skill, and perhaps a little luck as well.
I purchased SoJ because I do not get Avalon Hill’s 1989 3rd edition version of The Siege of Jerusalem to the table often given its complexity and playing time. So, if like me, you’re looking for an easy-to-learn, fast-paced wargame on this subject, SoJ may just scratch that itch. I enjoyed playing it both competitively and solitaire, and no two games played the same. If you enjoy SoJ, MMP has two other titles in the “Storm Over” series: Storm Over Dien Bien Phu, Storm Over Stalingrad, and Storm Over Normandy. Plus, there are plenty of other “Storm Over” titles available from other companies that use the same or similar system. Yes, that could be bad news for your wallet.
You have been warned.