Disclosure: Meeple Mountain received a free copy of this product in exchange for an honest, unbiased review. This review is not intended to be an endorsement.
Psst. Over here.
I have a confession to make: I am a board game collector.
To say that I have a burgeoning board game collection is to imply that it hasn’t already burgeoned. Currently, my collection hovers somewhere in the range of 500 games.
I’ve been doing this for a long time.
Over the years, the occasional game will enter my collection which, for one reason or another, will hit my table more so than any other. For games like those, I like to bling them out: card sleeves, metal coins, upgraded bits and baubles, you name it. I’ve tried numerous upgrades and enhancements from many different sources, many of which I wrote about a few years ago in my Top 6 Ways to Spark Joy In Your Gaming Experience article.
And today I’ve got a new company to talk about: Game Maker. Founded in June 2021 by Konstantinos Kokkinis, Vangelis Velles, and Giannis Vidali, Game Maker is a small company— based in Athens, Greece—that “design[s] and produce[s] an ever-expanding selection of 3D components and accessories for all your gaming needs.”
When Meeple Mountain was approached about reviewing some of their products, I took a look through their impressive catalog and noted a few items that matched up with my own collection, so I requested them. At the most, I expected maybe one or two things, but Game Maker was gracious enough to send me everything I’d requested, which consisted of the following:
- Two inserts – one for Lost Ruins of Arnak and one for Fields of Green
- Token shields and upgraded coins and carts for Altiplano
- Nest bowls and First Player token for Wingspan
- 3D Upgraded tile holder for Lost Ruins of Arnak
- Upgraded coins, compasses, notebooks, and magnifying glasses for Lost Ruins of Arnak
First, the Cons
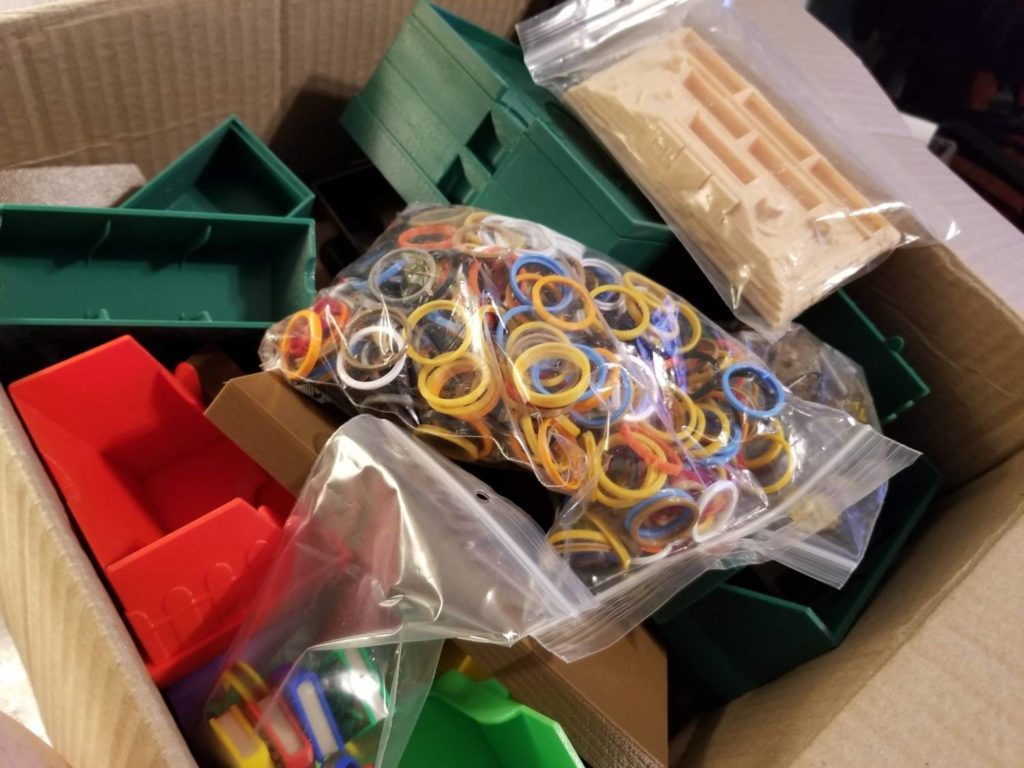
Before I get started, I wanted to get a few things out there that weren’t very positive about my experience. For starters, when the box arrived on my doorstep, I had no idea what it was. Opening the box, I discovered a jumbled mess of plastic pieces and nothing else—no fliers, or letters, or invoices, or instructions of any kind. I vaguely recalled discussions in Meeple Mountain’s Slack chat from several months earlier about Game Maker, so I scrolled back and discovered that, yes, this is what the items in the box were all about.
So, having that fixed in my head, I traveled to their website to try and find directions as to what belonged to what and how it was all assembled. And I found nothing. Aside from the product photos, there is nothing else to go on. So, I spent at least an hour zooming in on photos and separating out the various items until I was relatively certain I’d gotten them all organized by game.
Those are the two main issues: the terrible packing job and the lack of direction. But they’re not the only things. There’s also the feel of the plastic. These are 3D printed items and none of them have been polished, so they all have that “lenticular” feel about them. That doesn’t bother me, personally, but my wife shies away from touching them because she dislikes the texture intensely. If that also describes you, then I’d advise you to shy away from this company’s products. Also, the Altiplano token shields gave me blisters.
You might be wondering: blisters? How the heck did that happen?
I guess that’s as good a place to start as any.
Altiplano Upgrades
Altiplano is a beautiful game, both in looks and game play. When the game first entered my collection, it seemed like it was the only game I played for a good long while. I thought about it constantly while I was awake. I dreamt about it when I wasn’t. In short, it got played a lot. Like a whole lot. And those tokens are not made to withstand that much play. So, when I received the token shields, I eagerly leapt into the task of shielding them.
That was tougher than I thought it would be. I mentioned the lack of instructions earlier and that came into play here. Before I could begin shielding any tokens, I had to first figure out the mechanism for actually doing so.
It works like this: there is a small inner ring that has an indentation into which the token is placed. Then, there is a larger outer ring that snaps into place around this which locks everything into place. But, these being 3D printed objects, not everything is as precise as it needs to be. A large portion of those outer rings are just a few microns too thick, which means that you’ve got to really struggle to get them to stick together. At the start, I had to squeeze and squeeze with all my might, often without any noticeable results.
Eventually, I wound up having to use a hobby knife to shave the inner surfaces of the outer ring and this did the trick. After shaving the plastic down some, they went together without much effort. I wish I’d figured that out earlier rather than later, though, because all of that effort multiplied over hundreds of little tokens did a number on my thumb and forefinger. It’s been a week since I shielded the final token and my fingers are still healing.
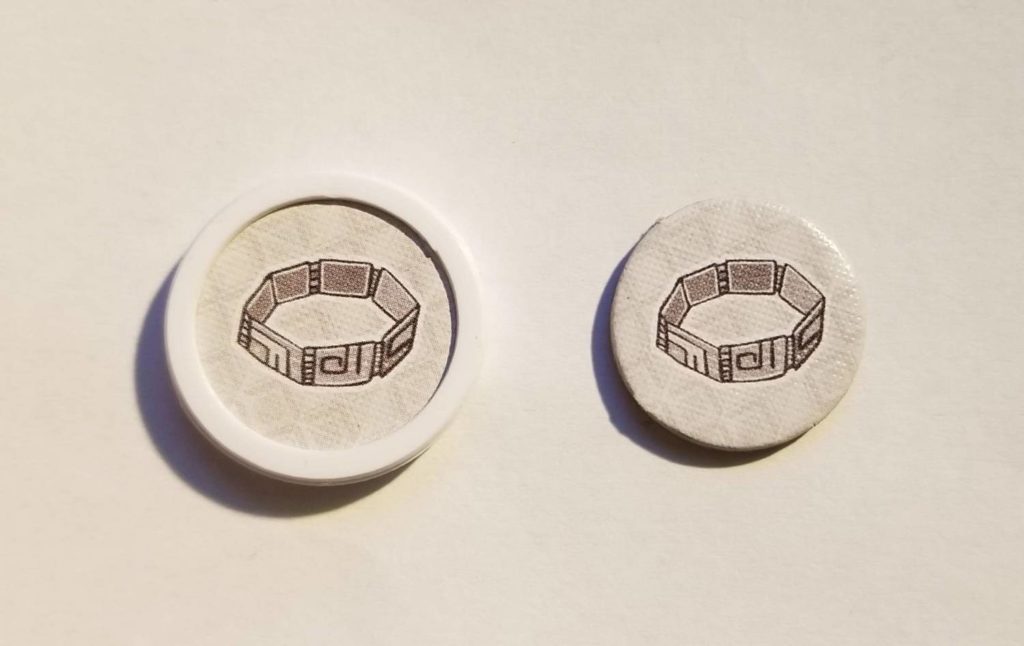
That being said, they look pretty great. Here’s a side by side comparison of a non-shielded token and a shielded one:
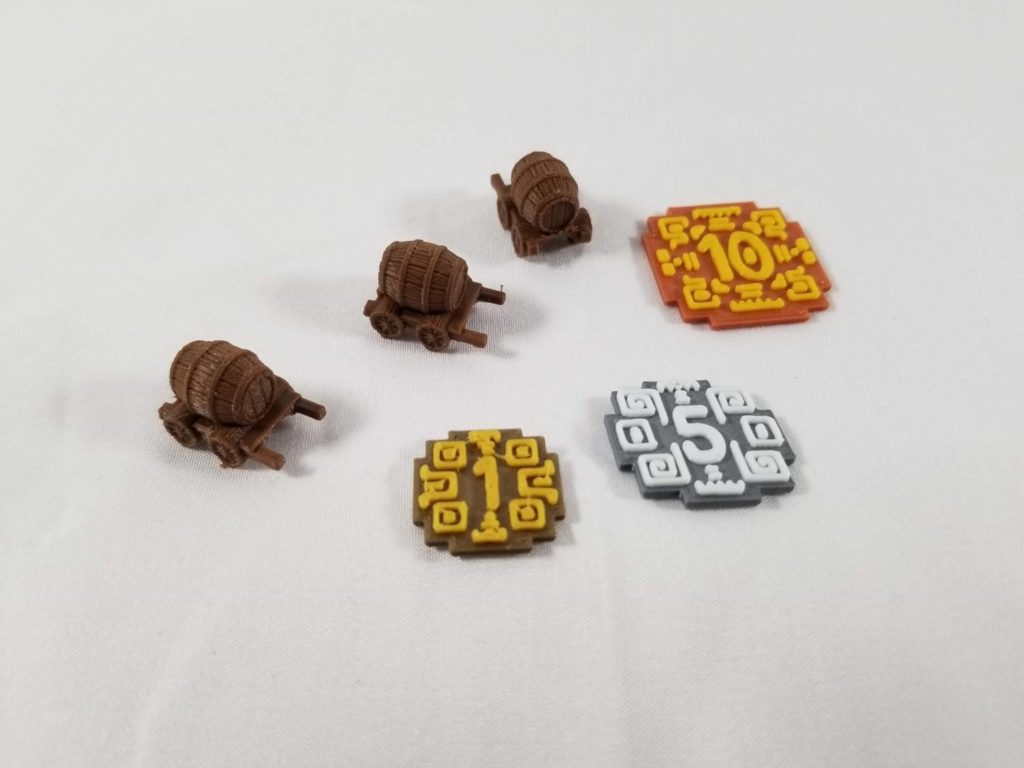
And, if you’re curious, here’s what the old coins and wagons looked like:
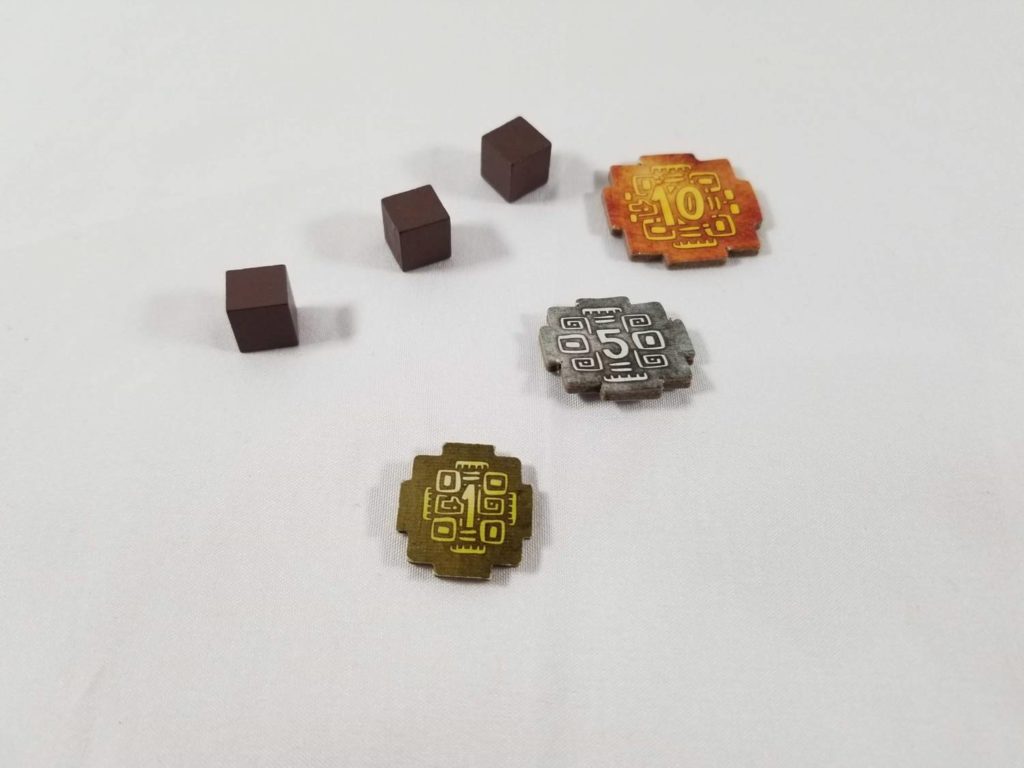
Compare that to the upgrades and you’ll clearly see the difference:
Wingspan Upgrades
A few years ago, my wife was gifted a copy of Wingspan along with all the expansions that were available to it at the time. Shortly thereafter, Stonemaier Games announced that they were designing a large Nesting Box that would accommodate not just the base game and its existing expansions, but all the future expansions they had planned for it. It was fortunate timing on their part because my wife and I were *this close* to purchasing an organizer for everything that we already owned. Had the announcement come any later, we would have been kicking ourselves. So, as far as any kind of upgrading goes, the most we’ve done for Wingspan was to sleeve all the cards since the game sees a lot of use.
That is until now. Among the products featured on Game Maker’s site are some nest-shaped bowls and an upgrade for the First Player marker. And now, thanks to Game Maker’s generosity, they are central features in our Wingspan games.
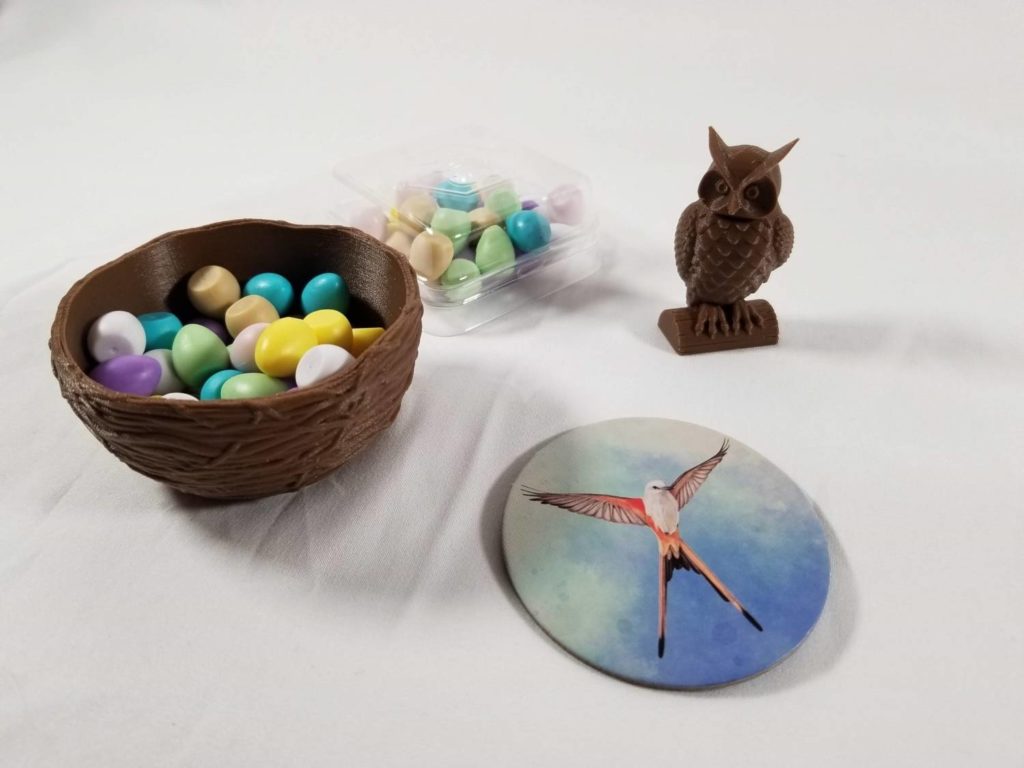
If you’ve ever played the game, then you’re already familiar with the original components. The eggs come encased in little square plastic boxes with removable lids and the First Player marker is a large, circular, awkwardly sized token with an image of the bird from the box’s cover printed on it. While this new First Player marker is a welcome upgrade, I’m not sure the nest bowls improve anything other than providing a more thematic experience.
Since these bowls don’t have lids, they’re not as functional as the plastic boxes, which can also be used to store their contents. That necessitates dumping items from one container into another just for the sake of the way the thing looks. Also, since I was only sent two of these bowls, it means that I don’t even have the option to replace the plastic boxes with baggies. I still need those boxes. Two bowls just aren’t enough to hold everything that needs to be held.
An additional concern is whether or not these bowls will fit into the Nesting Box once I’ve purchased it. As it is, with only the European and Oceania expansions and no Nesting Box, I am forced to store my Wingspan material across two boxes, and those two nest-shaped bowls are a tight fit.
Maybe once I own the Nesting Box I can appreciate these bowls more. As for now, I’m not too thrilled with them. But they sure do look nice.
Fields of Green Insert
I first encountered Fields of Green at Gen Con 2017. My wife and I were so smitten with the game that we purchased ourselves a copy on the spot. A few years later, there was a Kickstarter for a Fields of Green expansion, The Grand Fair, and I eagerly backed it. Once it finally delivered, I stored it in the base game box along with the base game. Without any kind of insert included, the game’s components have been living in plastic baggies for the last few years, a serviceable solution, but not an ideal one.
Besides looking like a hot mess, it’s difficult to determine what’s expansion material and what isn’t. And, if the box is stored sideways, the components all stack at the bottom and start forcing the lid open unless the box is wedged in between other boxes on either side.That’s why, when offered, I asked Game Maker for one of their Fields of Green inserts. I wasn’t really expecting anything, so I was pleasantly surprised when they sent it to me.
Let’s get this right out there: Game Maker’s game upgrades are all well and good, but their inserts are where they really shine. Their insert for Fields of Green is an exercise in sleek, stylish, and functional design. Everything has its place. The stackable components fit together tightly and have a lid on top. Spacers have been included that fit in between the pieces to hold everything in place. Everything has been sized perfectly to sit flush against the lid when the box is closed. Because of this, I can even turn the insert sideways (a feature most inserts don’t include) and everything stays in place. That’s pretty sweet.
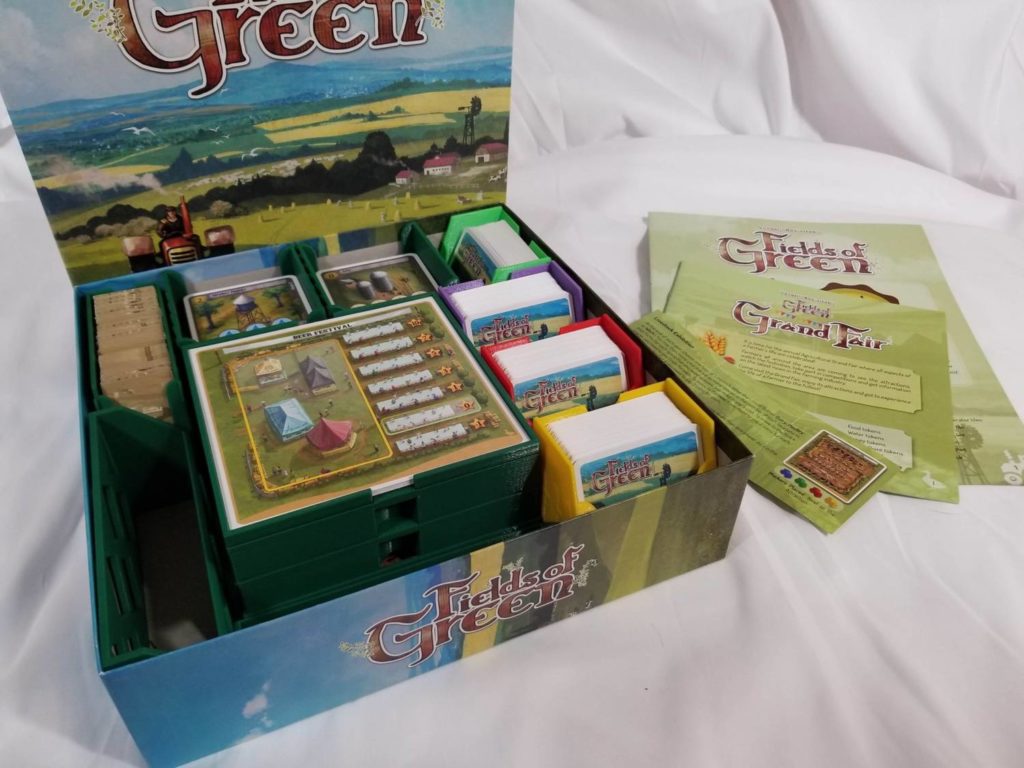
The insert looks killer, too. Not only is it highly functional, it’s very thematic as well. All of the removable bits feature a raised texture that resembles a wooden fence; very appropriate for a game about farming. I’m also appreciative of the fact that this insert accommodates all of the expansion material effortlessly. Now I can tell the expansion material from the base game material at a glance. No more hunting through plastic bags! In fact, now that I’ve got this insert, there’s not a plastic bag anywhere to be found in the box. That’s great news for other games that I’ve received that didn’t bother to include any.
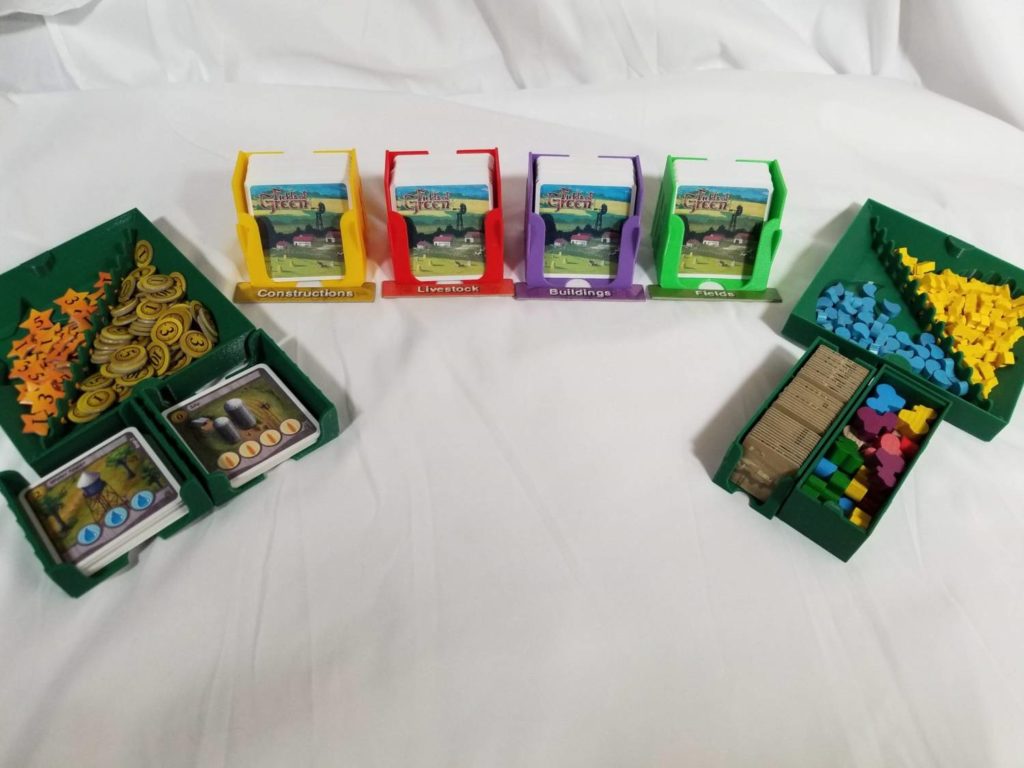
This insert has been designed with out-of-the-box functionality as well. The different field card types each have their own color-coded holder, as do the water tower and grain silo cards. The tiles have their own boxes. The water, food, and scoring tokens each have their own trays that stack on top of each other. In short, this is a very well engineered insert and I’m glad to have it.
Lost Ruins of Arnak Insert and Upgrades
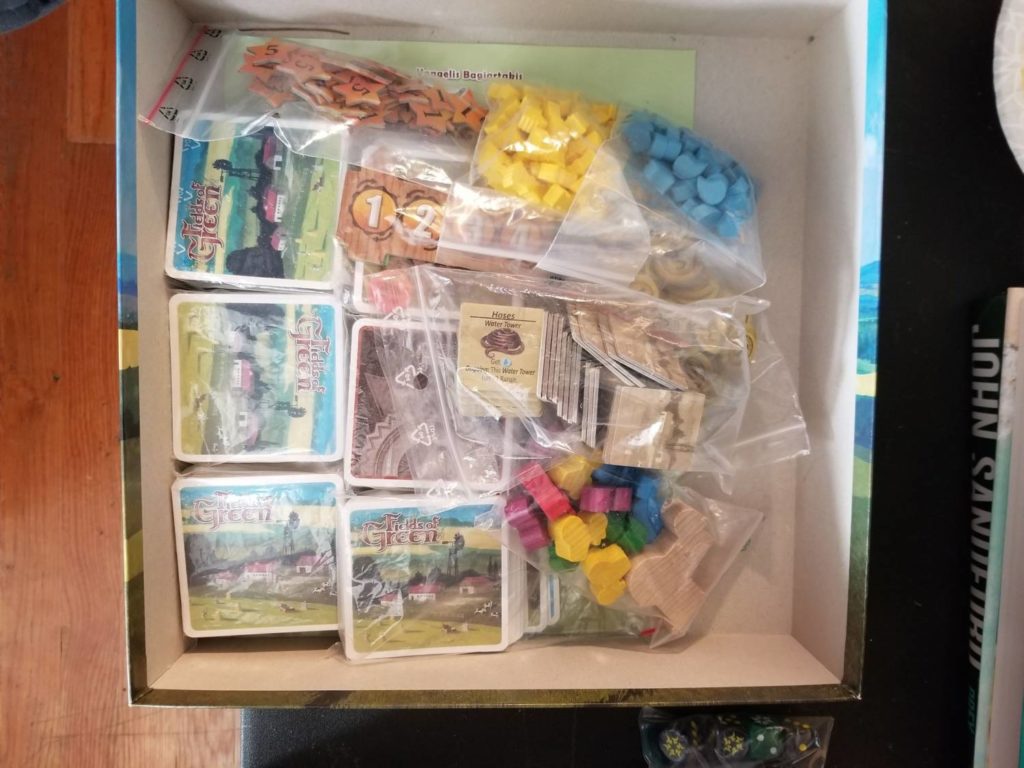
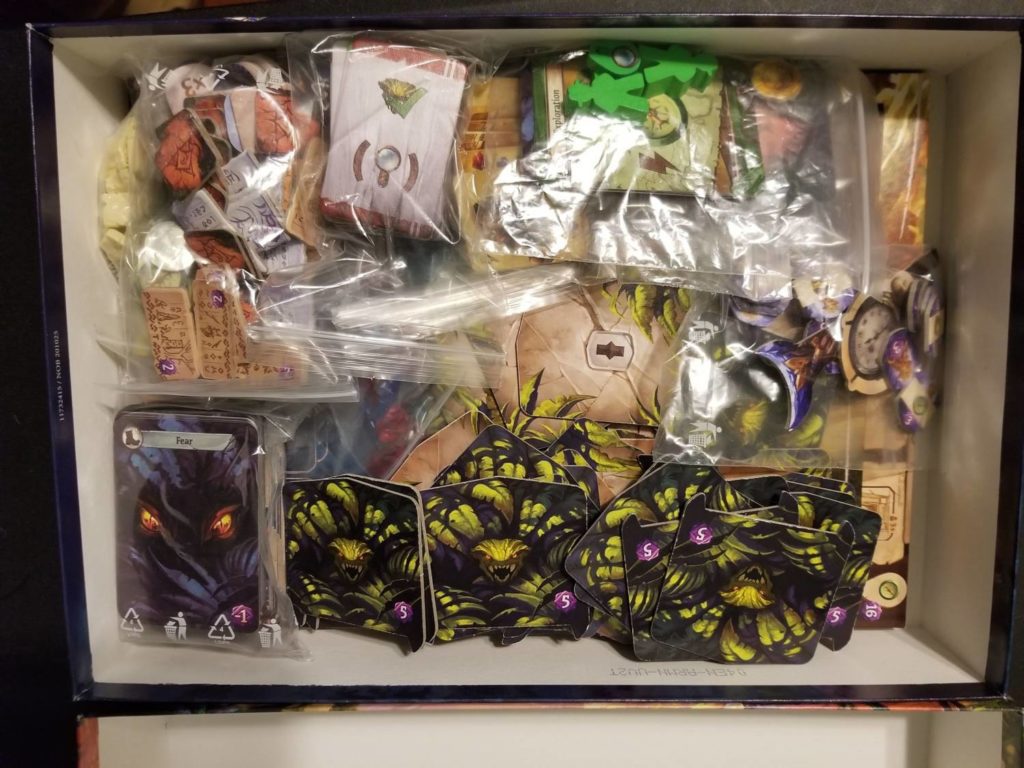
Czech Games Edition (CGE) is not known for their box inserts. If anything, they’re known for the opposite. Pulsar 2849, Lost Ruins of Arnak, Under Falling Skies, Starship Captains, Alchemists, Codenames… not a single one of them comes with an insert. For small games like Codenames, this isn’t an issue. But with more component heavy games like Pulsar 2849 and Lost Ruins of Arnak, you wind up with a rat’s nest of baggies that looks something like this:
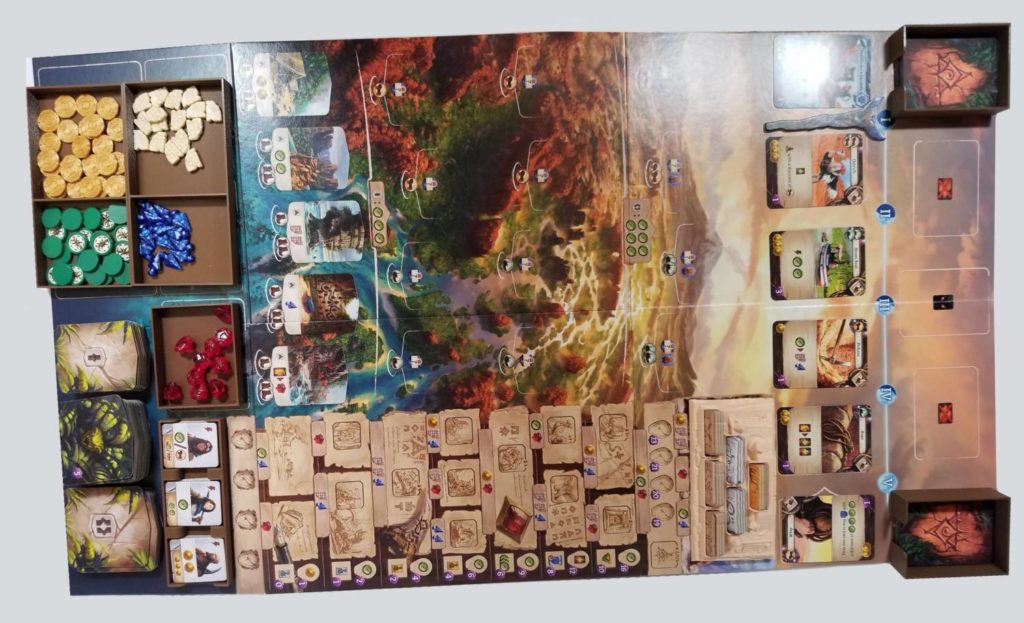
The unruly, unkempt nature of this type of storage means that a setup which should be a breeze is anything but. You don’t realize how much time you spend removing things from plastic bags (and having to remember which bags you pulled them from when you’re putting it all away) until you’ve done it repeatedly. And you especially don’t realize it until you’ve got something like the organizer Game Maker sent to me and those bags are a thing of the past. Just compare the photo above with this one and you’ll see what I mean:

It’s a marked improvement for sure. Everything fits snugly into place and everything has its place. But what makes this insert especially useful is its out-of-the-box functionality. Each tray has been designed in such a way that you can simply lift it from its place within the box and place it directly onto the game board, cutting the setup/teardown time in half.
The lack of instruction was a real issue with this insert. I struggled to piece it together from the images on the website. One of the cardholders is just a few millimeters too large and prevents the box lid from closing flush. And there was an extra cardholder leftover once all was said and done. Since there were no instructions provided, I’m not sure if this was just a packing error on Game Maker’s behalf or if there’s some mistake that I’ve made. Furthermore, some of the components have apparently changed since the photos on the website were taken, so not everything matched up. That added even more confusion to the process.
My only other complaint about this particular insert is just how starkly functional it is. Compare this insert with the Fields of Green insert that I talked about earlier and you’ll see what I mean. The Fields of Green insert was designed not just to store the game and be functional during game play, but it was also designed with a thematic flair. The Lost Ruins of Arnak insert is lacking that character. It’s functionality over form with form not even being given a single thought. After experiencing the Fields of Green insert, this is a bit of a letdown.
As for the various upgrades, I’m mighty impressed. They’re everything you could want in upgrades outside of the coins being made of actual metal. Not only do they look great, but they’ve got a nice tactile feel about them. Just take a look:
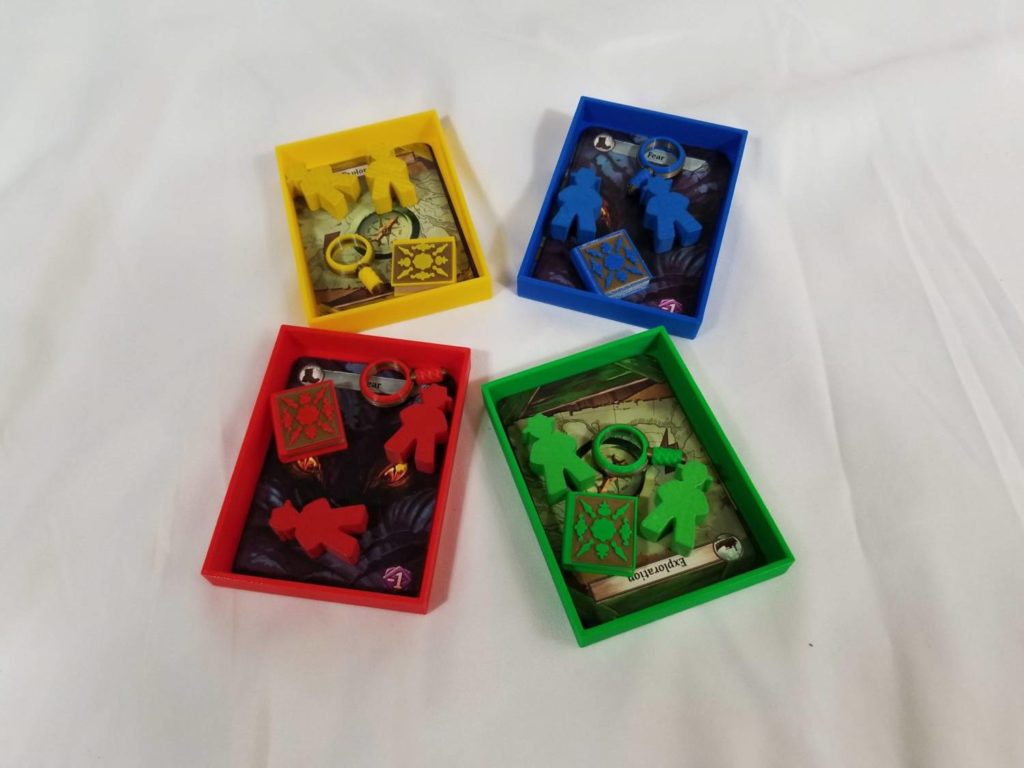
Each player has been provided with their own tray that holds their Explorer meeples, their magnifying glass and journal tokens, as well as their starting cards. The journal and magnifying glass tokens in the image above are upgrades provided from Game Maker. It is worth mentioning that the magnifying glasses are not solid, single piece objects. When I received mine, the handle of the yellow magnifying glass had broken off. Fortunately, it was easy to fix with a little bit of glue.
Out of all the upgrades I received, though, my favorite is the upgraded tile holder. It looks fantastic and it brings a smile to my face whenever I see it set up. This is the kind of thematic flair that I wish had been extended across the various pieces of the insert.
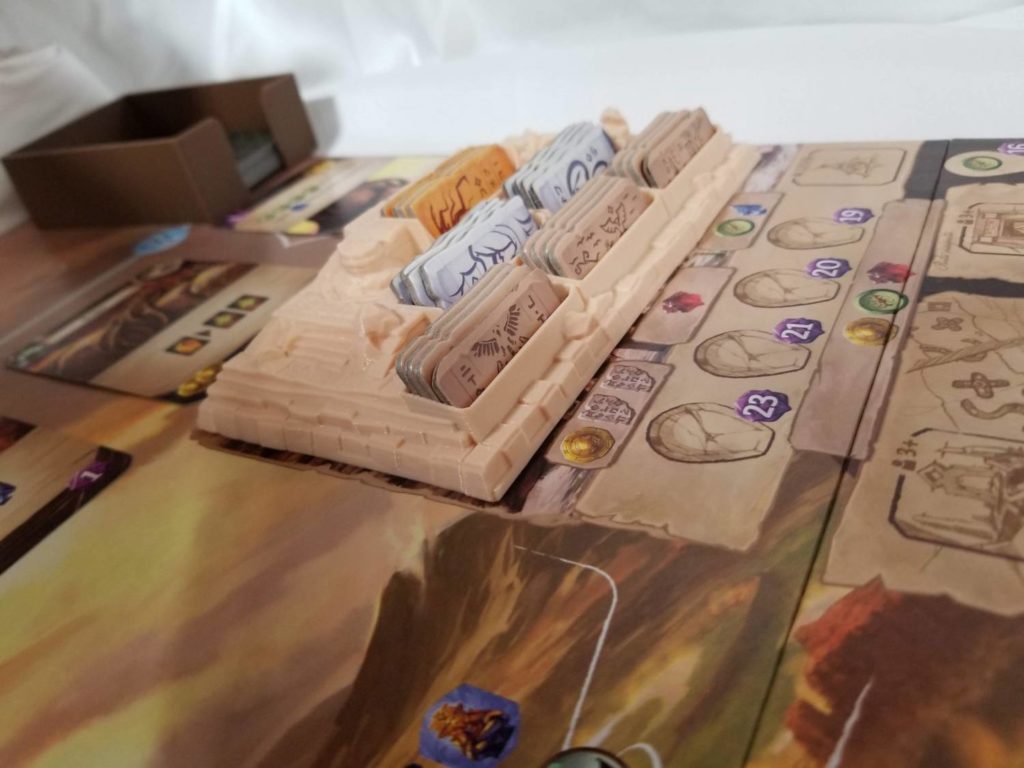
Game Maker’s Lost Ruins of Arnak insert is advertised as being able to accommodate the game’s expansion material. I have no doubt that it could. However, I do have concerns about whether it could also accommodate this tile holder at the same time. Without owning the expansion, I couldn’t say for certain, but I have my doubts. It is obvious that this tile holder was not designed with the insert in mind. So keep that in mind if you’re thinking of purchasing it.
Final Thoughts
Overall, I’m content with what I’ve seen from this company’s products so far. It’s got its ups and downs, but it’s obvious that a lot of time, thought, and effort has been put into producing them. 3D printed components being what they are, you can aim for precision, but you’re not always going to be able to achieve it. I’m fine with that and I can forgive Game Maker for the lack of precision in some of the products that they sent to me.
The bigger obstacle they need to overcome, in my opinion, is the packaging and directions. I shouldn’t have had to scratch my head over which piece belongs with which product. Nor should I have had to spend an inordinate amount of time squinting at images that I can’t even pinch to zoom into. Pieces that go together should be bagged together. Items that require assembly should be packaged with instructions for assembling them. And every product should come packaged with a parts checklist so that the consumer can make certain everything’s there.
If Game Maker can get those aspects nailed down, I have no doubt they’ll do well.