
Introduction
This article is bound to open a can of worms. Why? Well for one, there are just so many hex and counter wargames out there. There is no way any one person can have played them all – even once. Second, as with beauty, it is very much in the eye of the beholder. What I think makes a great game, whether it be mechanics, scope, artwork, etc., others might find downright hideous.
Let me begin by explaining how I came up with my list. First, I only considered games that were published relatively recently. There are many great games from Avalon Hill, Victory Games, and other publishers that have long since gone out of business, but I wanted to limit my list to games those new to the hobby might have a reasonable chance of finding either from the publishers or the secondary market. Another constraint I used was to try and select games that are part of a series. In this way, if someone liked one of the games in my top six, they could find other titles in the same series. I also selected games that, while designed for two players, could be played solo.
Finally, I admit personal biases did influence my list. For example, while I have wargames at the tactical and strategic level, operational games hit my sweet spot for some reason. I find tactical games too crunchy and detailed, while strategic games are too abstract. Likewise, I own more games about World War II than I do any other era. So just by sheer volume, there were many more titles in my collection covering WWII and thus my list of top six reflects that.
So, there you have it. I’ve come clean. You may not agree with how I came up with my list, but hopefully you’ll agree the games on it are quite good, even if they aren’t on your top six list.
If you’re unfamiliar with the term “hex and counter” and want an overview of what this means, then check out our Board Gamer’s Guide to Wargaming.
#6 – Poland Defiant
Published by Revolution Games, I found this little gem a few years ago. The only other game I then owned covering the German invasion of Poland in September 1939 was No Retreat! The French and Polish Fronts. Since it is card-driven (some would argue, card-assisted), I decided to see what Poland Defiant offered. I wasn’t disappointed. First off, the rulebook is only 10 pages in length and uses mechanisms most wargamers are familiar with, making it quite easy to learn. But what makes this game stand out to me are two things. First, it uses one of my favorite mechanisms, random chit pulls. The other is the remarkably balanced victory conditions.

Rather than one player moving and attacking with all their units, followed by the other player doing the same (known as IGO UGO), one of the players draws a chit out of an opaque container. Each chit in the container represents a formation and only units of that formation can move and attack. Then another chit is drawn for another formation. This is done until all the chits have been drawn, thus ending a game turn. Each game turn specifies how many total chits each player can draw. While one side might have 10 chits in the cup, they may only be able to draw 5 of them during the turn. This introduces an unknown random element – the fog of war – into the game. As the German player, you really want to draw the 10th Army chit every turn since it is the largest formation with the most armor. But there’s a chance you may not and that could seriously set back your timetable.
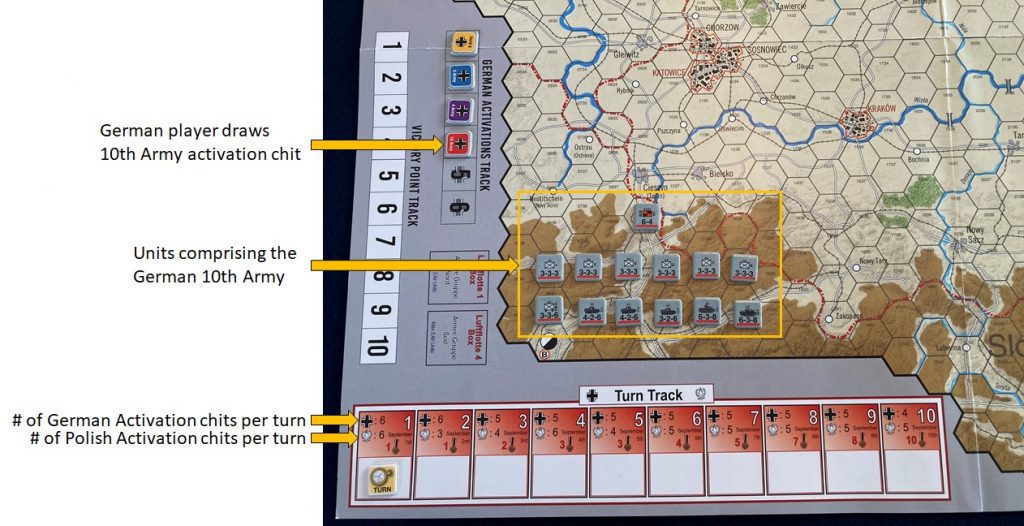
And that brings me to the victory conditions. Poland had no chance of defeating the Wehrmacht; the best they could hope was to delay the Germans long enough to allow the French and British to intervene. Of course, we know that never happened. Instead, the Russians invaded the Eastern half of Poland per the Nazi-Soviet Pact. Yet the Polish player can still win the game. That is because the game only covers the first 10 critical days of the campaign. The Germans need to either capture Warsaw or 10 other victory cities by the end of the game to win. If not, the Poles win. Given the random chit pull mechanism, that isn’t always possible. Therefore, no matter which side you play, the game is competitive. And because the rules are so simple, Poland Defiant is a great game for teaching someone new to wargaming.
Revolution Games also publishes Königsberg: The Soviet Attack on East Prussia, 1945 and Across the Narva: The Soviet Assault on Estonia, February 1944 – both of which use the same system. Multi Man Publishing also offers three games that use a similar system: A Victory Awaits: Operation Barbarossa 1941, A Victory Denied: Crisis at Smolensk, July-September 1941, and A Victory Lost: Crisis in Ukraine, 1942-1943. If you’re interested in warfare on the Eastern Front, you have plenty of titles to choose from with this series.
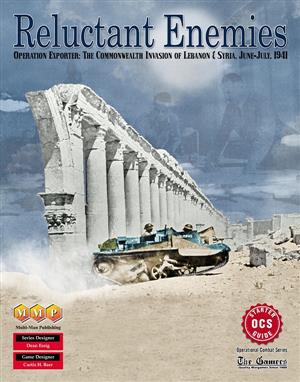
#5 – Reluctant Enemies
As with Poland Defiant, there are two main reasons Reluctant Enemies game made my list. First, it is the gateway game to the Operational Combat Series (OCS). Published by Multi Man Publishing (MMP for short), OCS games are not for the faint of heart. The series rulebook clocks in at 56 pages! Each game in the series then has a separate rulebook covering the details for that game. But unlike other OCS games that may have up to seven maps and nearly 3,000 counters, Reluctant Enemies uses a single 22×34 inch map and just 280 counters. If it were not for this game, I doubt I would have attempted to learn this truly remarkable system.
So why are the rules so long? Well that’s because logistics figure prominently in the OCS series. It is almost a game within the game. In most hex and counter wargames at the operational level, units are in supply if they can trace a line of supply from each unit to a supply source and the supply route is free of enemy units or enemy zones of control (the six hexes surrounding the hex the enemy unit occupies). That is also true of OCS games, but rather than assuming there are sufficient supplies available to each unit every turn, in OCS you must set up supply depots containing supply points from which your units can draw. Supply points are needed to attack at full strength and are also needed by motorized units (i.e., trucks and other wheeled vehicles) and tracked units (i.e., tanks and other armored vehicles) to move. Consequently, you will rarely be able to move and attack with all your units on the same turn. It is this added realism that makes OCS games unique and such a challenge.
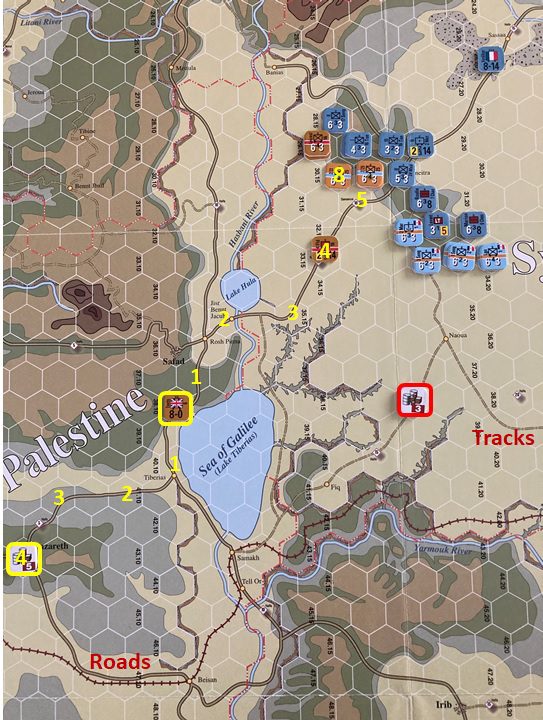
As shown here, the Free French (light blue) units can directly draw supplies from the depot to their south (highlighted in red) since it is within five movement points from their position. The rules allow a one hex leeway, so even the northernmost Free French unit is in supply. The British (light brown) units, on the other hand, are more than five movement points from the supply depot in Nazareth (highlighted in yellow). Fortunately, the headquarters unit on the northwest edge of the Sea of Galilea is within five movement points of the Nazareth depot — movement along roads costs only 1/2 movement point per hex — and can then “throw” supply eight movement points along the route indicated to the British forces attacking the northern end of the ridge (note it costs 3 movement point to move onto the ridge). In a similar manner, the Vichy (dark blue) units must draw supplies either directly from a depot or have it “thrown” to them by the headquarters unit to their northeast in order to defend at full strength.
The other reason why this game made my list is that it covers a campaign that many people don’t even know about. Every wargamer has heard about Tobruk, El Alamein and the other famous battles between the Afrika Korps and the Desert Rats in North Africa. Operation Exporter, which saw the British and Free French fighting against Vichy French forces is largely unknown. In fact, the only other game I am aware of that covers this operation is Compass Games’ aptly named Forgotten Legions. And like Poland Defiant, the British and Free French are not only fighting the enemy, they are also fighting the clock. The operation needed to be concluded quickly so that the forces diverted from North Africa could be redeployed against General Rommel. This really adds tension to the game.
MMP offers 12 games in the OCS series covering campaigns in the Mediterranean, Western and Eastern fronts, as well as one game covering operations in Burma, and one covering the Korean War. If you try (and like) Reluctant Enemies, then I recommend trying some of the other “lighter” titles in the series (Burma, Sicily II, and Tunisia II) before tackling the heavier games.
#4 – The Dark Valley
Designed by Ted Racier and published by GMT Games, The Dark Valley makes my list for several reasons. First, I’m a sucker for East Front games because the titanic clash between Germany and the Soviet Union in many ways decided the outcome of the war in Europe. The Dark Valley allows you to play specific campaigns or the entire conflict from 1941 to 1945. The deluxe second edition comes with two 22×34 mounted maps and over 500 counters. Normally a game of this scope would be considered a “monster”, but the elegantly simple rules make this an eminently approachable “mini monster,” which is another reason why this game is on my list.

Like Poland Defiant, The Dark Valley uses the chit pull mechanism. The chits not only represent specific formations, but also include ones that allow all units to move, all units to attack, or in the case of the Soviet player, to deploy reserves. The number and type of chits available to the players changes from turn-to-turn and simulates the ebb and flow both sides faced during the war. For example, early on the German player has more chits in the draw cup, but this changes as the Soviets gain strength. Yes, the German will encircle and destroy many Soviet forces early in the game, but as the Soviet player you will trade space (and lives) for time until the tables are turned.
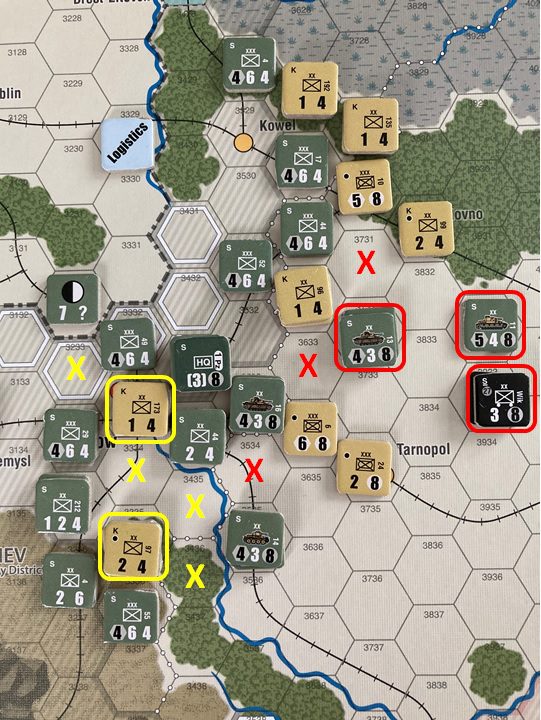
Another innovation the designer introduced is the Logistics chit. Rather than checking all units’ supply status at a set time during each game turn, it is only checked when the supply chit is drawn. Both sides must then determine if each of their units have a line of supply. This means the German player can take the risk of sending their armored formations way ahead of the infantry – as happened in real life – and even move them beyond the range of supplies in order to capture key objectives or perform deep encirclements, hoping that supply will be reestablished before the logistics chit is drawn later in the turn. In fact, because time is ultimately against the Germans, they must take such risks. This adds tension to the game and enjoyment assuming things work out in your favor.
In the example shown here, the yellow Xs indicate the location of German zones of control (ZOC). Only those units with their attack factor on a white hex exert a ZOC into adjacent hexes. So in the Logistics Chit were drawn now, the Soviet units in the two hexes highlighted in yellow would be completely surrounded and considered isolated. If still isolated by the Attrition phase of the turn, they would be eliminated. But the situation is even worse for the Germans. The three stacks highlighted in red have taken a gamble by pent rating the Soviet line in a gamble to reach Kiev further to the east. However, if the Logistics chit is drawn now, then the Soviet ZOC indicated by the red Xs would block their line of supply. The German Panzer unit to the south is still in supply since it can trace a line of supply across the river and then north (the yellow hex is a German, not Soviet, ZOC).
The ”Dark” system also includes The Dark Sands (about the campaigns in North Africa) and the upcoming The Dark Summer (covering the Normandy campaign). The system owes many of its concepts to Ted Racier’s earlier game, Case Yellow (the 1940 campaign against France, Belgium and the Netherlands), also published by GMT. I hope there are more games released in this system.
#3 – Saratoga
The only non-World War II game on my list, Saratoga is Volume I of GMT’s Battles of the American Revolution series. Closer to a tactical level wargame, it is relatively easy to learn making it ideal for someone new to wargaming. The series rulebook is just 12 pages long, although each volume comes with its own game-specific rules. Saratoga, like all games in the series, comes with one 22×34 inch map and a relatively small number of counters, so the game sets up fast and can be played in two hours. But what makes this game stand out is the central role leaders and morale have in game play.

In addition to the infantry, cavalry, and artillery units each player has leader counters. The British are commanded by Lieutenant General John Burgoyne and under him are numerous subordinate commanders such as Baron Adolf von Riedesel who commanded the German mercenaries. The Americans are ostensibly under the overall command of Major General Horatio Gates, but his command is divided. Major General Benedict Arnold commands an entire wing of the army and acts independently during much of the battle. Every leader has a close combat modifier that is added to the combat die rolls, and a leadership modifier that is used during morale checks and when rallying disrupted and shattered units.
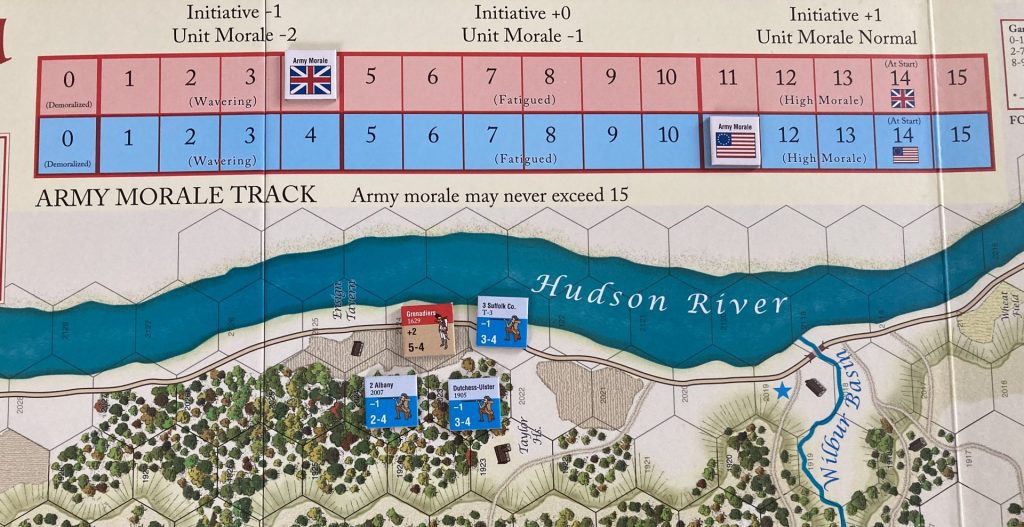
A track is used to record each Army’s overall morale. At the start of the game, each Army’s morale is high, which adds +1 to their Initiative die roll (this determines who goes first each turn) and means the morale value printed on each combat unit is used when making morale checks. But as each side takes casualties, is forced to retreat, or has units that become disrupted or shattered, the Army’s morale drops. When the Army’s morale value reaches the Fatigued level, the Initiative die roll modifier drops to 0 and each unit’s morale value is reduced by 1. If it reaches Wavering status, there is a -1 Initiative die roll modifier and each unit’s morale value is reduced by 2. And if it reaches zero, the Army is Demoralized and results in an immediate victory for the opponent. Thus, each player needs to use their leaders to conduct attacks that will cause the other’s Army’s morale to fall, while keeping their own Army’s morale level high. Doing so is the best means of achieving victory.
For example, if the three American (blue) militia units were to attack the British (red) unit, they would do so at 3 to 2 odds (summing up the attack values in the lower left-hand corner yields 8 attack points compared to 5 points for the British, which reduces to 3 to 2 on the Combat Results Table). Unfortunately they all have a printed morale value of -1 while the British unit has a morale value of +2. Normally this would cause the Americans to suffer -3 die roll modifier to their attack which would likely result in an adverse outcome. However, note that the British Army’s moral token is in the Wavering zone of the Army morale track. This reduces the British unit’s morale value from +2 to 0. So instead of -3 die roll modifier, it is now only a -1 modifier.
There are currently nine titles in GMT’s Battle of the American Revolution series covering many of the most important battles of the War for Independence: Monmouth, Guilford Courthouse, Brandywine, Germantown, etc. A tenth game covering the Battle of Rhode Island is about to be released. That means there is plenty of gaming available with little or no new rules needed to be learned.
#2 – Liberty Roads
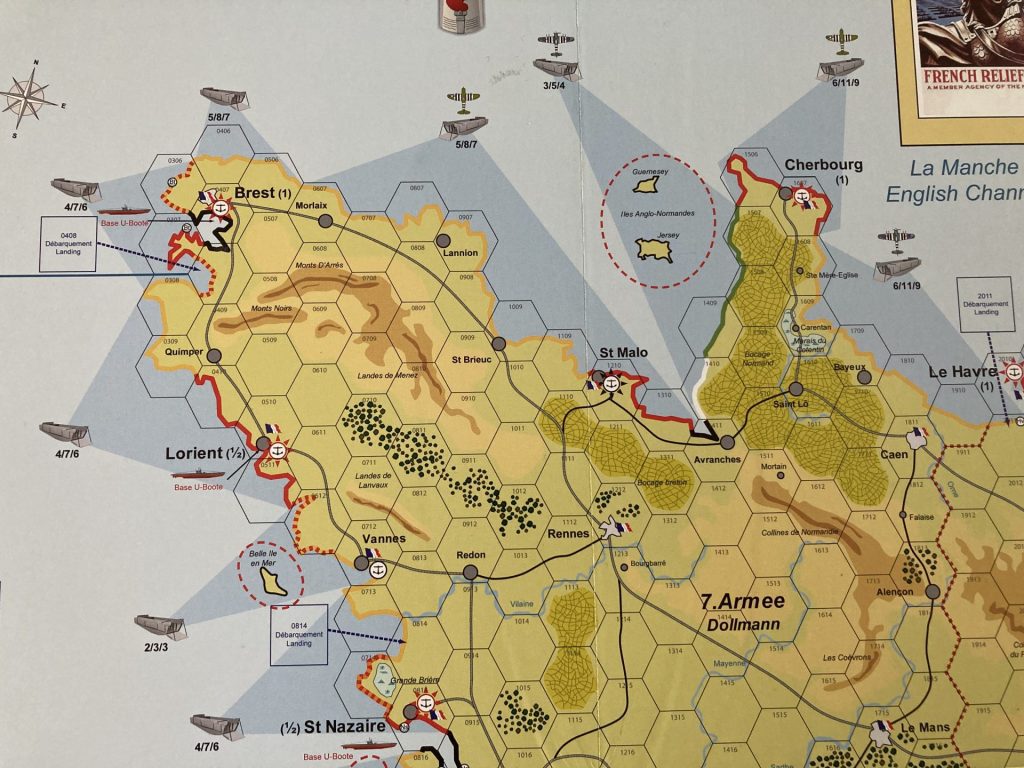
Published by the French company Hexasim, Liberty Roads is my second favorite hex and counter wargame for one main reason: possibilities. Unlike many games about the 1944-45 campaign to liberate Western Europe, this is only one of two games I know of that allows the Allied player to conduct the invasion anywhere along Hitler’s vaunted Atlantic Wall. (The other is Compass Games’ Fortress Europa.) This allows the Allied player to try different strategies for getting ashore and racing to the German border. Do you land in Holland, which is much closer to Germany? Or do you land further west, say along the coast of Brittany, to capture the numerous ports there? You can even launch an invasion along the Mediterranean coast.

There are pros and cons to every beach. Each invadable beach hex has a numeric value based on its color that represents its intrinsic defense value as well as the number of “Atlantikwall” markers the Germans can deploy. These markers represent concrete block houses, mines, anti-aircraft batteries, anti-tank guns and other defensive measures. The Allies must consider these factors when deciding where to invade, but also other factors. For example, some beaches are in range of Allied air cover (those with the aircraft symbol). Others are not, such as those between Brest and St Nazaire. Some beaches allow you to land more troops in the initial assault wave (first number below the landing craft symbol) and follow-up wave (second number) than others. Additionally, some beaches permit the use of more D-Day markers (the third number below the landing craft symbol) that simulate the use of naval gunfire, air support, amphibious tanks, Commandos and Rangers to cancel out the German player’s Atlantikwall markers. Finally, the Allied player must consider what forces the Germans have deployed on the beaches and inland, the proximity of ports they can capture to use for supply, the need to take out U-boat pens and V1 rocket sites, and how far it is to the German border. It’s the plethora of choices that makes this game have incredible replay value.
In addition to all the choices this game offers, it uses many innovative mechanics, such as the Support markers. Like the D-Day and Atlantikwall markers, these represent additional resources available to each side. Some are offensive in nature, such as Allied air support and German Tiger tanks. Others are defensive, such as German panzerfausts to blunt Allied armor attacks and the Allied Nuts! marker — named after General McAuliffs’s famous response to the German demand that he surrender Bastogne during the Battle of the Bulge — that cancels any German combat result. The Allies can only place Support markers within three hexes of their PLUTO (Pipeline Under the Ocean) marker, which represents the primary axis of Allied attack. The Germans have no such restriction, although they will generally receive fewer Support markers each turn.
Even the combat resolution table (CRT) is unique. Like many other games, it is odds-based. For example, if 15 combat factors attack a hex with 4 combat factors, the odds round down to 3 to 1. The attacking player then rolls two dice, adds in any modifiers from the Support markers and determines how many losses each side takes. But in addition to these, the CRT may list additional results for the attacker and defender, such as the ability to exploit (move and attack again) or retreat a certain number of hexes.
I could go on and on about the other unique and innovative features of this game, such as keeping track of Hitler’s approval (and its consequences) and creating Free French forces by liberating French cities and ports. It also has one of the most beautiful maps I’ve ever laid eyes on. Plus, the rulebook is only 16 pages in length. That is incredible given what is packed into this game. Unfortunately, there is only one other game in the system, Victory Roads, which covers the Soviet offensive that began around the same time as the D-Day landings to the fall of Berlin — which is why it falls short of the #1 spot.
#1 – Holland ’44
Published by GMT Games, Holland ’44 is part of the 194x series designed by Mark Simonitch. This title covers the famous (or should I say infamous?) Operation Market-Garden, Montgomery’s ambitious plan to cross the Rhine River by using airborne troops to grab key bridges in Holland and then race armored formations across those bridges into northern Germany. Holland ’44 comes as close to a perfect wargame as I think is possible. I say that because it shares many of the same attributes that I have already mentioned in making this list.
First, while Reluctant Enemies covers a little-known operation, Holland ’44 covers one of the most well-known. Ask any wargamer about this battle and they can give you lots of details. And they probably have all watched the movie, A Bridge Too Far – considered one of the best war movies ever made – that recreates the entire operation from its initial planning stages to its anticlimactic ending. Along with the D-Day invasion and the Battle of the Bulge, there probably is no other WWII operation topic that generates more interest among wargamers.
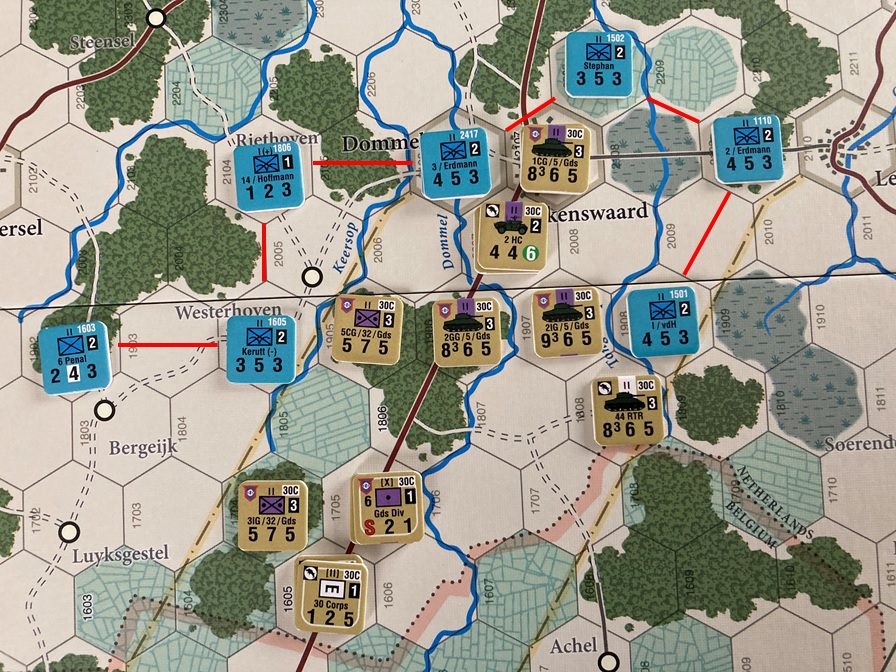
Because of the operation’s popularity among wargamers, there are many other games on the subject. What makes this the best of those, in my opinion, is Mark Simonitch’s system. While it uses the classic IGO-UGO turn sequence rather than chit pulls, there are several unique mechanics that make this game, and indeed the entire series, stand out. The first is the concept of Zone of Control (ZOC) bonds. Many wargames employ ZOCs. These reflect the influence combat units have, not only on the hex they occupy, but the surrounding hexes. Thus, in many games a unit must cease movement upon entering an enemy ZOC. However, they may be able to continue moving between the enemy units next turn. A ZOC bond prevents this. It forms a barrier that stretches between two occupied hexes that are two hexes apart (as depicted by the red lines between the German units pictured below). This prevents the enemy from entering the hex in between or crossing the hexside between the two units. Therefore, it is not necessary to have a line of adjacent friendly units to block enemy movement. Instead the units can be spread out, which significantly reduces the clutter caused by adjacent stacks of counters.
Other unique mechanisms in this system are Determined Defense and Breakthrough Combat. A defender can opt to not retreat from a hex by rolling on the Determined Defense table. They may wind up taking additional losses, but at least they held a critical position. Breakthrough Combat allows units advancing after combat to attack again under certain conditions and restrictions. Like the Exploitation result on the Liberty Roads CRT, this allows the attacker to make deeper penetrations.
Although the game setup and objectives are identical each game, how one goes about achieving those objectives can vary wildly and much will depend on how the initial airborne landings go. So, oxymoronically, the game has high replay value and offers different choices each game, especially for the Allied player. For example, if the 101st Airborne Landings go poorly and they cannot send sufficient forces south of the Wilhelmina Canal to attack Eindhoven from the north, the British may need to divert units from 8th and 12th Corps from guarding the flanks of 30th Corps to support an attack on Eindhoven from the East and/or West. Of course, doing so provides an opportunity for the German player to counterattack along the supply lines of 30th Corps.
The reason the Allies might take such a risk in the above situation is the time factor. This game really is a race against time. And not only is time your enemy, so is the terrain. Multiple rivers and canals, flooded areas (known as polders), and marshes lie in the path of the 30th Corps’ advance north to link up with the airborne troops. Just like in Poland Defiant, while the Allied forces are superior, they are hard pressed to make it all the way to Arnhem to relieve the beleaguered Red Devils of the British 6th Airborne division. This means the German player can, and probably will, prevent the Allies from capturing Arnhem and its bridges across the Rhine. So, play balance is quite good and neither side will likely do better than what occurred historically. In other words, the Allied player will capture Nijmegen, and perhaps the bridges across the Waal River, but they will still be one bridge too far. The game is a nail biter from start to finish.
The Holland ’44 rulebook is 40 pages long, but that includes 15 pages containing an extended example of play, designer notes, reinforcement schedules, an index, and expanded sequence of play. So as with most of the other games on this list, the game is easy to learn. GMT offers five other games in this series covering operations on both the Eastern and Western fronts. A new title covering the battle for Salerno, Italy is also in the works.
Time to Face the Music
I am sure many will disagree with my list. But of course, it is my list. If you feel there is a great hex and counter game out there that deserves recognition, let me know. It may not be on my list simply because I have not played it. In which case, if you can make a compelling enough argument, I will probably be spending more of my hard-earned money on another wargame. But hey, let’s keep that between you and me. I don’t want to get in trouble with my wife.


Thanks! This list made me decide to buy Holland ’44. Appeared only to be available in Holland now!!
This is an excellent list and I’m surprised it took me this long to come across it. Operational-scale games hold a high allure for me and your reasoning (alongside the example pictures) really showed why the games are as popular as they are.
Thank you, David. If you have any suggestions on other operational hex and counter games, please let me know.
Dave, loved your reasoning for why you posted the list. I really enjoyed the read and like the games listed. I confess up front that I am a Dark Valley tragic; love the game and its iterations. Like yourself, retired military, though in my case it was Army and I’m this side of the Pacific, in Australia (as what a civilian would call a ‘research analyst’, I worked with the USAF an awful lot, starting in 1988). One game I have been keenly awaiting delivery of is ‘France 40’, by Mark Simonitch. I submitted an order in May of 2021, it’s Jan 2023 and GMT still has it listed as ‘made the cut’, so it hasn’t gone off to art development yet, despite 1080 orders. I am told it is the best of the French 1940 campaign games manufactured. Do you agree? I’m tired of waiting for GMT to deliver (like a number of friends this side of the Pacific, we have been cancelling P500 orders wholesale, because the games never seem to get developed). Can you recommend a divisional level French 1940 campaign hex and counter game you would play as an alternative to ‘France 40’? Something I would want to keep on my shelf, not sell second-hand at a war-game convention in a couple of years time.
Hi Pete. I’ve not played Mark Simonitch’s France ’40, so I can’t say it’s the best. But I do very much like Ted Racier’s Case Yellow. From what I understand, it was the precursor to his “Dark” series of games that use a chit-pull mechanic which I’m a fan of. Unfortunately, it doesn’t appear to be in stock at GMT’s website, and while there are several copies for sale at the BGG Geek Market, the prices they’re asking for are rather steep. Another alternative is GMT’s No Retreat! The French and Polish Fronts. It’s available in stock.
Hope this helps scratch that itch for you.
I’m rather partial to Hell’s Highway. Victory Games’ take on Market Garden. Some very interesting game mechanics.