
“The Hallertau or Holledau is an area in Bavaria, Germany. With an area of 178 km², it is listed as the largest continuous hop-planting area in the world. According to the International Hop Growing Convention, Germany produces roughly one third of the world’s hops (used as flavoring and stabilizers during beer brewing), over 80% of which are grown in the Hallertau.” (source: Wikipedia)
In many of Uwe Rosenberg’s previous games, beer has made an appearance, but in this game, it’s the entire point. In Hallertau, the players take on the roles of 19th century village chiefs. By farming, trading, beer making, and sheep breeding, they hope to guide their tiny hamlets into a prosperous new century.
It wouldn’t be an Uwe Rosenberg game without sheep.
Overview
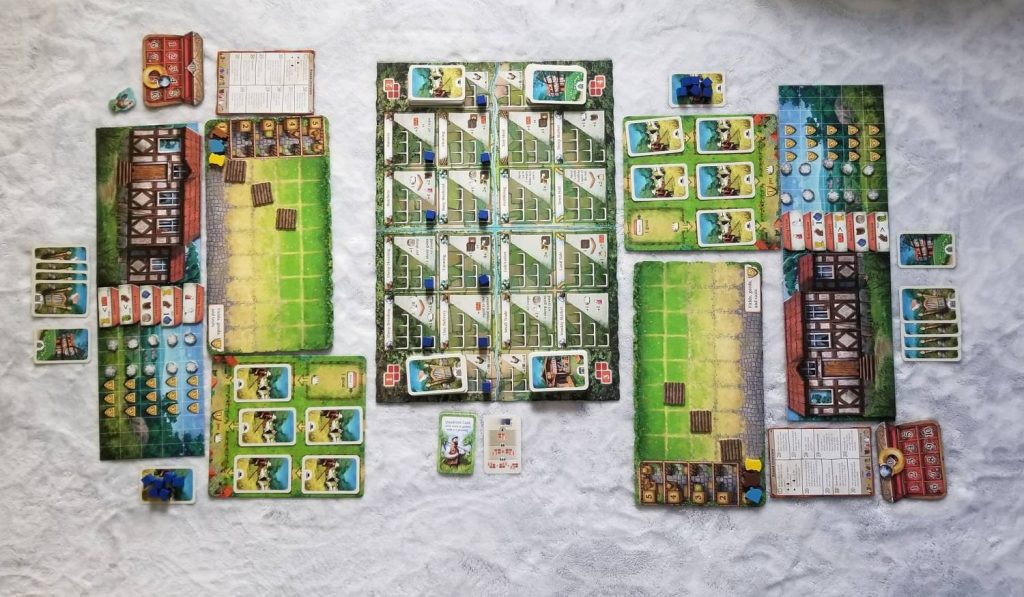
In Hallertau, each player is given a player board which is mostly covered by a large Community Center tile. Over the course of the game, the players will be vying to collect the most victory points. A large portion of these points will come from moving the Community Center along the player board. But, in order to move it, the players must first move the obstacles out of the way that are there to impede its progress. This is done via the expenditure of material goods, such as rye, barley, hops, and wool.
Hallertau is a worker placement game with a mechanism akin to Key to the City: London in that each player taking an action someone else has already chosen must spend more workers in order to take the action (so, turn order matters!). These actions are how the players will be doing things such as obtaining resources, sowing and planting fields, gathering and shearing sheep, and collecting cards.
You read that right. Cards. In Hallertau, there are four different card decks. Each deck is designed around a specific concept such as end-of-game objectives, in-game goals that offer immediate rewards, and cards that offer long term benefits whenever their objectives are met.
Suffice to say, Hallertau is a complex game with a lot of moving parts. If you’d like to get a better idea of how the game is played before moving on to the Thoughts section, then click the button below.
Set Up
Hallertau is set up thusly:
First, the Action board is prepared. Set this onto the table and then shuffle the Bonus card and Point card decks and place them onto the marked locations. There are four decks of Gateway cards and four decks of Farmyard cards. Select one of each of these by some means, shuffle the selected decks, and place them into their starting locations. Return the unselected decks to the box. Then, place a worker onto the lowest level of each action on the board.
Next, each player receives: Field, Stable, and Community Center boards (one of each) along with a Community Center tile, an Overview tile, ten Boulder tokens, a Jewelry token, a Jewelry Box tile, and five different Craft Building tiles.
The Community Center tile is placed onto the matching board in the starting position with the six showing in the window. This number indicates how many workers a player will begin each round with. Directly to the right of this tile, randomly place the five Craft Building tiles in separate rows. Then the columns two to the right, and four to the right, of each of these are filled with Boulder tokens. The Jewelry Box tile is kept close by—along with the Overview tile—with the Jewelry tile placed onto its starting position.
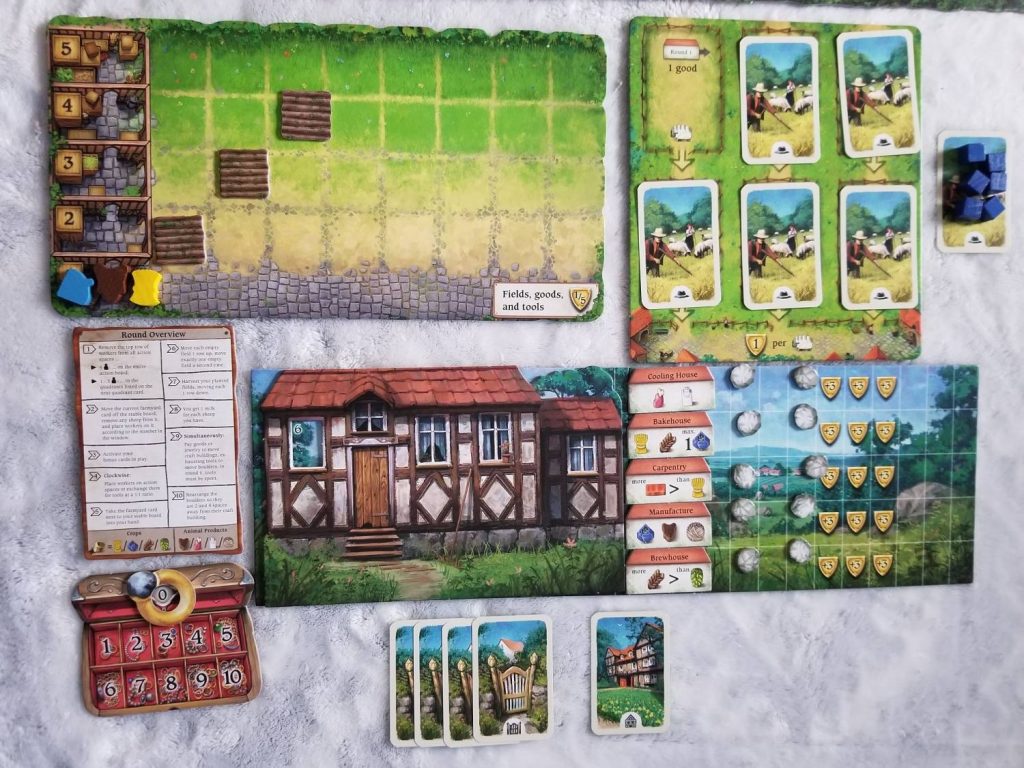
Each player then receives six Farmyard cards which are placed, face down, onto the six spots of their Stable boards. They also receive one barley, one flax, and one rye and place these onto the ‘1’ position of their Field boards. Then, give each player three Fields which are placed onto the marked positions on the same boards. Along with all this, each player also receives a starting hand of four Gateway cards and one Point card which are kept hidden from the other players. The various resource bits, Tool tiles, and worker cubes are kept in a general supply within easy reach.
Now, select a starting player and give them the first player token (which looks like a rooster) and you’re ready to begin.
A Round of Play
The actual structure of a round (of which there are six) in Hallertau is pretty easy. It follows this structure:
Remove workers: Some workers will be removed from the Action board. The amount removed and where they are removed from is dependent on the player count.
New workers: The players remove the next Farmyard card from their Stable boards and then place a number of worker cubes from the supply, equal to the number showing in the window of their Community Center, on top of it. If the removed Farmyard card had sheep on top of it, those are returned to the supply.
Income: some Bonus cards will reward their owners with resources, free fields, etc. during this step.
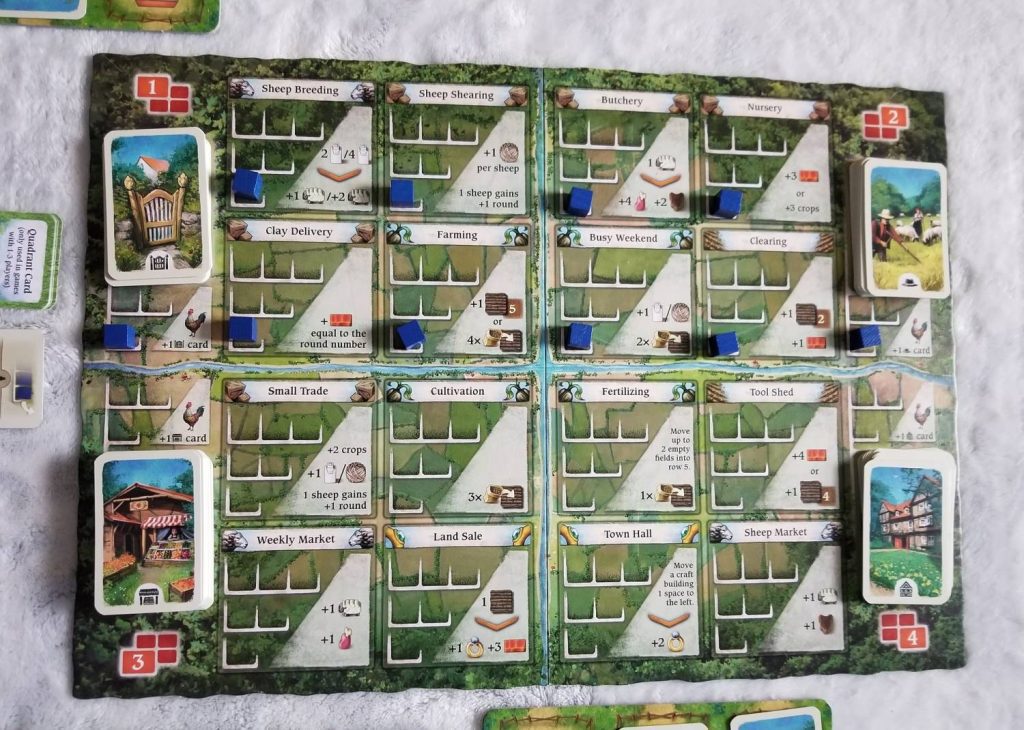
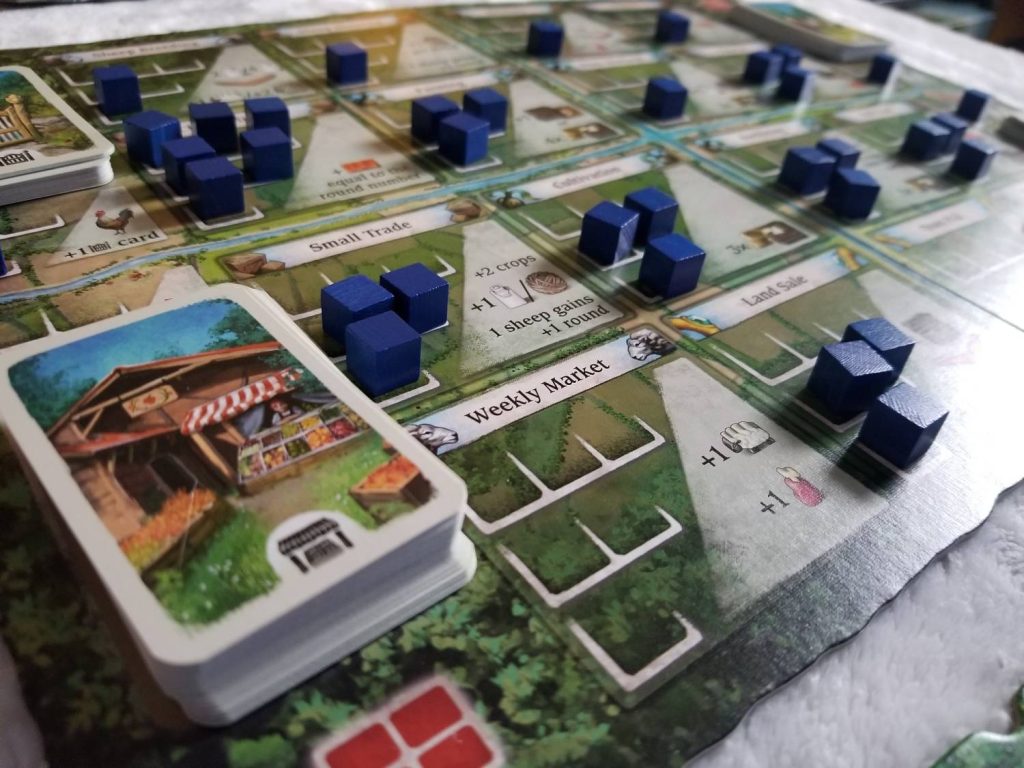
Actions: Starting with whoever is holding the rooster, the players will take turns using their workers to perform actions. If a player has no more actions they can, or want, to perform, they will pass. For the most part, each action can only be performed up to three times. The first time the action is performed, if it is empty, it will only cost a single worker. Each subsequent use of the action is going to cost one additional worker. We’ll talk more about the various actions later.
New card: The Farmyard card that was removed at the beginning of the round is added to the player’s hand.
Fallow fields: Any empty fields get moved up a row on the Field board.
Harvest: Each field containing a resource token is harvested. The removed token is added to the matching position on the Field board. A token removed from a field in row four, for instance, is added to the ‘4’ position.
Milking: The player receives one milk per sheep they currently own.
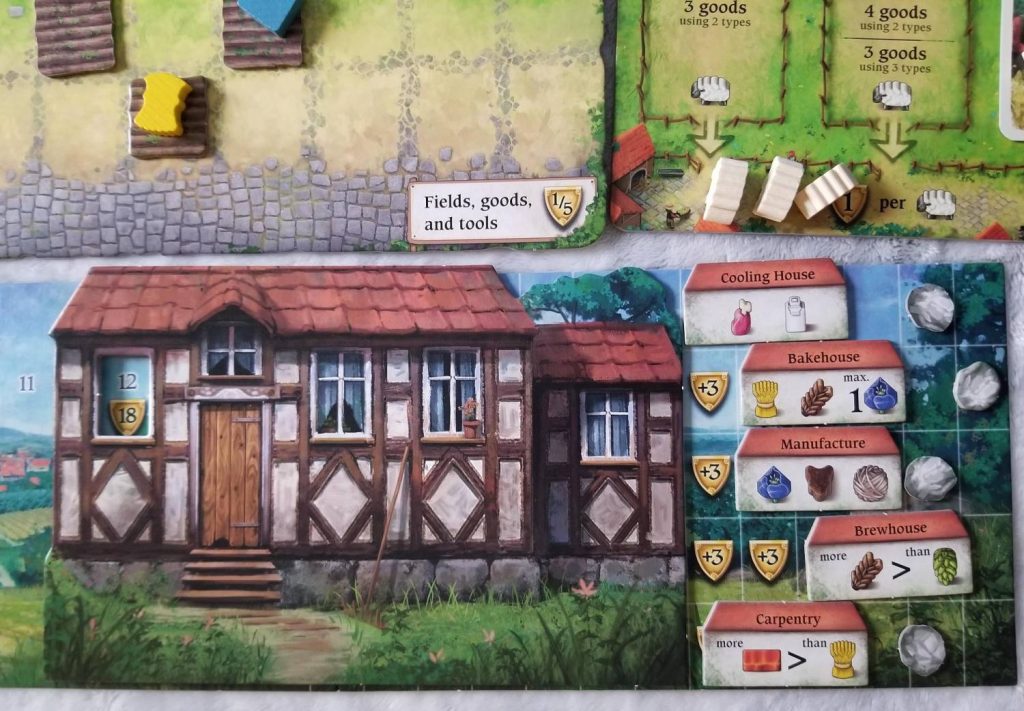
Progress: The players spend goods to advance their Craft Building tokens. These tokens show which resources can be used to advance them. The amount needed to advance is determined by the current round and is shown on the Stable board. This may require pushing some boulders out of the way. Understanding this step is so critical that I will talk about it more in-depth in its own section.
Boulders: The boulders remaining on each row of the Community Center board are rearranged so that there is a boulder two and four spaces to the right of each of the Craft Buildings. It is possible that some of the boulders may have been pushed off of the board. If that’s the case, don’t worry about them.
That may look like a lot, but after one or two rounds, you’ll find yourself blazing through these steps pretty quickly. The Overview tile you are provided is very helpful in this regard. As far as player aids go, this one is top notch.
An Action Overview
In order to take a specific action, you will first need to place worker cubes into the next unoccupied row, from the bottom up. The first use of the action costs one worker, the second costs two, and the third costs three. In general, the various actions will allow you to:
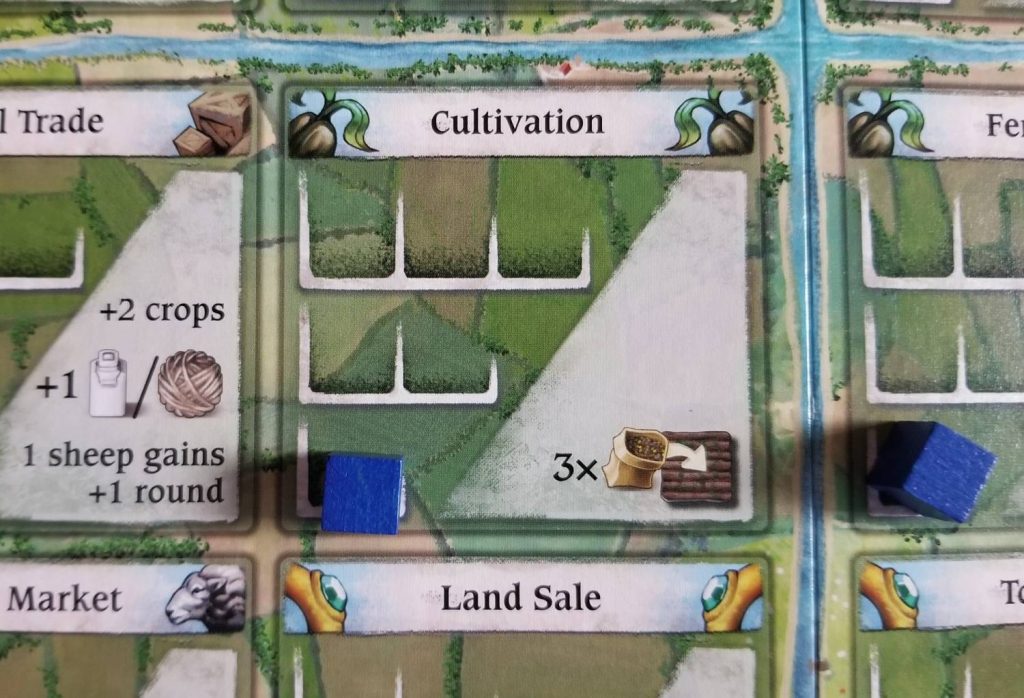
- Gain resources.
- Gain empty fields.
- Plant vegetables into fields.
- Convert resources into other resources.
- Sacrifice fields/Craft building movement for Jewelry (the importance of which will be discussed in the next section).
- Gain sheep. Any sheep gained is placed onto the Farmyard card beneath the current round on the Stable board. If you’re already in rounds four, five, or six, the sheep is placed directly into the stables at the bottom of the board. Sheep placed in stables will never get removed.
- Advance your sheep an extra round. This moves them from their current location onto the next Farmyard card (or possibly into the stables).
- Draw a card from one of the decks and gain the first player rooster.
The Progress Phase
Moving your Community Center from left to right has a direct effect on how many workers you will have available to you at the start of each round. Eventually, in addition to uncovering a new number, having moved your Community Center will also reward you with end-game victory points. But, the Community Center is hindered from moving by the Craft buildings that are pressed up against it. In order to progress the Center, you’ve got to first progress all five of the Craft buildings. This is one of the hardest concepts to wrap your mind around, so it bears going into a little more detail about how it works here.
Determining what you need to spend: each Craft building uses specific resources to move them along. Some feature multiple resource icons in a line. Others feature icons separated by a > sign. Any Craft building can use any combination of the depicted resources to move it along. However, when you see the > sign, that means that whenever you use a combination of the resources shown, you must always use more of the resource on the left than the one on the right.
Determining how much you need to spend: the total amount of resources needed to shift a Craft building is determined by consulting the current round space on the Stable board. For instance, Round Four reads: “4 Goods | 3 Goods using 2 types”. This means that in Round Four, you can move a Craft building one spot to the right by spending four of a single resource. Or, you can use two different resources and only have to spend a total of three.
Alternatively, instead of paying anything, if you’ve got Jewelry to spend, you can spend one Jewelry to ignore the cost entirely and simply shift the Craft building.
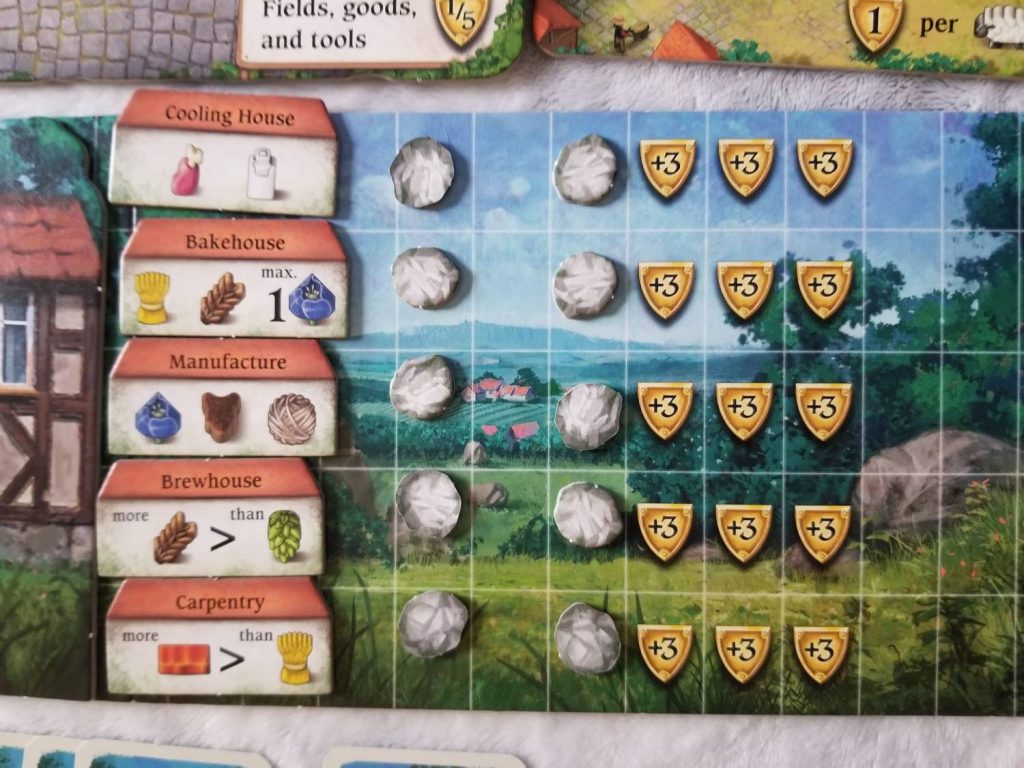
Moving boulders: Craft buildings can be shifted until they butt up against boulders. There are two ways to move boulders. The first is simply to wait until the end of the round when they all shift on their own. The other way is through the usage of Tool tiles.
Tool tiles can be acquired via certain actions or cards. To shift a single boulder, one Tool must be expended. To shift two boulders that have butted up against one another, two Tools must be expended. When using Tools in the first five rounds, you don’t actually discard the tiles. Just move them off to the side to show that they’ve been used. Any tools used in the sixth round are discarded and any leftovers will be worth points at the end of the game.
Sliding your Community Center: once you’ve cleared out columns, your Community Center shifts until it butts up against one of your Craft buildings. Shifting your Community Center has several benefits. Firstly, the further it has shifted, the more workers you’ll begin each round with. Secondly, as it shifts, you will begin uncovering victory point values that will earn you points at the end of the game.
End Game Scoring
The game ends at the end of Round Six. At that point in time, the players will tally up their points to determine the winner. In Hallertau, points come at you from a lot of different directions:
- The final victory point value in the windows of your Community Center plus any visible values in your Craft buildings area.
- Each leftover sheep is worth a point.
- Each leftover Jewelry is worth a point.
- Add the total of your leftover Tools and resources to the value of your leftover fields (a field in row three is worth three points, for example). Then divide this total by five to determine how many points you’ll receive.
- Some cards will reward you with points.
Thoughts
2020 was a good year for Uwe Rosenberg. His breakout hit from 2019, Nova Luna, was nominated for the Spiel des Jahres. He quickly followed that by dropping four new games on us: Fairy Trails, Sagani, New York Zoo, and the subject of this review, Hallertau. Having played those first three, I was eagerly anticipating the fourth, greedily eating up every crumb of information that I could find about it. The early impressions were favorable. I saw the word ‘buzzworthy’ floated around a lot.
But nothing I read or saw could have prepared me for the glorious experience of actually playing it. And I don’t use that word lightly. Once upon a time, I had declared Rosenberg’s more well-known endeavor, Agricola, as a masterpiece of gaming. In fact, in that review (the second review I ever wrote), I stated that Agricola came “the closest to being the perfect game as any I have ever played.”
High praise, indeed. Without a doubt, Agricola put Uwe Rosenberg on my radar and he’s stayed there ever since. There are only a handful of designers that I follow with such passion and dedication. And throughout the years, as I’ve gobbled up title after title from Herr Rosenberg, I have yet to run across any of his titles that have made me feel the way that Agricola once did.
Until Hallertau, that is. Hallertau is Uwe Rosenberg’s magnum opus. Everything he’s learned in his decades-spanning career has led to this, his crowning achievement. It is easily the most compelling, best illustrated, deepest, most thought-provoking, most challenging, and most rewarding design in his oeuvre. The most unsatisfactory moments I have ever spent with the game were the minutes that elapsed as I read through the rulebook that first time because those were minutes that I could have been playing.
One of the most polarizing aspects of Agricola is the cards. There are some who eschew them entirely due to the extra complexity and luck-driven aspects they bring to the game. And there are those that embrace them and refuse to play without them. I am in that second camp. Without the cards, Agricola is just a standard fare worker placement game. There’s nothing special about it. But those cards give the game life. And they’re what keeps the game going even to this day.
Hallertau shows that, when it comes to designing cards, Uwe Rosenberg hasn’t lost his touch. In fact, he’s actually gotten much better. The cards in Hallertau are much more streamlined and easier to read. The iconography is clearer. The timing of when to use certain cards is easier to understand. This approach has enabled him to pack much more information onto the cards than he was able to do in Agricola. In an ironic way, this card simplification has actually paved the way for a much richer, complex game. The rewards for clever card play are great, but they’re also a dangerous lure. Spend too much time focusing on playing cards and you might let other opportunities slip through your grasp. That being said, there’s nothing quite as satisfying as drawing a card that you’re able to play immediately, because you just happen to meet the requirements, and being rewarded with another card draw. And it’s especially thrilling when you’re able to repeat that process with the newly drawn card.
Another thing that’s changed significantly in Hallertau is Rosenberg’s approach to worker placement. In the past, most of his games would allow you to snipe a worker placement location in order to deny it to another player. But here, it’s different. Those who choose an action earlier use fewer workers to perform it. Those who come later pay more. But the payoff is just the same. This makes it harder to deny your opponents the use of beneficial actions, the passive interaction you’ll see in many worker placement games. The net effect here is that it also almost entirely eliminates any sort of player interaction at all—about the only negative thing I could think of to say about this game.
It’s just as well. In many of his other games, most of that action denial revolves around trying to make it more difficult for your opponents to feed their families, pay their wages, etc. But that just isn’t a concern in Hallertau. There is no between-the-rounds upkeep to worry about. In fact, as far as big box Uwe Rosenberg games go, Hallertau is one of the few where every single thing you do only improves your outlook. There isn’t a negative number to be found.
I’d be hard pressed to name a time in my many plays of Hallertau to come up with even a single instance where I took an action specifically to keep my opponent from taking it. This game has you trying to keep way too many plates spinning at any given time for you to worry about other peoples’ plates. That action denial isn’t needed, so it’s no big loss to see it removed.
But my favorite aspect of the game is the Community Center board and the deeply thinky puzzle that goes along with it. Every move you make is in service to trying to move those Craft buildings along. From the very first turn of the game, you can calculate precisely how much you’re going to need to shift each of the buildings to the furthest edges of the board and figuring out how to do that can be challenging. For instance, I know that moving the Cooling House uses some combination of milk and meat. Therefore, I know that, over the course of the game, to efficiently move it, I am going to need to come up with a combined total of seventeen resources, four of which must be different from the others. And I am going to need at least two Tools for the job if I want to move it along faster than the end-of-round mechanics allow.
And that’s just for a single Craft building. I won’t sugarcoat it, Hallertau can be a very math-y game at times. So, if math isn’t your strongest subject, you may not fare well at playing this game. This mathiness can also lead to some long turns if you play with people that are prone to analysis paralysis. In a game where resources are this vital and the opportunities to gain them are this tight, using those resources efficiently is key.
None of that bothers me, though. When I am playing Hallertau, I am so deeply immersed in the experience, so busy trying to solve the puzzle that lies before me, that I am not even aware of the time passing by. And that’s about the best thing I could ask for from a game.
With Hallertau, Uwe Rosenberg has set the bar very high for himself. Honestly, I don’t know if he can ever top it. But, I’ll tell you this, I’m excited to watch him try.
Hallertau details
- Designer: Uwe Rosenberg
- Artists: Klemens Franz, Lukas Siegmon
- Publishers: Funforge, Galápagos Jogos, Hobby Japan, Hobby World, Korea Boardgames, Lookout Games, Maldito Games
- Release Date: 2020
- Player count : 1 - 4
- Age range : 12+
- Time range : 50 - 140 minutes
- Mechanism(s): Action Points, Advantage Token, Automatic Resource Growth, Contracts, End Game Bonuses, Hand Management, Income, Increase Value of Unchosen Resources, Market, Modular Board, Solo / Solitaire Game, Turn Order: Claim Action, Worker Placement
- BGG Geek Rating: 7.84318 - converted to Meeple Mountain scale: 4.0.
- More articles about Hallertau.