Disclosure: Meeple Mountain received a free copy of this product in exchange for an honest, unbiased review. This review is not intended to be an endorsement.
Disclosure: Meeple Mountain was provided a pre-production copy of the game. It is this copy of the game that this review is based upon. As such, this review is not necessarily representative of the final product. All photographs, components, and rules described herein are subject to change.

Welcome to Kosk, the western-most city of Valeria. Its proximity to the ocean and Valeria’s abundant natural resources has turned this once tiny town into a thriving metropolis. It’s a hub of commerce where the nation’s craftsmen, mercantile classes, and scholars come together to find employment, fill their coffers, and broaden their knowledge. As the city grows, so does the need for skilled management to help guide the city’s Guilds and direct their efforts to where they’re needed most.
And thus it is that the Duke of Kosk has gathered you and your opponents together for a once-in-a-lifetime opportunity. He’s looking for a new Castellan to manage the daily business of running the city and he’s hoping you’re it.
Castellans of Valeria (COV) brings to bear a mixture of dice drafting, action selection, resource management, and area control to achieve its goals. Over the course of five game rounds, players will be vying for control of the city’s districts while also competing to garner the most influence within the city’s four Guilds. At the end of each round, a district scoring will be performed in which players earn points based on how much presence they’ve established in certain city districts. At the end of the game, players are going to score points based on how far they’ve progressed on the Guild tracks. These points are added to any the players have earned over the course of the game to determine the winner.
Of course, this is a very high level overview of the game. If you’ve got a good idea of how things are played or just want to know what I think, feel free to skip ahead to the Thoughts section. Otherwise, read on as we learn how to play Castellans of Valeria.
Setup
A game of COV is setup thusly:
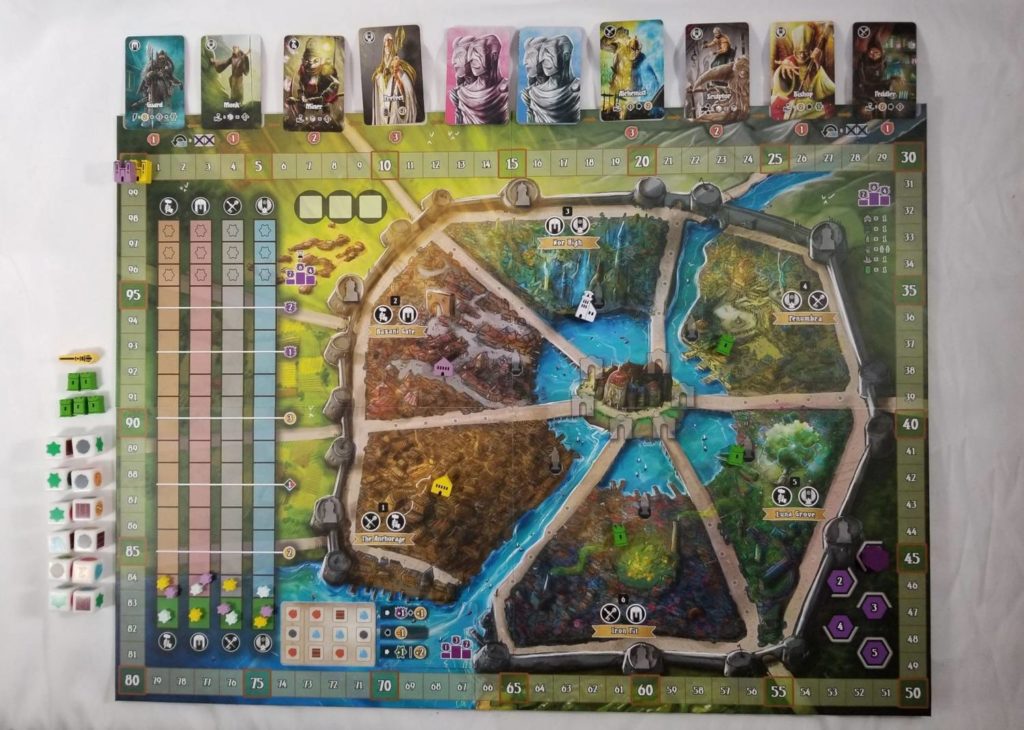
The main board is laid out between the players. The Citizen cards are separated into their different decks, shuffled, and four randomly drawn cards from each deck are splayed out above the game board. The Wharf cards are shuffled into a deck, which is placed into the marked position. The top card of this deck is drawn and placed next to the deck, face up. The Round tracker is placed into the 1 position.

Each player selects a color and receives the pieces matching their selection. They are also provided with a dual-layer player board. The various pieces are placed into their marked starting positions. There will be a few left over—four Influence counters and a Score tracker—which will be added to the main board at the bottom of the Guild tracks and the zero space of the score track, respectively.
Then, select a Start player by some means and give them the First Player token. Next, in reverse turn order, players take turns placing one of their manors (their choice of which one) into a city district which doesn’t already have a manor. As their manors are placed, they will receive an influence in each of the Guilds associated with the district. Any district without a manor, after players have placed theirs, receives one of the green Keep tokens.
And, with that, you’re ready to play Castellans of Valeria.
The Dice
COV is played with a variable number of dice equal to three times the number of players plus three. Every die features one of six icons on each of its faces: Wood, Stone, Food, two gold, Influence, or Magic.
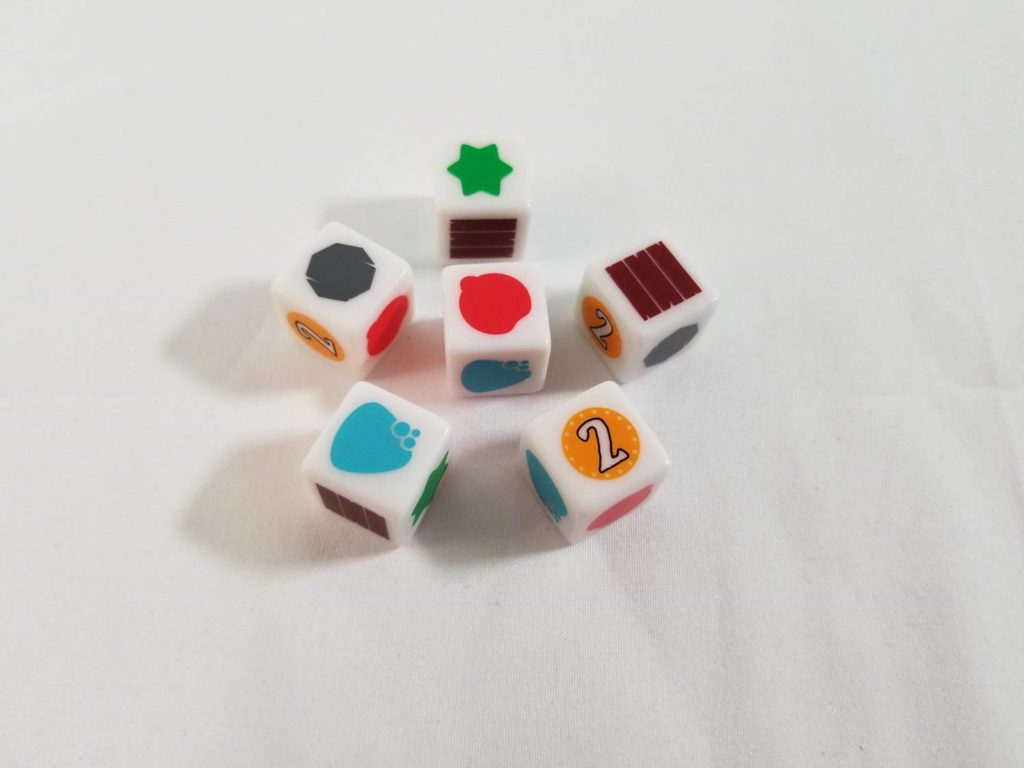
At the start of the round, the player holding the First player marker gathers and rolls all the dice. Then, in turn order, players take turns selecting one die at a time and placing them into one of the draft spaces on their player board. They then receive one of whichever resource is depicted on the face of the selected die. In the case of Influence, they move their influence counter up on a single Guild track of their choice.
Once every player has selected three dice, the leftovers are placed into their marked position on the main board. Then, players take turns performing actions with their dice, one at a time, in turn order.
The Actions
Any die face can be used to perform any of the available actions. But, each action is associated with a specific die face and using that die face to perform the action will result in the player receiving a small bonus. Some actions also have sub-actions that can optionally be performed when taking the main action. With few exceptions, most of the actions have the same goal in mind: to add your pieces into the various districts so that they will count for the purposes of area majority scoring.
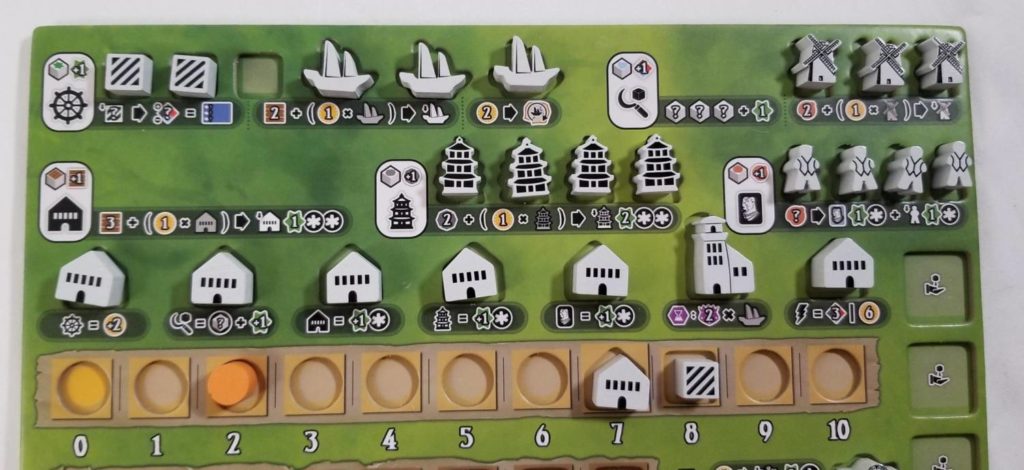
A brief summary of the actions along with their associated die faces, bonuses, sub-actions, and rewards are as follows:
Ship (Influence = +1 influence on a Guild track of your choosing) – place your Crate cubes onto the Wharf card to sell resources for money, influence, and/or victory points and/or spend gold to purchase resources. Optionally: spend Wood to build a ship and/or spend gold to move existing ships to different districts. If ships are already present in a district where you’re building your ship, you have to pay an extra gold for every other ship that’s already there.
In fact, any time you build anything at all and there are already copies of that thing present, you’re going to have to spend extra gold to build it. This is true for everything—ships, windmills, temples, and manors— so I’m only going to mention it here.
Harvest (Magic = +1 resource of your choice) – receive whatever’s showing on the faces of the dice you have drafted this round. Also, receive a single influence push on a Guild track of your choosing. Optionally, spend Food to build a windmill.
Temple (Stone = +1 Stone resource) – spend Stone to build a temple. Receive two influence pushes in each of the Guilds that are associated with the district in which it was built.
Recruit (Food = +1 Food resource) – spend Food to recruit Citizens, gaining access to their unique abilities. Receive an influence push in their associated Guild. If you have a Citizen meeple left on your board, you can assign it to a district and receive an influence push in one of that district’s associated Guilds.
Manor (Wood = +1 Wood resource) – spend Wood to add a manor to a district. Receive an influence push in each of that district’s associated Guilds. Additionally, you will gain access to that manor’s special ability. For the sake of brevity, I am not going to provide an exhaustive list of these abilities here, but most of them give an extra bonus whenever you perform one of the various actions.
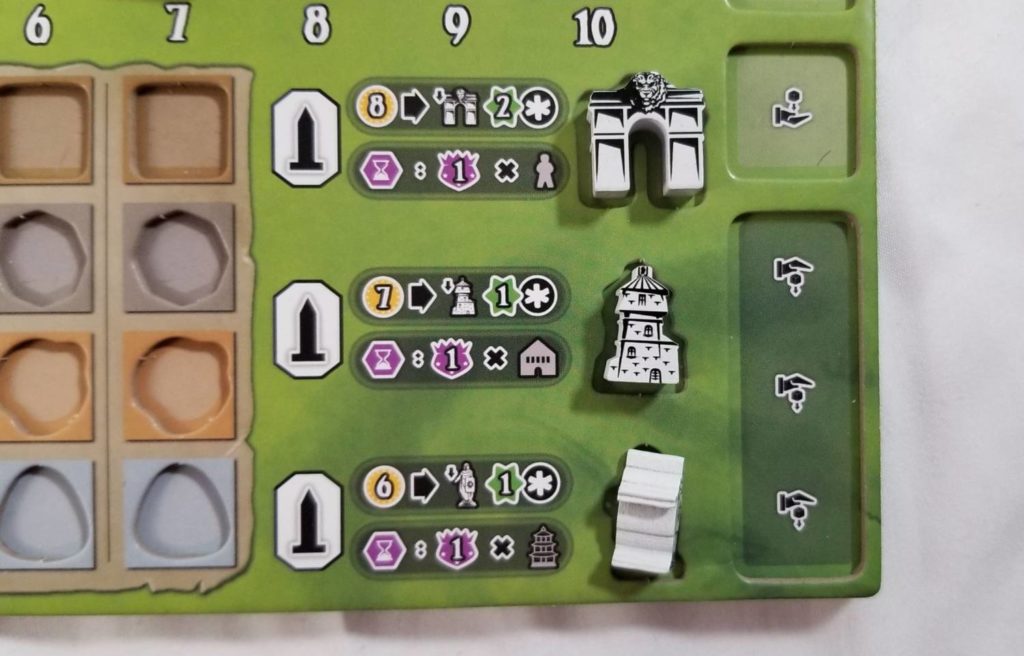
There is another action available to you that you do not need to use a die to perform: build a monument. There are three types of monuments and each district can only accommodate one of each. They are:
Gate – spend 8 gold to build a Gate and receive two influence pushes in one of the Guilds associated with the two districts that the Gate straddles.
Ward Tower – spend 7 gold to build a Ward Tower and receive an influence push in one of the district’s associated Guilds.
Statue – spend 6 gold to build a Statue and receive an influence push in one of the district’s associated Guilds.
It’s also worth noting here that the Magic resource functions as a wild resource that can act as a stand-in for any other resource (except gold) when paying for something’s cost, but you have to have spent at least one of that resource first. For example, when paying the cost of 2 Wood for a manor, you can pay one Wood and one Magic, but not two Magic.
Scoring
At the end of a round, a District scoring is performed. For each of the districts being scored that round, each player counts up the total amount of manors, towers, ships, citizens, and windmills within that district to determine the total amount of influence they have brought to bear. The player who has the most scores 6 points. Second place scores 4. Third place scores 2.
Then Monument scoring is performed. Each Gate scores its owner points equal to the total number of Citizen meeples present in the districts it straddles. Each Ward Tower scores points for every manor within its assigned district. And Statues score points for temples.
Finally, Wharf card scoring is performed. The player with the most Crates assigned to the card scores 3 points. Second and third score 2 and 1 points, respectively.
Once these scorings have been completed at the end of the fifth round, the different Guild tracks are assessed to determine who has the highest influence in each. First place is awarded 6 points, second is awarded 4, and third is awarded 2.
The player with the highest overall score wins.
Thoughts
Imagine, if you will, a pile of small tiles, each etched with the name of a tried-and-true board game mechanic. Then, imagine placing these tiles into a bag, giving it a good shake, and drawing a few out of the bag. These freshly drawn tiles are your ingredients for your next game.
Now, it’s highly plausible that the tiles you’ve drawn are going to fuse together into some abomination that can only be loosely called a game. But, it’s just as plausible that those ingredients will coalesce into something heretofore unseen, something mind blowing. Then again, your assortment of mechanics may just bond together to form a game that, while interesting and engaging, is nothing you haven’t seen before.
That last one describes Castellans of Valeria to a tee. There’s nothing here I haven’t seen before. But what is here has been done well. The pieces fit. I like the game just fine. When I play, I’m invested, but I’m not blown away.
Well, that’s not entirely true. I love the artwork. I am, and probably always will be, a huge fan of The Mico. His style appeals to me. And, if I’m being honest, I think it’s his artwork that really carries the game. It brings just the right amount of energy to the proceeding to make what you’re doing feel exciting rather than just the above average experience it would otherwise be.
This isn’t to say that COV is a bad game, because it isn’t. There are some interesting things going on.
Deciding which dice to draft and what to do with them offer up some challenges. Is there a die in the pool that’s under-represented? Do you draft that die to deny it to your opponents? Or do you draft dice you actually need? Do you draft a die for its resource or do you draft a die in anticipation of the bonus it’ll provide when you use it for an action later? And, which actions should you even take?
The area control aspect will dominate your strategy. Do you spread yourself out in anticipation of future scoring or do you laser focus on the current round and deal with the next when it comes? And you can’t forget the Guild tracks either. Maybe you should turn your focus to remaining competitive there and let that influence when, and where, you decide to build things. Or maybe you try to play a more balanced game and do a little bit of everything all at once.
All in all, COV gets more right than it gets things wrong. But it does get a few things wrong. In my playthroughs, I ran into some snags: some clarity issues, some things that don’t make sense thematically, and a few rules goofs. Much to the publisher’s credit, when I reached out to Daily Magic Games with my concerns, most of them were addressed right away. So much so, in fact, that I’m only left with two concerns.
Firstly, the way that the top of the Guild tracks works out bothers me. At the top of each track are three stars. The person that reaches the top of a track first places their marker on the lowest star. If another person reaches the top after them, that player’s marker is placed onto the star above theirs. When final scoring is performed, the person highest on the track will score the most points for that track.
Let’s say that the Magic Guild sets up shop in Kosk and I am such a firm believer in their cause from Day 1 that I race up to the top of that track way before anyone else does. My loyalty to the Guild is without question. I’ve had their back since the get-go. Then, years later, another person becomes equally involved in the Guild’s affairs. And then, for some bizarre reason, they give that person preferential treatment? How does that make sense? Your star’s not locked in place and you can always gain influence to keep moving up, but wouldn’t it be simpler to just move the first person to top out their influence in a specific Guild into that top position?
Then there’s the issue that arises during the setup of a four to five player game. During setup, each player places a manor into an open city district. Since the players know exactly which of the six city districts will be scoring at the end of the first round (there are three of them), those first three players placing their manors, in every game that I have played so far, place them into one of those three city districts. The other players have to place their manors into districts that won’t score until the end of the following round.
While it may seem like everyone’s at an equal disadvantage because those first to place will experience at the end of the next round what players the last to place are experiencing now, it isn’t exactly the same. At the start of round two, players that placed first will have resources at their disposal to overcome the difference that the others did not enjoy at the start of round one. And there’s nothing in place to help them overcome this shortcoming. If, during setup, fate decides you’re placing in the fourth or fifth position, then you’re already at a disadvantage.
Admittedly, I haven’t played hundreds of games of COV and this disadvantage may not equate to much, but it sure feels like it does. In the few games where I wound up late in the turn order, it felt like I was constantly having to play catch up. Maybe that feeling could have been quelled by throwing some extra coins or a few extra resources (or maybe even a windmill) my way at the start of the game—anything to give me a competitive edge, or at least the illusion of one. You may argue that going first IS my advantage, but it never really feels like one.
Putting that aside, though, I’ve enjoyed my time spent with Castellans of Valeria. While I never walked away from the table dreaming of the next time I’d get to play it again, I did walk away from the table fully satisfied. I felt like my time had been well spent. For the time I was playing, I was fully engaged.
Castellans of Valeria may not have blown my mind, but I was entertained. Sometimes that’s enough.
Castellans of Valeria details
- Designer: Isaias Vallejo
- Artists: Mihajlo Dimitrievski
- Publishers: Daily Magic Games
- Release Date: 2023, 2024
- Player count : 1 - 5
- Age range : 14+
- Time range : 60 - 120 minutes
- Mechanism(s): Action Drafting, Area Majority / Influence, Dice Rolling, Variable Player Powers
- BGG Geek Rating: 7.7215 - converted to Meeple Mountain scale: 4.0.
- More articles about Castellans of Valeria.