Hello and welcome to ‘Focused on Feld’. In this series of reviews, I am working my way backwards through Stefan Feld’s entire catalogue. Over the years, I have hunted down and collected every title he has ever put out. Needless to say, I’m a fan of his work. I’m such a fan, in fact, that when I noticed that there were no active Stefan Feld fan groups active on Facebook, I created one of my own.
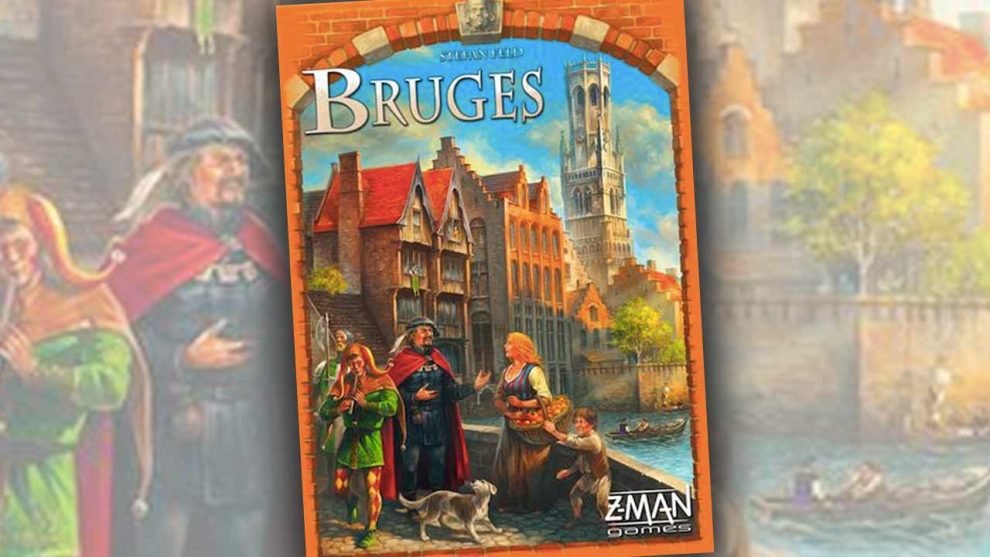
Today we’re going to talk about 2013’s Bruges, his 18th game.
In the Feldiverse, Bruges holds a couple of important distinctions. For starters, it’s Feld’s very first game to feature multi-use cards (and arguably one of the best games in existence to have ever done so). Secondly, it was the first game selected to be overhauled for the much lauded Stefan Feld City Collection from Queen Games. What us old-timers know as Bruges, future generations will know as Hamburg.
Overview
In Bruges, players take on the roles of merchants who work to maintain their relationships with those in power in the titular city while competing against one another for influence, power, and status. This is accomplished through the aforementioned multi-use cards. On a player’s turn, they will have a hand of cards that they can discard to build canals, gain workers, construct buildings, influence townspeople, and more. In total, each card has six different uses. During setup, the deck of cards is split into two and the running out of one of these decks functions as the game’s timer. When the timer runs out, one final round is played and the player with the most points wins.
Of course, this is an oversimplification. It doesn’t even touch on the way that the dice rolls affect things, having to contend with the impending doom of the game’s threat mechanic, or the reputation track. But, if you are already familiar with the game, or think you’ve heard enough, and just want to know what I think, feel free to skip ahead to the Thoughts section. Otherwise, read on as we learn how to play Bruges.
Setup
A game of Bruges is set up thusly:
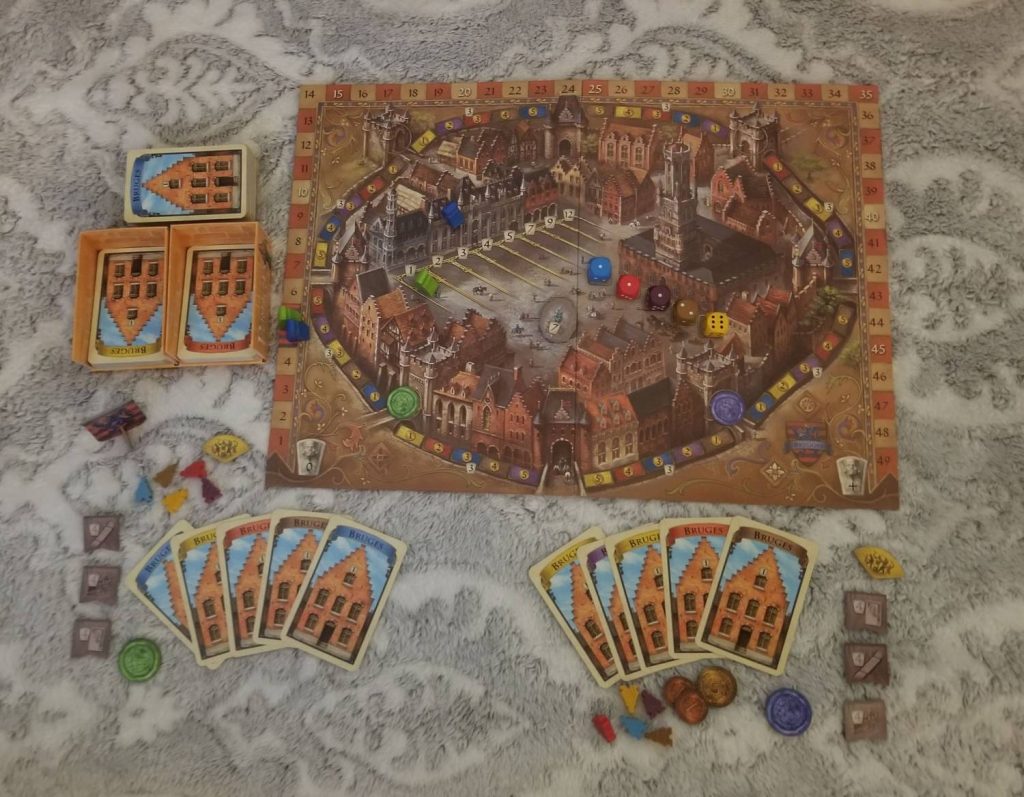
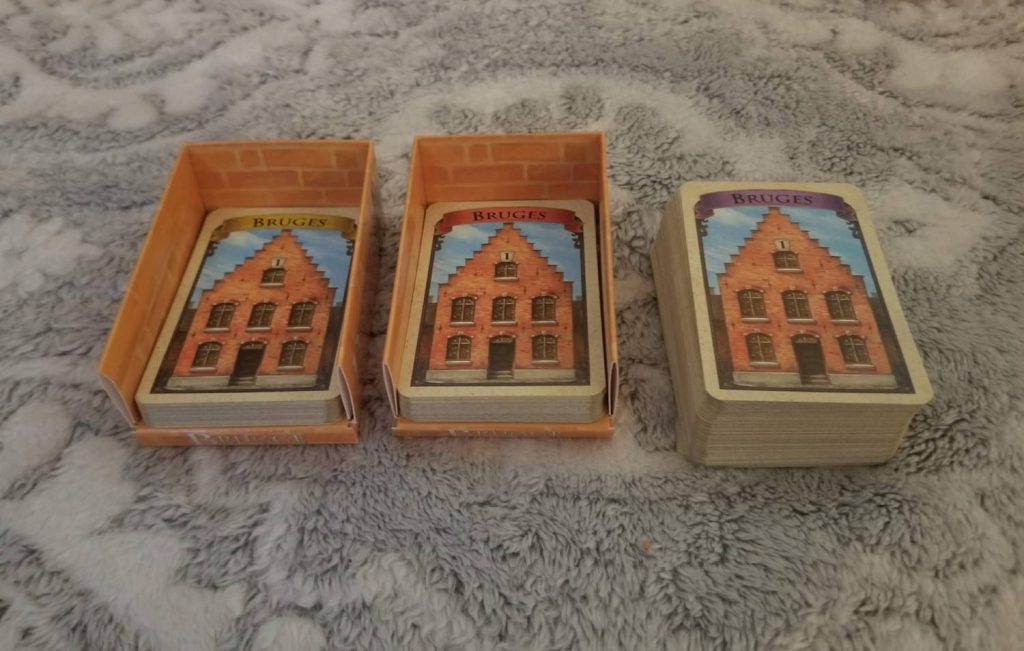
After laying out the game board, the 50/100 scoring tokens are placed in a stack at the end of the score track, the statue tokens are placed in ascending order onto the statue space, and the cards are shuffled together to form a deck. This deck is then divided into five roughly equal stacks. Select one of these stacks per player, shuffle them together to form a new deck, then divide it into two and place each of these smaller decks into the cardholders with the building side face up. The remaining decks are stacked together and placed off to the side for the time being.
Now, each player selects a color and receives the pawns and emblems in their color. The smaller emblem is placed onto the guard house that is closest to them. The larger one is there primarily to remind the player which color represents them. One of their pawns is placed onto the fifth space of the scoring track. The other is placed onto the starting location of the reputation track. Each player also receives one of each type of majority marker (placed grey side up), one worker in each of the five colors, five guilders (the money in the game), and one of each Overview card. The threat markers, remaining workers and guilders, and the canal tokens are kept in a general supply close by.
After selecting a start player, and giving them the start player emblem, they are given the five dice and you’re ready to go.
A Round of Play
The actual round structure for Bruges is simple:
First, each person draws cards until their hand total is five. Next, the person holding the start player emblem rolls the dice and then places them into their locations on the game board without changing their pip values. Then, if there are any fives or sixes, each player receives a threat marker (which we’ll discuss shortly) of the matching color. This may cause some players to succumb to one or more of the threats. Once that’s been handled, the total value of the ones and twos is added together and players will be presented with the option to pay that amount of guilders to move up one space on the reputation track. Then, players will take turns playing cards from their hands until each has played four. Then, the round ends. Majorities are verified (more on this later), the start player emblem passes to the next person, and a new round begins.
While the round structure may be simple, the gameplay is anything but. To better understand how each of the elements I’m going to discuss tie together, it’s essential for us to examine the layout of the multi-use cards.
Anatomy of a Card
Every card in the game shares some attributes with every other card:
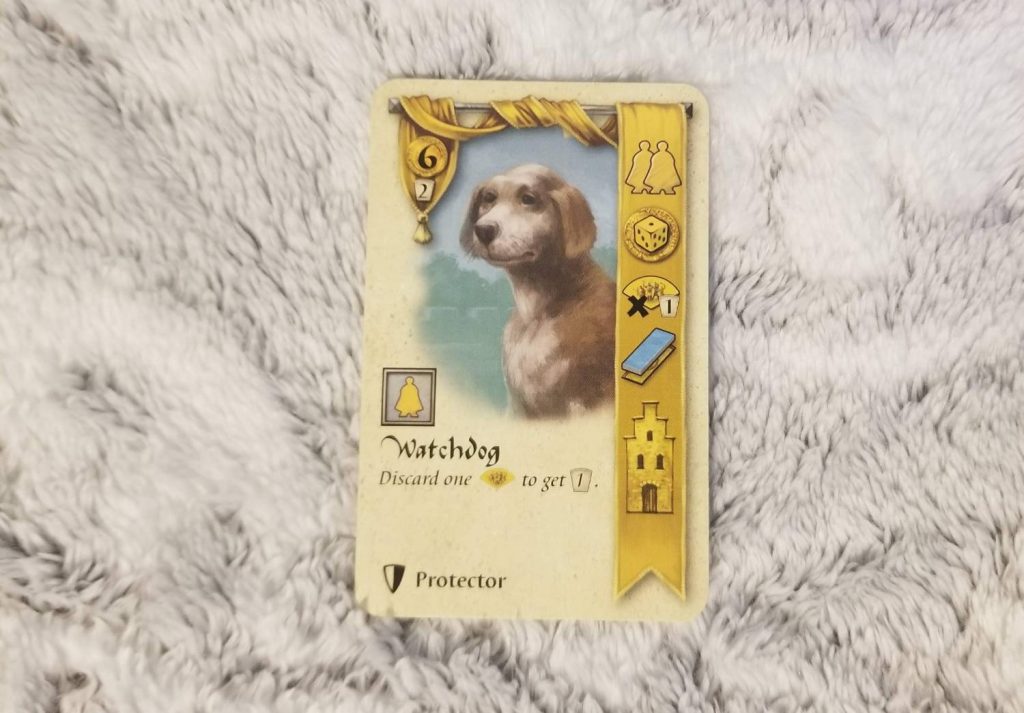
Along the right side of the card runs a banner containing icons that depict five of the six possible actions that can be performed with the card. The top action allows you to discard the card to gain two workers matching the card’s color. The next one allows you to discard the card to gain a number of guilders equal to the current value of the die matching the card’s color. The third one allows you to discard the card to discard a matching colored threat marker from your play area and gain a victory point. The fourth allows you to discard the card to construct a canal space matching the card color (more on this later). The fifth allows you to pay a matching color worker to flip the card over to use as a house matching the card’s color, which leads us to the sixth action that you can perform with the card: add the person to your tableau.
In order to add a person to your tableau, two conditions must be met: you must have an empty house for the person to live in (the color of the house doesn’t matter) and you must pay the card’s cost in guilders. The card’s cost is found at the top left of the card. Directly beneath that is an icon which denotes how many victory points the card will be worth at the end of the game if it’s still in your tableau.
The lower portion of the card contains a grey box featuring an icon which denotes the card’s timing. Some cards have immediate effects, some are end of game effects, while others are ongoing. And some may only fire off if a worker of a particular color is paid. Beneath this is the card’s title and its effect. Finally, at the bottom of the card is its type. The card type might be important because some card effects specifically refer to specific card types.
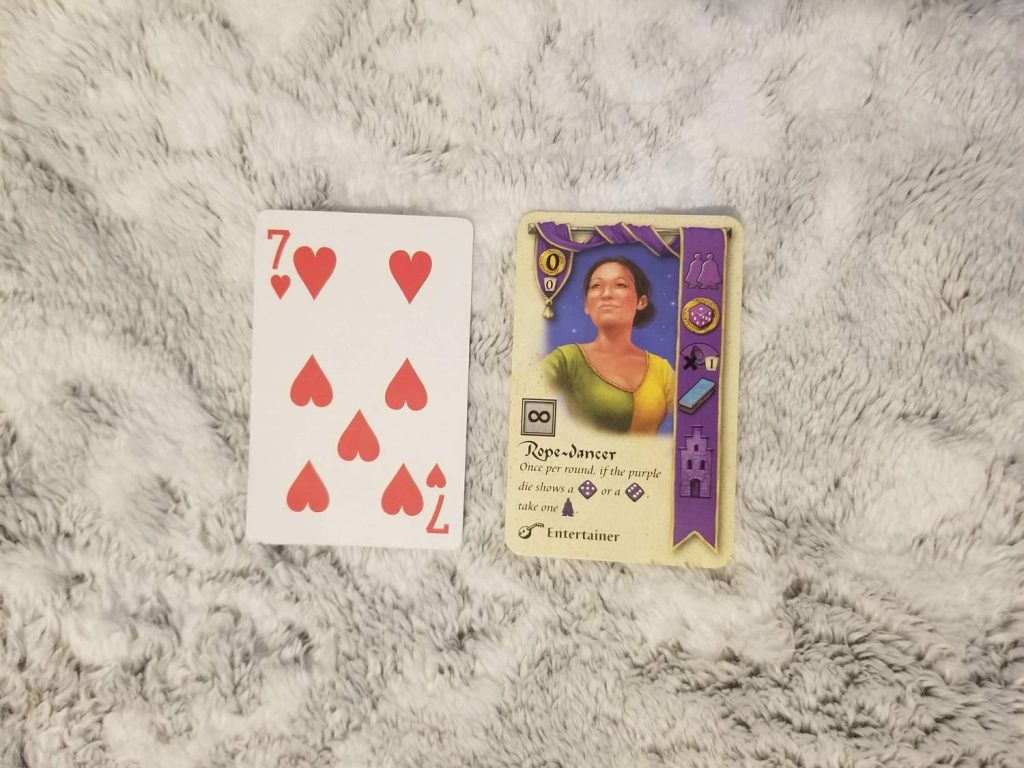
As an example, consider the Ragman.
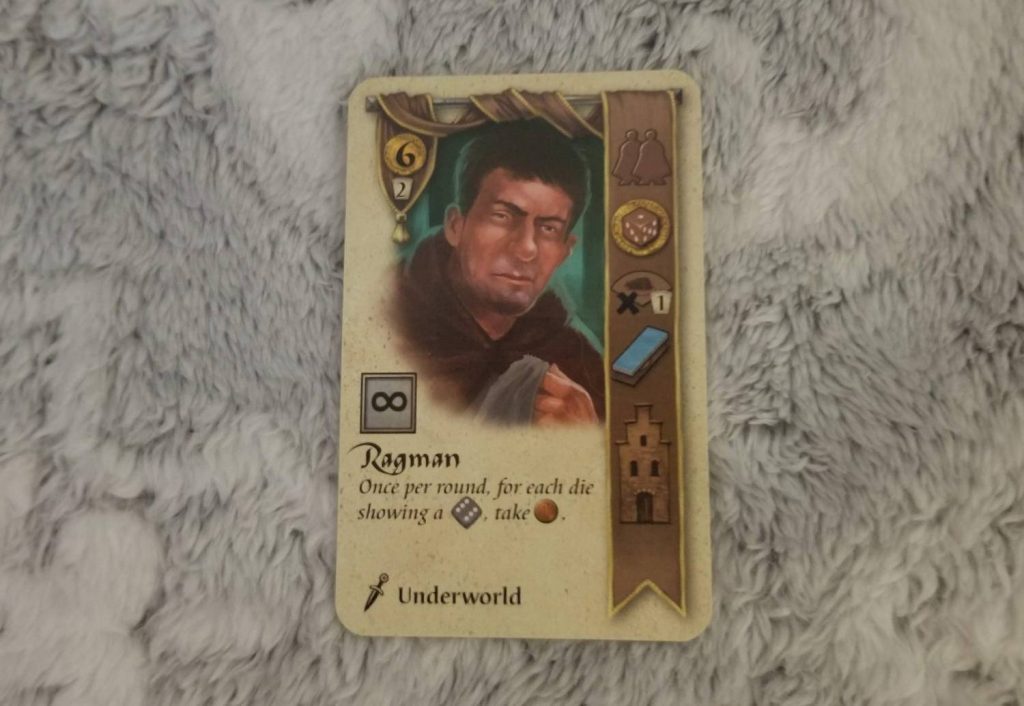
The Ragman costs six guilders to bring into play and is worth two victory points at the end of the game. His is an ongoing effect that reads: “Once per round, for each die showing a [value of six], take a guilder”. And his type is ‘Underworld’.
Decisions Aplenty
Before you’ve even begun the first round, Bruges is already forcing you to make some tough decisions. Which stack(s) do you draw from? At the beginning of the game, there’s very little to steer your decision other than the color of the spaces to either side of the guard house you’ve marked with your emblem. In order to construct a canal, you’ve got to discard a card matching the color of the space and also pay an amount of guilders equal to what is printed on the space. These spaces have to be built in succession and each is more expensive than the previous one. Once you build the third space of either canal track, you earn three victory points at the end of the game. Reach the end and you take the topmost statue tile, which will earn you victory points at the end of the game equal to the statue’s value. This is usually the guidepost at the beginning of the game. You know at least two of the colors you need, and an informed decision is always better than an uninformed one.
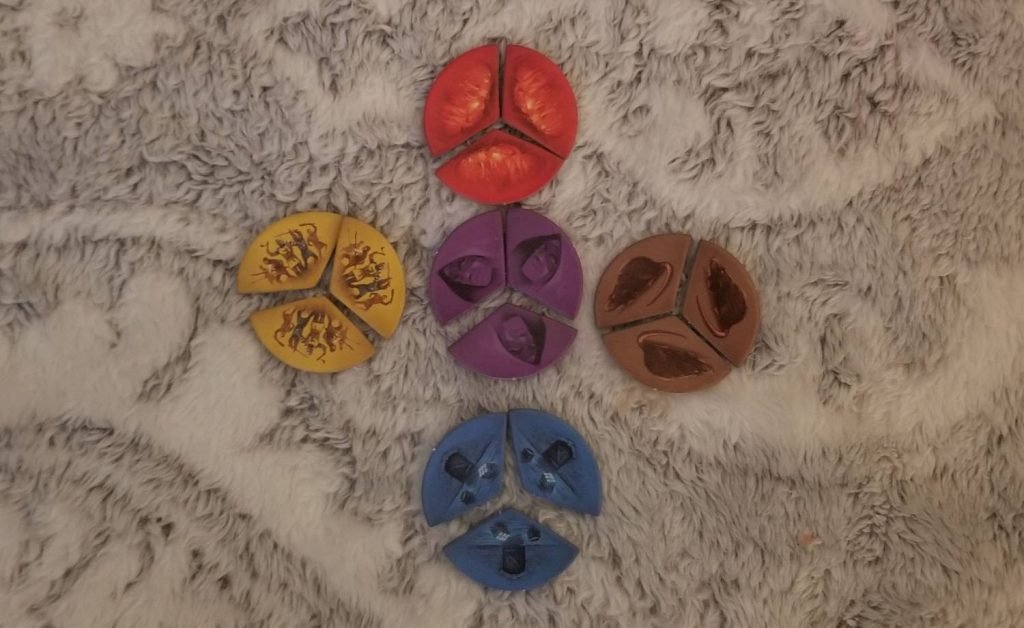
But, it’s not guaranteed you’ll actually draw any of these colors. The only information about the decks that’s available to you at any given time is the color of the cards that are on top of the decks. So, maybe you’ll want to diversify. For instance, since the value of each of the dice determines how many guilders you’ll receive from discarding a matching colored card, diversifying would give you greater earning potential. Diversifying would also give you greater potential to get rid of a wider range of threat tokens. Each threat token, shaped like a pie wedge, comes in a specific color that’s associated with a specific negative effect—losing all of your gold or workers, for example—and completing the pie (three slices) will cause that effect to trigger.
And, as the game goes on, your previously played cards will begin informing (and muddling) your decisions. For example, the ‘Marble Dealer’ gives you extra guilders any time you take guilders using the yellow die. Knowing this, you may want to take a higher percentage of yellow cards. But those other concerns are still there, so you can’t ignore them entirely.
And that’s just drawing cards. Once you get to your actual turn, the heat really gets turned up. You’re only going to get four actions, so you’ll have to figure out a way, using the cards you’ve been dealt, to eke out as many points as you possibly can. The easiest way to ensure at least twelve of those points is to focus on the three types of scoring majorities: having the most canals, being furthest along the reputation track, and having the most people assigned to houses. At the end of the round, if you have the majority in any of these, then you get to flip the matching majority marker face up which scores you four points at the end of the game. And once a marker’s been turned over, you’ll never lose it, even if someone else gains the majority in the categories you took the majority in earlier.
Other considerations are driven by external forces, such as your threat markers. Have two blue threat markers already? If you get one more, you’ll lose all of your workers. So, unless you’ve got a plan to immediately use any workers you may gain this turn, gaining more workers is going to be a risky endeavor. You MIGHT get to carry them over to the next round, but it’s just as likely that a blue five or six will get rolled and cost you your workforce. And if you’ve already got a large workforce? Then you’ll most likely want to find ways to use as many of them as you can, since there’s a decent likelihood you’re going to lose them all anyway. Then again, you can stave off disaster by discarding a blue card and simply removing a threat marker, but that just means you’ll have to deal with it further down the road.
Like the title of this section implies, in Bruges, there are decisions aplenty. And stop thinking about Colin Farrell. I said “in Bruges”. Not “In Bruges”.
End Game
When either of the decks runs out during the drawing cards step of the round, the game ends once that round is complete. If the deck runs out during the actions phase, the current round is finished and another is played. Regardless of how the deck is emptied, the large deck that was set aside during setup comes into play. If the other deck runs out after this, the remaining deck is split in two. There should always be two cards to choose from at any time you would draw a card.
Once the game is finished, end game scoring is performed thusly: each recruited person scores its victory point value; each house constructed earns a point; any ‘end-of-game abilities score their points; each face up majority marker earns its owner four points; each third canal space reached earns its owner three points; collected statues earn points; and points are rewarded based on the player’s position on the reputation track. The person with the most points is the victor.
Thoughts
As I mentioned earlier, Bruges’s use of multi-purpose cards is inspired and serves as an excellent example of what can be achieved with the mechanic when it is used well. Most Stefan Feld fanatics will tell you that Bruges is one of Feld’s best designs, and they aren’t wrong. Every decision you make in favor of one thing comes at the cost of something else. It’s a highwire juggling act, complete with a tumbling routine, with a million different objects in the air. This is one of those things that Stefan Feld consistently does well. It’s a large part of why he’s such a well-respected designer.
I love Bruges. I love the way that the various mechanics intertwine. I love the challenges it presents and the way that it makes me have to carefully consider each and every move that I make. I love the way that it makes me feel. But, I recognize that even with all of its many strengths, there are some aspects of Bruges that maybe aren’t that great.
The biggest issue, the one that’s in your face right from the get-go, is the luck factor. There is no denying that luck plays a significant role here. I’ve had games where I started with a hand of cards that all cost between nine and twelve guilders to play and not a single one of them matched the colors of either of my starting canal spaces or any of my threat markers. And rounds like this aren’t an outlier. They happen with a high degree of frequency and there’s nothing you can do to mitigate it. Whereas some games have a built-in mechanism for using multiple things you don’t want as a stand-in for something that you do, like Bonfire for instance, Bruges has no such mechanic. You’re stuck with what you get and just have to make the best of it.
Some comfort can be taken knowing that everyone suffers from the same problem, but it’s small comfort when you seem to be the only one experiencing it. Fortunately, there’s an easy variant that fixes this. The average game at any player count is between eight and nine rounds. So, just separate the cards into multiple decks by color and then play for eight or nine rounds. There’s still an element of luck involved when it comes to the actual content of the cards, but this will give you some control over which colors you’re able to pick up at least.
The other issues are minor in comparison (and may not bother you at all).
For starters, the theme can start to get a little wonky if you think about it too much. Consider the act of recruiting people, for instance. Why would a princess living in her high castle agree to come live in some hovel that some random merchant built for her to live in? And there’s a dog in the game as well. Why does a dog need its own house? Why does recruiting the dog cost me six guilders? What use does a dog have for money? Its ability lets me pay a yellow worker to remove a ‘raid’ threat marker. Thematically, the concept of the dog barking at the sound of approaching footsteps as an early warning system makes sense. But why does it come at the expense of a worker? Maybe I just overthink these things, but surely I’m not the only one.
And then there’s the aesthetic. I love the aesthetic. Don’t get me wrong. But I recognize that everything in the game just looks…dirty? Yeah, that’s a good word. All of the cards in this game look like they’ve been in circulation for years and manhandled multiple times a day. When I broke out the game to play in preparation for this review, I had to do a double take. How had my cards gotten so dirty? And then I realized that this look was intentional, which makes sense in a way. For a game that takes place in the era following the Middle Ages, right in the thick of the European Renaissance, the artwork evokes a feeling of antiquity. For me and my tastes, I think the artwork in Bruges is representative of Michael Menzel at his best. It’s even more impressive when you consider that, aside from the stellar box cover artwork, there are 165 unique character cards in the game. But I can see where other people would disagree. When people offhandedly dismiss “beige euros”, Bruges is one of those games they’re talking about.
There’s also the awkward card set up. Having to break the deck into smaller decks, shuffle them, recombine them, and then shuffle everything again just feels weird. I can understand the need to make sure everything is shuffled well and to set some sort of game timer. But still… *shudder*.
None of that stops me from playing the heck out of it, though. I just can’t get enough. Bruges, for its faults, is really fun. If you’re one of those “try before you buy” types, you’re in luck. Bruges is available, along with its expansion, to play on Yucata, free of charge. Be aware, if you do decide to add it to your collection, though, it might be hard to find. It’s been out of print for awhile now, so it sells on the secondary market for a premium (especially if its expansion is added in). But if you can get your hands on a copy, you won’t be disappointed.
Oh, and it’s worth mentioning, if you’d like to try out Bruges for yourself, it’s freely available to play on Yucata!