
Introduction
Splotter Spellen has recently taken fame due to their modern classic: Food Chain Magnate (FCM). Built on top of simple mechanisms, FCM is infamous for its rich and deep gameplay, taking 3+ hours per game. As good as FCM’s gameplay is, I don’t always have the time to bang out a game, especially if I’m teaching new players or want to follow certain strategies. The Great Zimbabwe (TGZ), the focus of this review, is as good a logistics puzzle as FCM, just packaged into a game that takes under two hours.
In TGZ, you’re a tribe in ancient Zimbabwe and your goal is simple: build monuments to worship the gods, and do that better than the tribes around you. You’ll accomplish that goal by hiring craftsmen and spending cattle to capitalize on the available resources around you. Resources are limited, so it is vital to win out in the unique turn order auction and to choose a god to give you game-breaking powers which you will need to overcome your opponents. Though TGZ is not a mean game per-se, it definitely is a knife fight in a phone booth where each player’s fate is entirely in their hands.
Gameplay
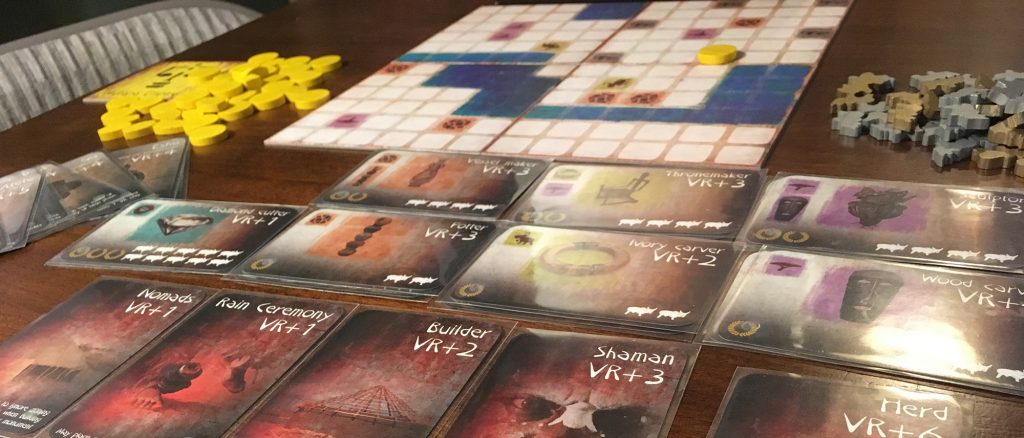
The core gameplay of TGZ focuses on building monuments to worship the gods. On your turn, you can pay to hire craftsmen which exhaust resources, resources any player can use to build their monuments. If you’re building a monument from level one to level two, you need one type of resource, from level two to level three you need two types of resources, etc up to level five. A level one monument scores you one point, level two scores you three points, up to a level five monument scoring you 21 points.
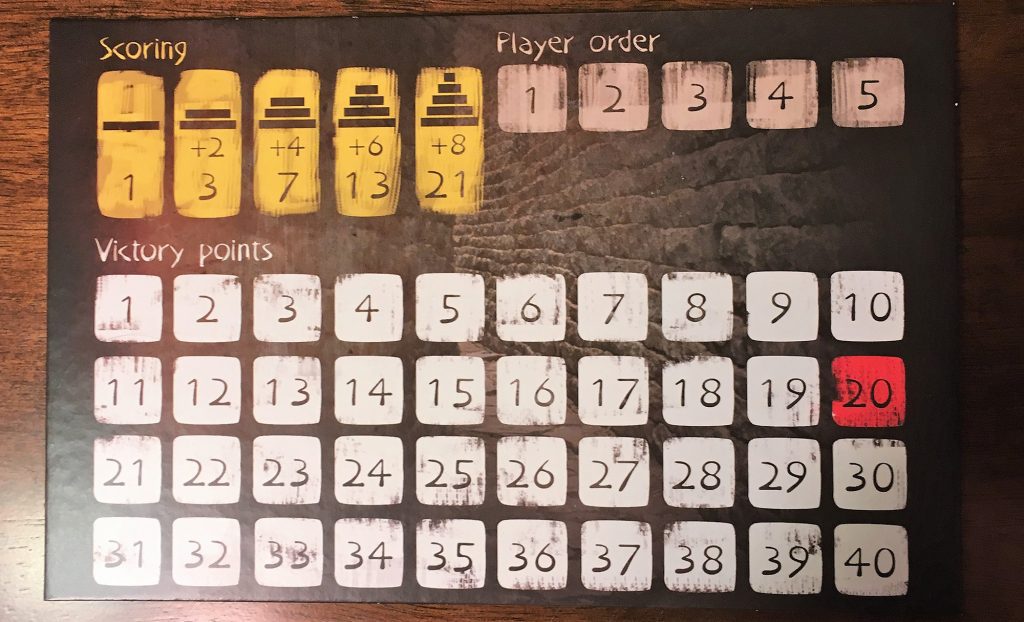
At the start of the game, all players have a victory requirement (abbreviated as VR on many cards) of 20 points. The goal of TGZ is to be the first player to meet or exceed their victory requirement. This victory requirement is a moving target in the sense that several things you do throughout the game will increase your victory requirement, but more on that later.
Range
One of the most important concepts of TGZ is the range that craftsmen operate. Craftsmen operate by exhausting resources that are within a range of three spaces to provide monuments with the goods needed to grow. The monument to which the craftsman is providing resources needs to be within the range of the monument as well. The game board also contains water spaces. Connected water spaces count as one space of movement when calculating range.
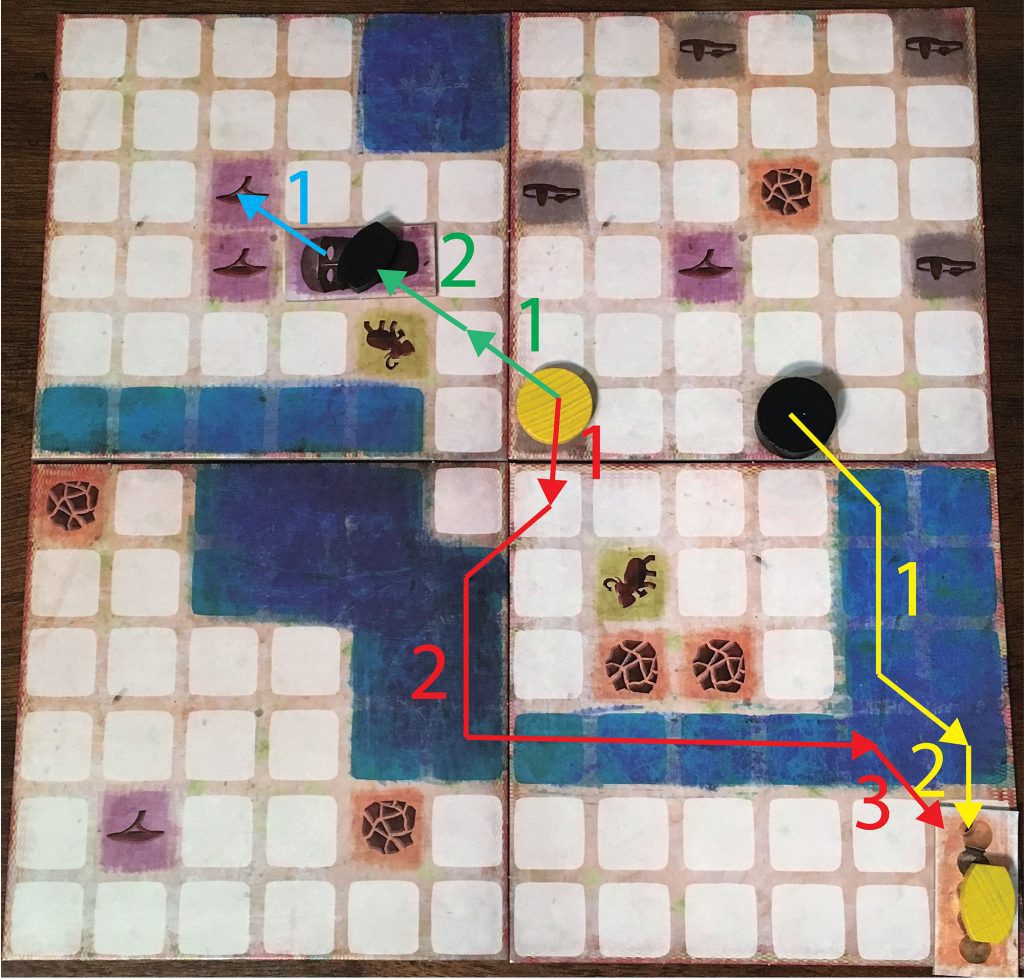
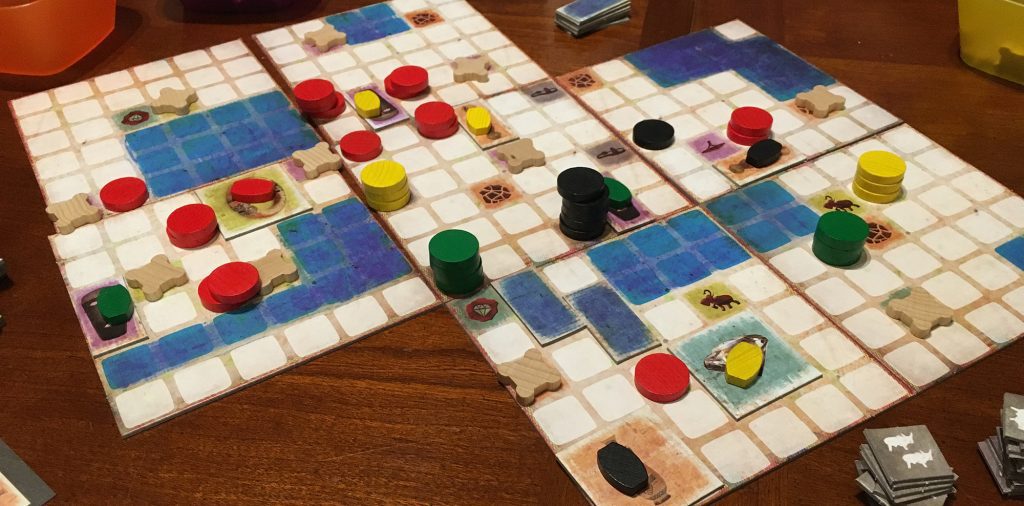
An example of range in TGZ. The black player is two spaces away from the yellow player’s clay craftsman, the yellow player is two spaces away from the black player’s wood craftsman, and the yellow player is three spaces away from her clay craftsman. The black player’s wood craftsman has access to the two wood resources it is adjacent to. Other connections are available, but only these are shown for simplicity.
As craftsmen are providing monuments with resources they can also use “hubs” to transport goods. Hubs are monuments used as intermediary jumps to create a route to the destination monument. Each hub needs to be within three spaces of the previous hub (or the craftsman or destination monument). For each hub used to transport a resource, the player pays one cattle (TGZ’s currency) to the bank.
Craftsmen
One possible action for your turn is to place craftsmen. If you choose to place craftsmen, you are first able to select a new craftsman type. When you do this, you increase your victory requirements by the amount listed in the upper right-hand corner of the card. You can then place new craftsmen onto the board by paying the cost in cattle listed on the card and you score victory points equal to the laurels shown on the card.

As you place a primary craftsman, it must be in range of at least one resource of its type that no other primary craftsman of that type has access to.
After you have placed new craftsmen, you can set the price (from 1-3 cattle) to use the craftsmen for each craftsmen that you have.
Monuments
The second option you can take is to either build a new monument or raise your monuments. If you want to build a new monument, you simply place a new monument on the board that is not immediately adjacent to another monument. When you do this, you immediately score a point.
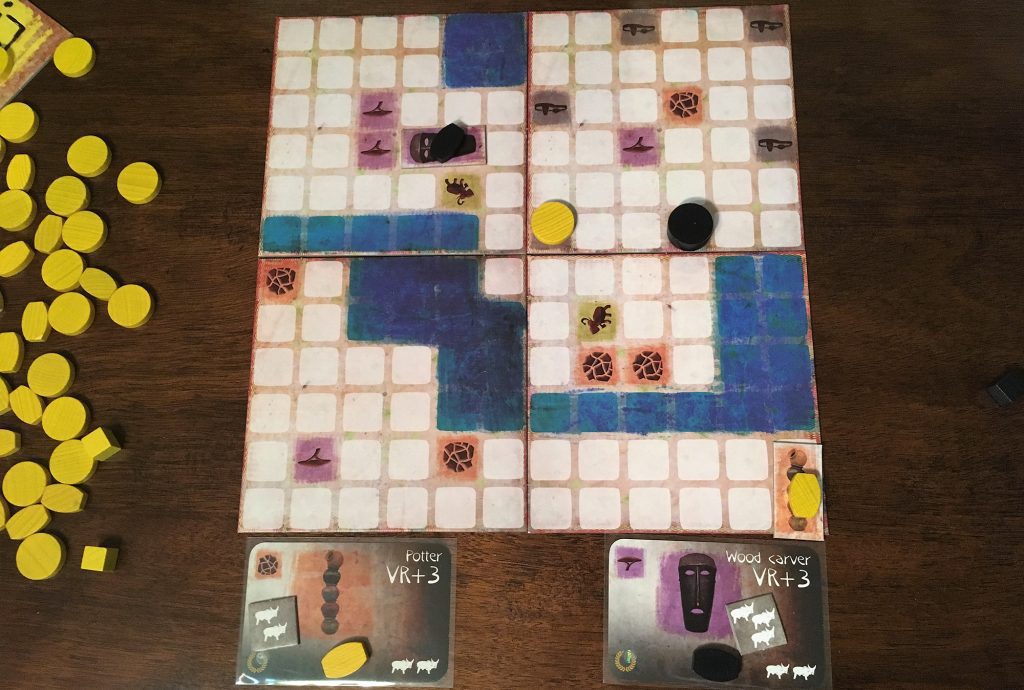
If you choose, instead, to raise your monuments then you can use craftsmen and the resources available. You can raise each of your monuments by one level, assuming you have the resources available to raise the monuments. In order to raise a monument you need to use different types of goods, provided by craftsmen, equal to the monument’s current level. For instance, to improve a monument from level two to level three you could use a wood and stone resource. As you use the resources, you must pay the owner of the craftsmen the cost they have set for it and you must cover up the resource used, making the resource unavailable to other players.
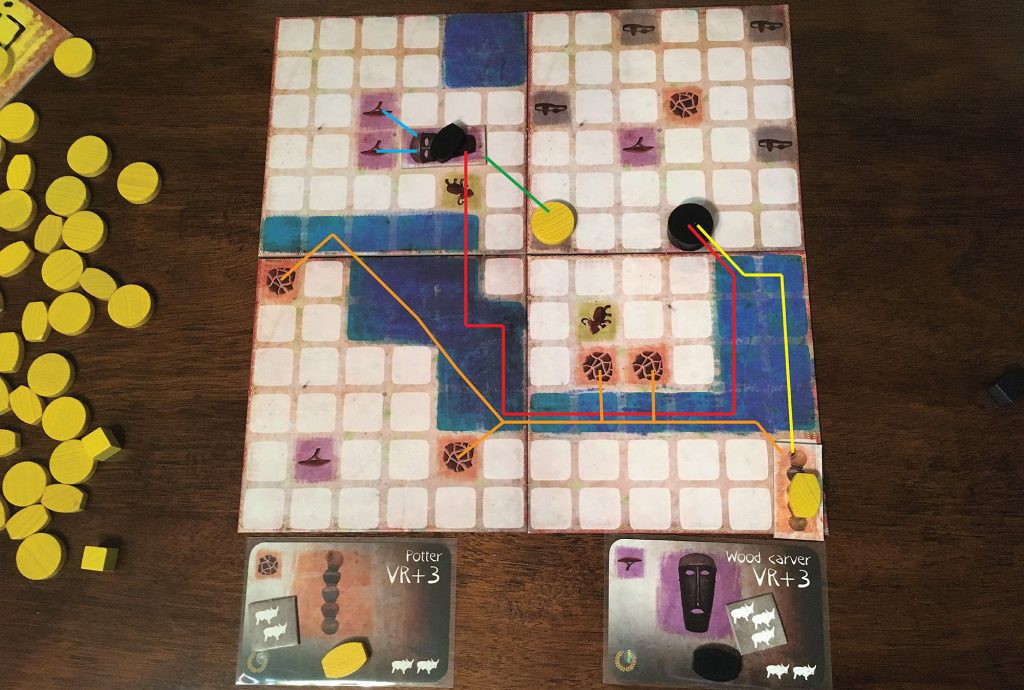
An example of raising monuments. The black player can raise her monument from level two to level three by using the yellow player’s clay craftsman and paying her two cattle and using her wood cratsman and paying herself three cattle. Afterwards, she selects which wood and clay resources to exhaust. The yellow player can then raise her monument from level one to level two using the black player’s wood craftsman and paying her three cattle. Finally, she exhausts the remaining wood resource.
Secondary Craftsmen
As the game progresses, secondary craftsmen can be built. These craftsmen require both a standard resource from the board and a resource produced by a primary craftsman. Secondary craftsmen require the input from one type of primary craftsmen and a basic resource on the board. Once a secondary craftsman of a type has been built, the clans only want the resource from the secondary craftsman which means the primary craftsmen space may no longer be used. The same rules for the primary craftsmen apply for the secondary craftsmen. As a note, I typically don’t teach secondary craftsmen at the start of the game when teaching new players, I tend to wait for 2-3 turns before unleashing them.

Turn End
Once all players have taken their turns, players take cattle from the bank equal to the level of their highest monument. All resource markers are removed from the board. Finally, players check to see if anyone has reached their VR and if anyone has, the game ends. If not, the game continues.
Turn Order
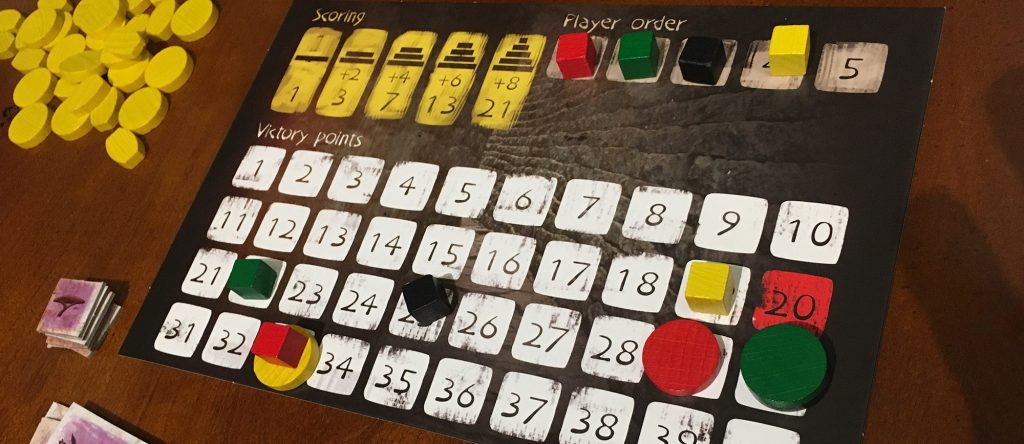
At the beginning of the turn, players bid for turn order. Though this is the first thing players do each round, I’m bringing it up last because it’s hard to understand its importance without discussing resource scarcity and the rush to raise your monuments. The players arrange their special bidding boards in order from highest VR to lowest. In this order, players can then bid for turn order.
When it’s your turn to bid, you must bid at least one more than the player before you or pass. If you pass you move your turn marker to the next open spot at the end of the turn order (if you’re first to pass you go last, second to pass you go second last, etc). If you bid, you start placing cattle on the player boards where the player before you left off. See the example below.
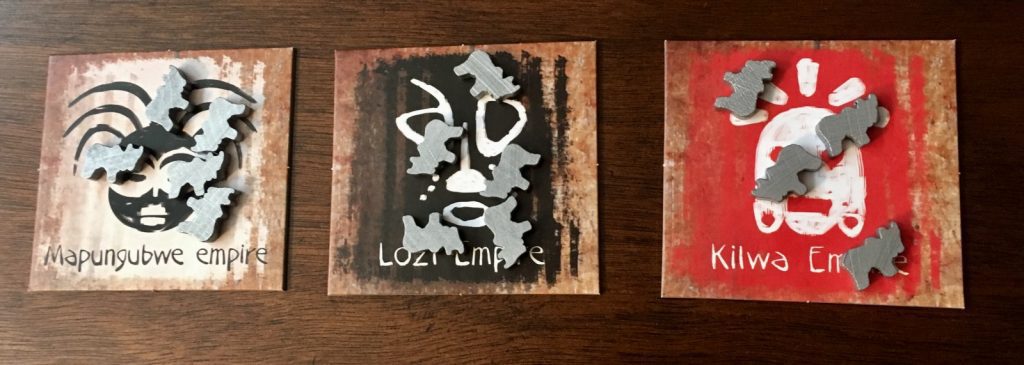
The turn order bidding mechanism. The Mapungubwe empire start by bidding two cattle (one on their tile and one on the Lozi Empire). The Lozi Empire bids three cattle (one on the Kilwa Empire, one on the Mapunqubwe empire, and one on the Lozi Empire). The Kilwa Empire then bids four cattle (one on the Kilwa Empire, one on the Mapungunbwe empire, etc).
The Mapungubwe empire player then passes and places her turn order marker on the third player spot. The Lozi Empire player then bids five cattle. The Kilwa Empire then passes and places her marker on the second player spot and the Lozi empire player places her marker on the first player spot.]
Once all players have passed, any cattle on their player boards goes into their personal supply and the next round begins.
God Cards and Specialists
The final thing you can do on your turn is choose a god to worship (assuming you have not already chosen one) or choose a specialist, and then adjust your VR accordingly. Gods give you special powers that, throughout the rest of the game, will change your course of play. I won’t go through all of the gods, but I’ll highlight some of my favorites.
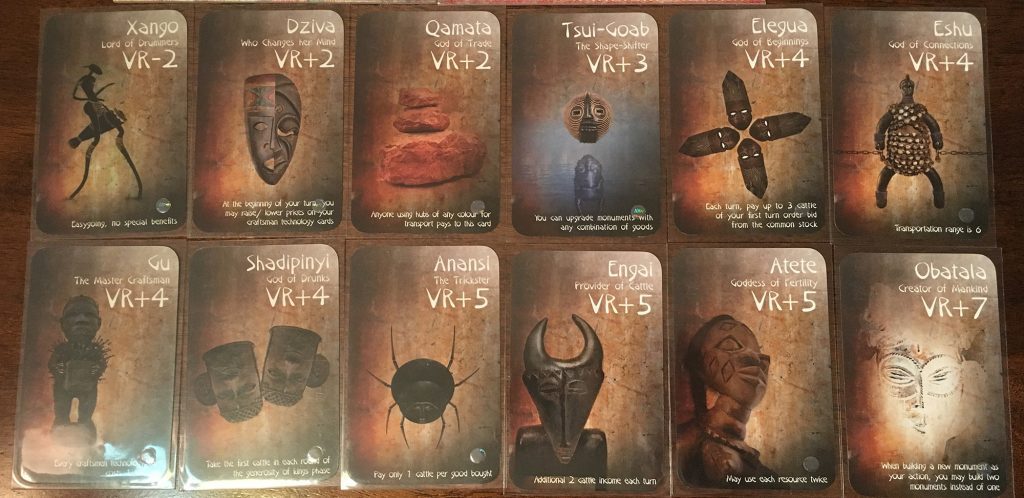
Tsui-Goab (VR+3), The Shape-Shifter, lets you use any combination of goods to raise a monument, so instead of needing two unique goods to go from level two to three, you can use two of one kind. Atete (VR+5), Goddess of Fertility, lets you use resources a second time. Omata (VR+2), God of Trade, forces people to pay you instead of the bank when they use hubs. Finally, Obatala (VR+7), Creator of Mankind, lets you place two monuments instead of one when placing new monuments.
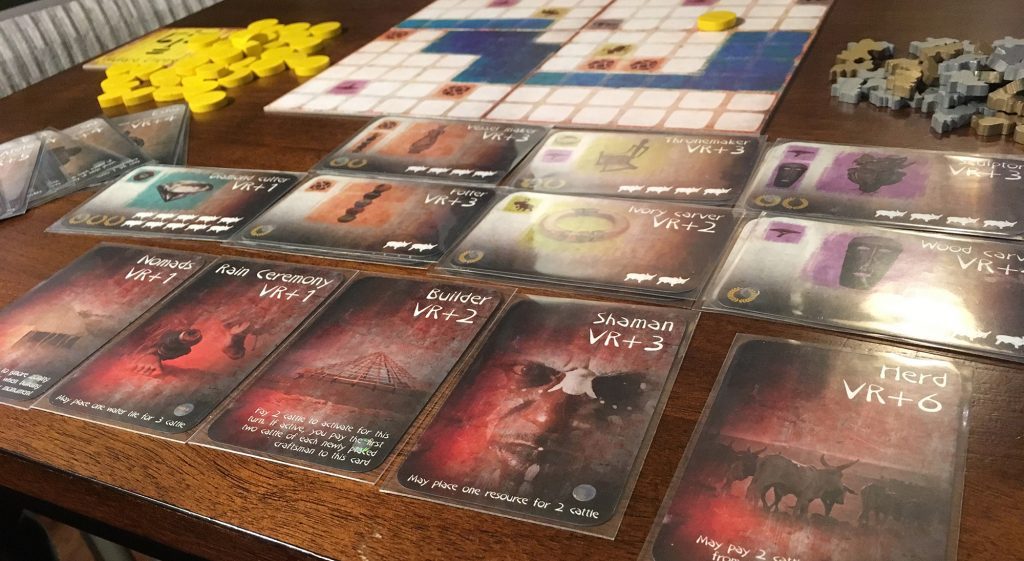
The specialists are similar, but instead you need to pay to use them. This payment gets paid to the card so you get it back at the end of the round.

For instance, the Rain Ceremony (VR+1) lets you place a two space water tile. The Shaman (VR+3) allows you to place a resource of any type onto the board. The Builder (VR+2) lets you pay the first two cattle of any craftsman purchase to that card instead of the bank.
What I like
TGZ has so many layers to its gameplay. The more you play, the more you see its brilliance. Even though the rules are very streamlined, there are tough decisions to make at so many stages of the game. Do you want to choose a god early on and head into a strategy? Or would it be better to see how things pan out before dedicating to a strategy? How much can you reasonably spend this turn on the auction before the turn won’t be valuable? How do I make use of a turn even if I’m not going to get the resources I need?
There are two mechanisms that really stand out to me. First is the turn order bidding and wealth redistribution. Each turn you can go in big on turn order and try and get early access to the resources. Or if you don’t get the resources you need, can you find ways to make your turn valuable? By distributing the wealth through this turn order bidding, this forces players to carefully consider when they will make their move because as you make a large bid for turn order, you’re also giving all of your opponents access to valuable funds that they can use on later turns.
The second mechanism that I find interesting is the moving Victory Requirements. A big part of success in TGZ is determining what the value of any of the god or specialists are to your current game and how you can leverage them. Certain gods lend to taking them early on and going headlong into a particular strategy. For instance, taking Obatala (the god that lets you place two new monuments instead of one) early in the game and building a large population of monuments and raising them all at once may work for you. On the other hand, taking Atete (the god which lets you reuse resources) and never spending money on auctions may suit you better, especially as resources become scarce.
The one difficult mechanism to grasp, secondary craftsmen, are also a brilliant addition to the game. By adding them in, they bring on an added complexity in the building of craftsmen and how you can control the game with them. Without them, it would be nearly impossible to stave off runaway leaders and there would not be as many routes to victory.
TGZ is easily the simplest Splotter from a mechanisms standpoint and also the best Splotter game for teaching new players. Even with its simplicity there are still numerous strategies that experienced players can follow. I personally enjoy teaching the game because it gives me the opportunity to search out new strategies that will be successful for me, but also make the gameplay interesting for the people I’m playing with.

My collection of Splotter games except Cannes: Stars and Scripts because the artwork is too bad, seriously, look it up. Yes the Antiquity box is that comically large.
What I don’t like
There are really only two things I don’t like about TGZ: the price and the end game. Splotter Spellen is a smaller game producer and their print runs for games are generally smaller. As a result, the price tags on their games are pretty high. When I purchased TGZ, it set me back $95, making it one of the most expensive games in my collection. To me, it is worth every penny, but I understand if it isn’t to you. If you can try before you buy, I highly recommend it.
The second issue I have is the end game. One of my least favorite things is when board games let players pile on a leader. This happens in TGZ when one player has clearly taken the lead and all of the other players collude to slow them down. At times, this can create moments where the winner is the player who comes out of the scrum instead of the player who necessarily plans best.
Final Thoughts
The Great Zimbabwe gives you a paintbrush and a blank canvas. You can either be Da Vinci painting the Mona Lisa, or you can be me in second grade art class painting smudges on a board. The brilliant thing about TGZ is its entirely up to you; your success or failure is entirely dependent on your ability to maximize the game system. This is in stark contrast to many modern board games. Popular games like Scythe, Yokohama, and 7 Wonders give you a system, constraints within the system, and some degree of goals. You then find the best way to connect the dots to find your path to victory. The brilliance of TGZ, and many other Splotter games, is you only get the system and as you play you can build up your constraints and abilities which drive you to victory.
The Great Zimbabwe is amazing and it has earned a place in my pantheon of board games. It has an unparalleled combination of strategic depth in a relatively short game, while also teachable in under ten minutes. It’s a true masterpiece of game design. TGZ is a game with the training wheels taken off, with dynamic but not overly direct player interaction, similar to games like Keyflower where players can, and are expected to, use the resources other players create to help bolster their chances of success. Though newer players can be successful, they will quickly see how the mechanisms seamlessly integrate and how they can improve their strategy with a few more plays.
As I write this, I constantly stop to think through new strategies for the game, new ways to counter different plays, new interactions between the gods and specialists. If you like heavier games and want to dive into a Splotter game, TGZ is the perfect starting place for you. I highly recommend it.
What do you think about The Great Zimbabwe? Give us your opinions about what you like and/or dislike about the game in the comments below!
The Great Zimbabwe details
- Designer: Jeroen Doumen, Joris Wiersinga
- Artists: Ynze Moedt
- Publishers: Splotter Spellen
- Release Date: 2012
- Player count : 2 - 5
- Age range : 14+
- Time range : 90 - 150 minutes
- Mechanism(s): Auction/Bidding, Card Drafting, Mancala, Modular Board, Network and Route Building, Open Drafting, Route/Network Building, Tile Placement, Variable Player Powers, Variable Set-up
- BGG Geek Rating: - converted to Meeple Mountain scale: .
- More articles about The Great Zimbabwe.